

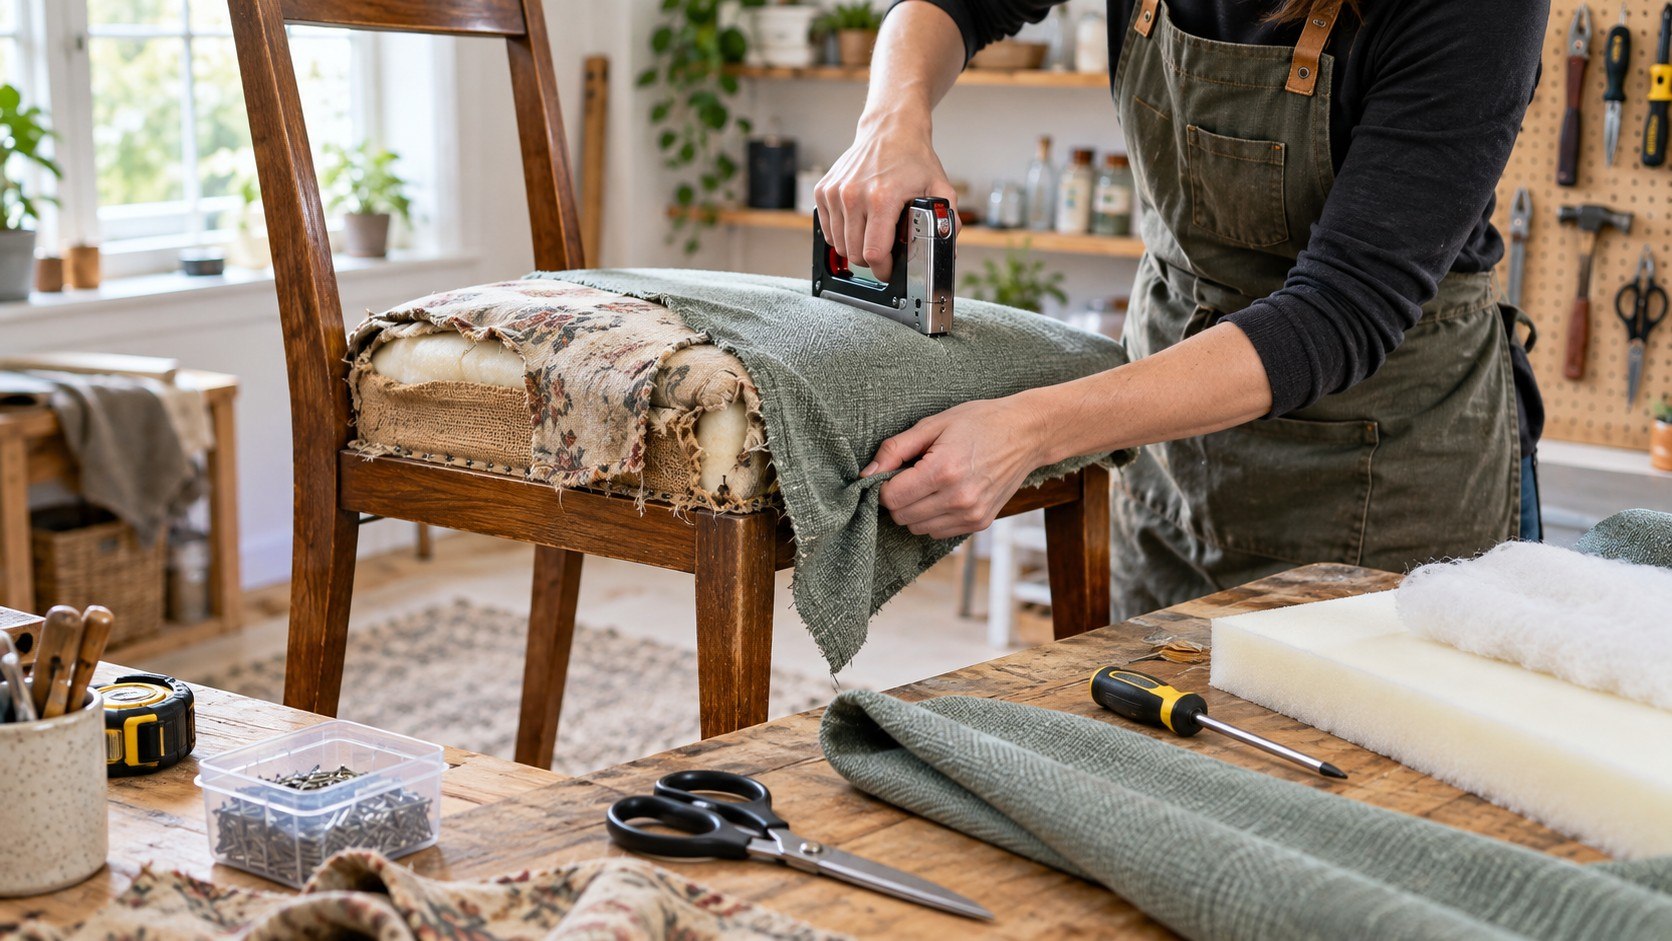
How to reupholster a chair yourself starts with 3 decisions: keep the old foam, choose durable fabric, and staple it correctly. A basic removable dining-chair seat takes about 1–2 hours. Most beginners can finish it without sewing, as the Baltimore Chronicle editorial team notes.
The simplest project is a chair with a padded seat screwed to a wooden frame. Remove the seat, strip old staples, inspect the foam, and use the old fabric as a cutting pattern. Expect about $35–$100 in supplies during 2026 if existing tools remain usable.
Key takeaways
- Replace foam when it stays compressed, crumbles, smells, or no longer supports the sitter evenly.
- Use upholstery fabric rather than thin apparel cloth because chairs experience concentrated pulling around edges and corners.
- Staple from each side’s center toward the corners, checking the visible surface repeatedly for wrinkles.
A removable seat is forgiving because every staple remains hidden underneath. Mistakes can usually be corrected by removing several staples and adjusting tension. Upholstered arms, sewn backs, springs, and deep tufting require more skill. Start with a dining chair before attempting an armchair.
Material quality matters more than decorative complexity. A strong plain weave can outperform delicate fabric that costs twice as much. Foam condition affects comfort more than an extra layer of expensive batting. A reliable staple gun also prevents loose edges.
Owners restoring the frame simultaneously can use this wood furniture refinishing guide. Painted frames require different preparation, covered in the Baltimore Chronicle furniture painting guide.
What you need for DIY chair upholstery
Most DIY chair upholstery jobs need inexpensive hand tools and a clear work surface. Measure everything before buying fabric or foam.
- Flathead and Phillips screwdrivers
- Needle-nose pliers or a staple remover
- Manual or electric upholstery staple gun
- 1/4-inch to 3/8-inch staples for many wooden seat bases
- Upholstery fabric, usually 54 inches wide
- High-density upholstery foam when replacement is necessary
- Polyester batting
- Fabric scissors and a marker or tailor’s chalk
- Optional foam-safe spray adhesive
- About 1–2 hours for a simple removable seat
Do not buy fabric before measuring the seat and its wraparound allowance. Add enough material to reach several inches beneath every edge. Patterned cloth needs extra yardage because stripes and motifs must remain centered. Keep the removed covering intact because it provides the safest cutting template. Photograph the underside before pulling the first staple. Those photos become useful when screw holes disappear beneath new material.
Current US prices give the project a manageable budget. In 2026, a heavy-duty manual staple gun commonly costs about $20–$30. A 2-by-24-by-72-inch upholstery foam sheet often falls around $28–$42, depending on density and seller.
| Material | Typical 2026 cost | What to buy |
|---|---|---|
| Manual staple gun | About $20–$30 | Heavy-duty model accepting common upholstery staples |
| 2-inch upholstery foam | About $28–$42 | Furniture-grade foam with suitable firmness |
| Upholstery fabric | About $15–$50+ per yard | Durable woven or performance fabric |
| Batting | About $10–$25 | Polyester upholstery batting |
| Staples | About $5–$15 | Correct gauge and leg length for the tool |
Prices vary by seller, pattern, thickness, and location. Maryland shoppers may see different promotions than buyers in Texas or California. Performance textiles usually cost more than basic solids. Large pattern repeats also increase fabric consumption. Existing tools can reduce the project below $50. Replacing foam and buying a new stapler pushes the total higher.
The cheapest useful upgrade is often fresh foam, not expensive decorative fabric.
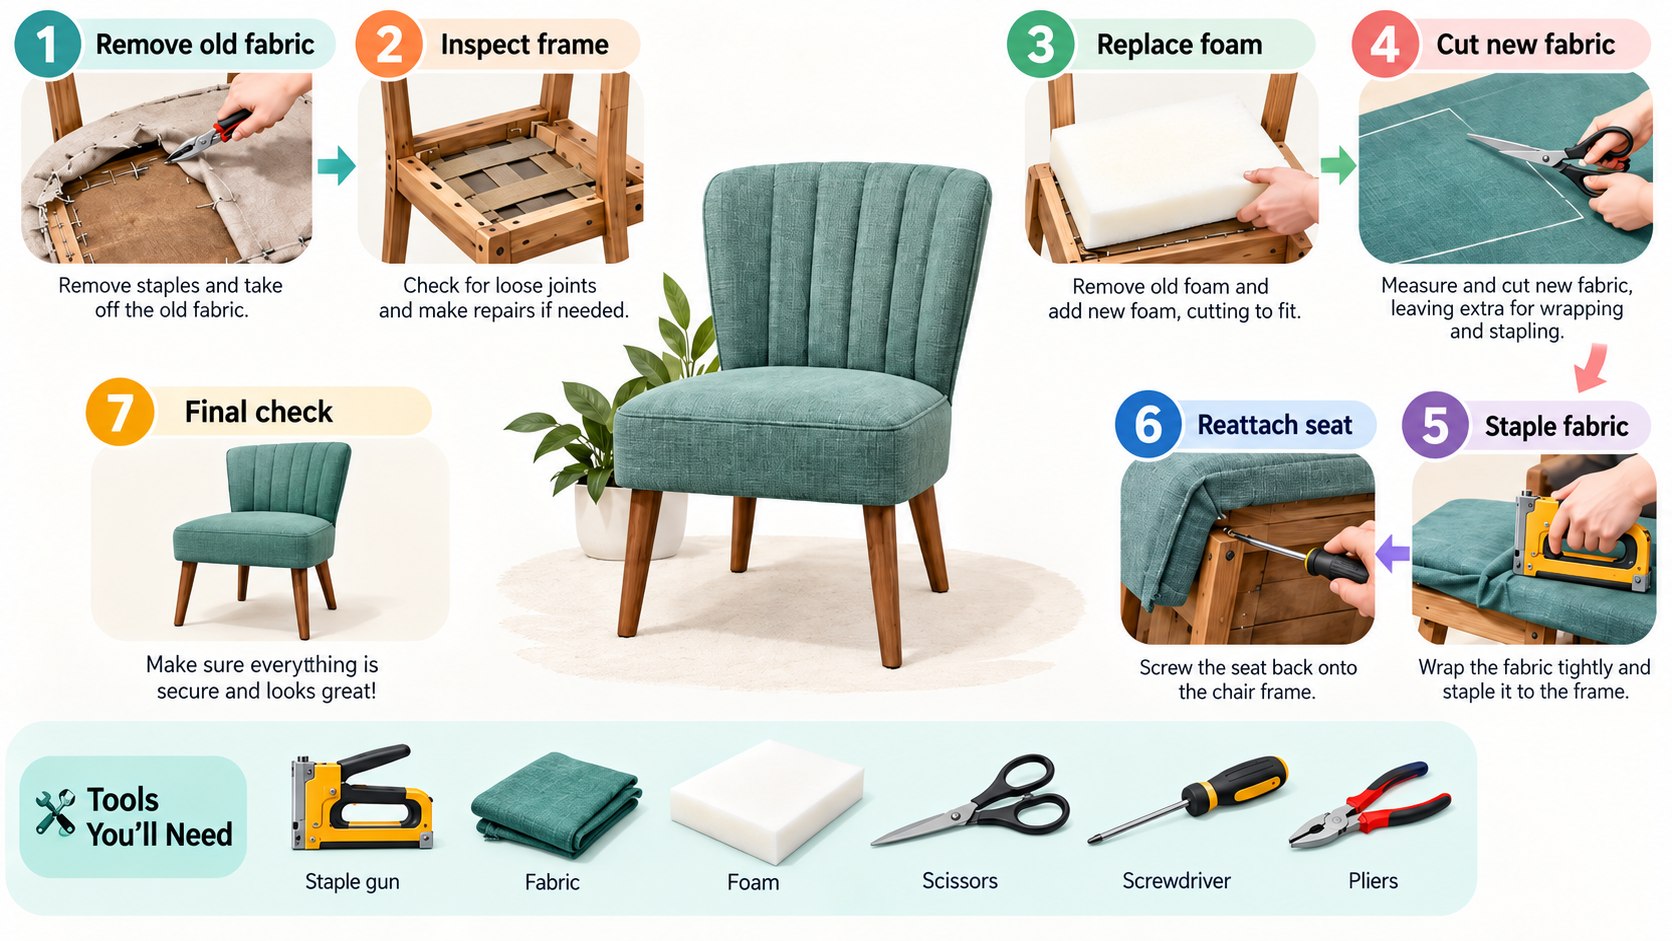
Step 1: Remove the seat and document everything
Turn the chair over and locate the screws holding the seat panel. Remove them, then photograph the seat from several angles before taking anything apart.
Pull old staples with pliers or a staple remover. Preserve the old fabric instead of cutting through it. It shows the original shape, corner folds, and required overlap.
This matters because recovering a chair seat becomes much easier when the original covering serves as a pattern. The common mistake is destroying that pattern during removal.
Step 2: Inspect the plywood, foam, and batting
Press firmly across the cushion. Foam that rebounds evenly can often remain. Replace material that stays compressed, crumbles, smells musty, or has permanent hollows.
A simple dining seat often works well with 1–2 inches of firm upholstery foam. Thicker is not automatically better because seat height changes.
Inspect the plywood for cracks, delamination, loose screws, or protruding staples. Repair structural problems before adding padding. New upholstery cannot stabilize a damaged seat base.
“Designed specifically for foams and fabrics.”
3M, describing Foam Fast 74 Spray Adhesive for upholstery and foam applications. Source: 3M product documentation.
Foam adhesive is optional on a removable seat. It helps stop freshly cut foam from sliding while batting gets attached. Apply only products compatible with the chosen foam.
Step 3: Cut new foam and batting
For replacing chair foam, place the seat board on the foam and trace its shape. A serrated knife or electric carving knife produces cleaner cuts than small scissors.
Some upholsterers cut foam slightly beyond the plywood edge to soften the perimeter. Avoid a large overhang because it can create a rounded, unstable seat.
Cut batting larger than the foam. It should wrap over the cushion and reach the underside without excessive bulk.
- Center the foam on the seat board.
- Place batting over the foam.
- Anchor the batting at the middle of 4 sides.
- Work outward while maintaining even tension.
- Trim bulky excess before adding decorative fabric.
This sequence controls the cushion shape before expensive fabric is involved. Keep the batting smooth rather than pulling it aggressively. Excessive tension can compress one edge more than another. Check the seat from above after every side. Correct uneven areas before continuing. Once fabric covers the batting, those corrections become slower.
Readers deciding whether an old chair deserves restoration can compare replacement costs in this 2026 US furniture retailer guide.
Step 4: Measure and cut the upholstery fabric
Lay the new upholstery fabric for chairs face down on a clean surface. Position the old covering over it, matching the new fabric’s grain and pattern direction.
Add extra material when the original piece looks unusually tight. A few spare inches beneath the seat are easier to manage than insufficient coverage.
For ordinary removable dining seats, roughly 1/2 yard can cover many single chairs. Larger seats and directional patterns need more. Chairs with upholstered backs require substantially more fabric. Exact yardage should follow actual seat measurements.
Center stripes, checks, and large motifs before cutting because staple adjustments cannot repair a visibly crooked pattern.
Do not assume an attractive drapery fabric is suitable for seating. Chair fabric receives repeated friction and concentrated stress. Search for material sold for upholstery or performance seating applications.
Step 5: Staple the fabric without wrinkles
Center the seat upside down on the fabric. Start with 1 staple at the middle of each side. Then check alignment from the visible side.
The upholstery staple gun should drive staples flush without cutting the textile. Arrow lists T50 staples from 1/4 inch through 9/16 inch for its T50 tool. The manufacturer says staple length depends on material thickness and wood hardness.
“Thickness of material to be stapled” and “hardness of the wood” determine staple leg length.
Arrow Fastener, T50 operating guidance for selecting staples.
Work from each center toward the corners, alternating opposite sides. Pull firmly enough to remove slack but not enough to distort the foam. Leave the final 2 inches near every corner unstapled.
A common mistake is completing one entire side before touching the opposite edge. That method pulls the pattern off center. Balanced fastening keeps tension distributed across the seat.
Step 6: Fold corners and reinstall the seat
Corners reveal whether a reupholster dining chair project looks careful or improvised. Fold excess fabric into compact pleats on the underside where they remain hidden.
Avoid stacking a large knot of fabric directly over a screw hole. Trim unnecessary bulk, but leave enough material to prevent fraying near staples.
Inspect every visible edge before final fastening. Remove and reset any staple causing a diagonal wrinkle. Reattach the seat only after all corners sit evenly.
Tighten mounting screws gradually rather than fully tightening the first screw immediately. This keeps the seat aligned with the chair frame. Stop if a screw spins freely because its mounting hole may need repair.
Troubleshooting common upholstery problems
Most beginner problems appear while the seat remains removable. Fix them before reinstalling it.
- Fabric wrinkles: remove nearby staples, redistribute tension, and staple again from the center outward.
- Staples stand proud: test a shorter staple or improve pressure against the wooden base.
- Seat feels lumpy: inspect uneven batting, damaged foam, or bulky corner folds.
- Pattern drifts sideways: release several staples from opposite edges and recenter before continuing.
- Foam slides: reposition it and consider a foam-compatible adhesive before wrapping fresh batting.
Do not solve every loose area by pulling harder. Excess tension can distort a pattern and prematurely stress the fabric. A wrinkle often means tension is uneven rather than insufficient. Work in small sections and inspect the top frequently. Manual staplers also require firm contact against the wood. If repeated staples bend, test another length or inspect the plywood condition.
California residents should read adhesive labels carefully before purchase. Some formulations have state-specific VOC versions or sales restrictions. 3M lists low-VOC variants within its foam and fabric adhesive range.
FAQ
Can a beginner reupholster a chair?
Yes, if the chair has a removable padded seat. Full armchairs with springs, sewn panels, or tufting are more demanding.
How much fabric is needed for 1 dining chair?
About 1/2 yard often covers a standard removable seat. Buy more for large patterns, wide seats, or upholstered backs.
What thickness foam should a dining chair use?
Many dining seats use about 1–2 inches. Match the original height when possible because thicker foam changes seating position.
Can new fabric be stapled over old upholstery?
Removing the old covering is usually better. It exposes damaged foam, loose staples, stains, and problems hidden beneath the surface.
What staples work for chair upholstery?
Many simple wooden seats use 1/4-inch to 3/8-inch staples. The correct length depends on fabric layers and wood hardness.
When is professional upholstery worth paying for?
Consider a professional for valuable antiques, coil springs, complex backs, channeling, tufting, or extensive sewing. Simple screw-on seats remain practical DIY projects.
Earlier we wrote about How to Set Up Apple Cash on Apple Watch 2026: Wallet, Verification and Fixes