

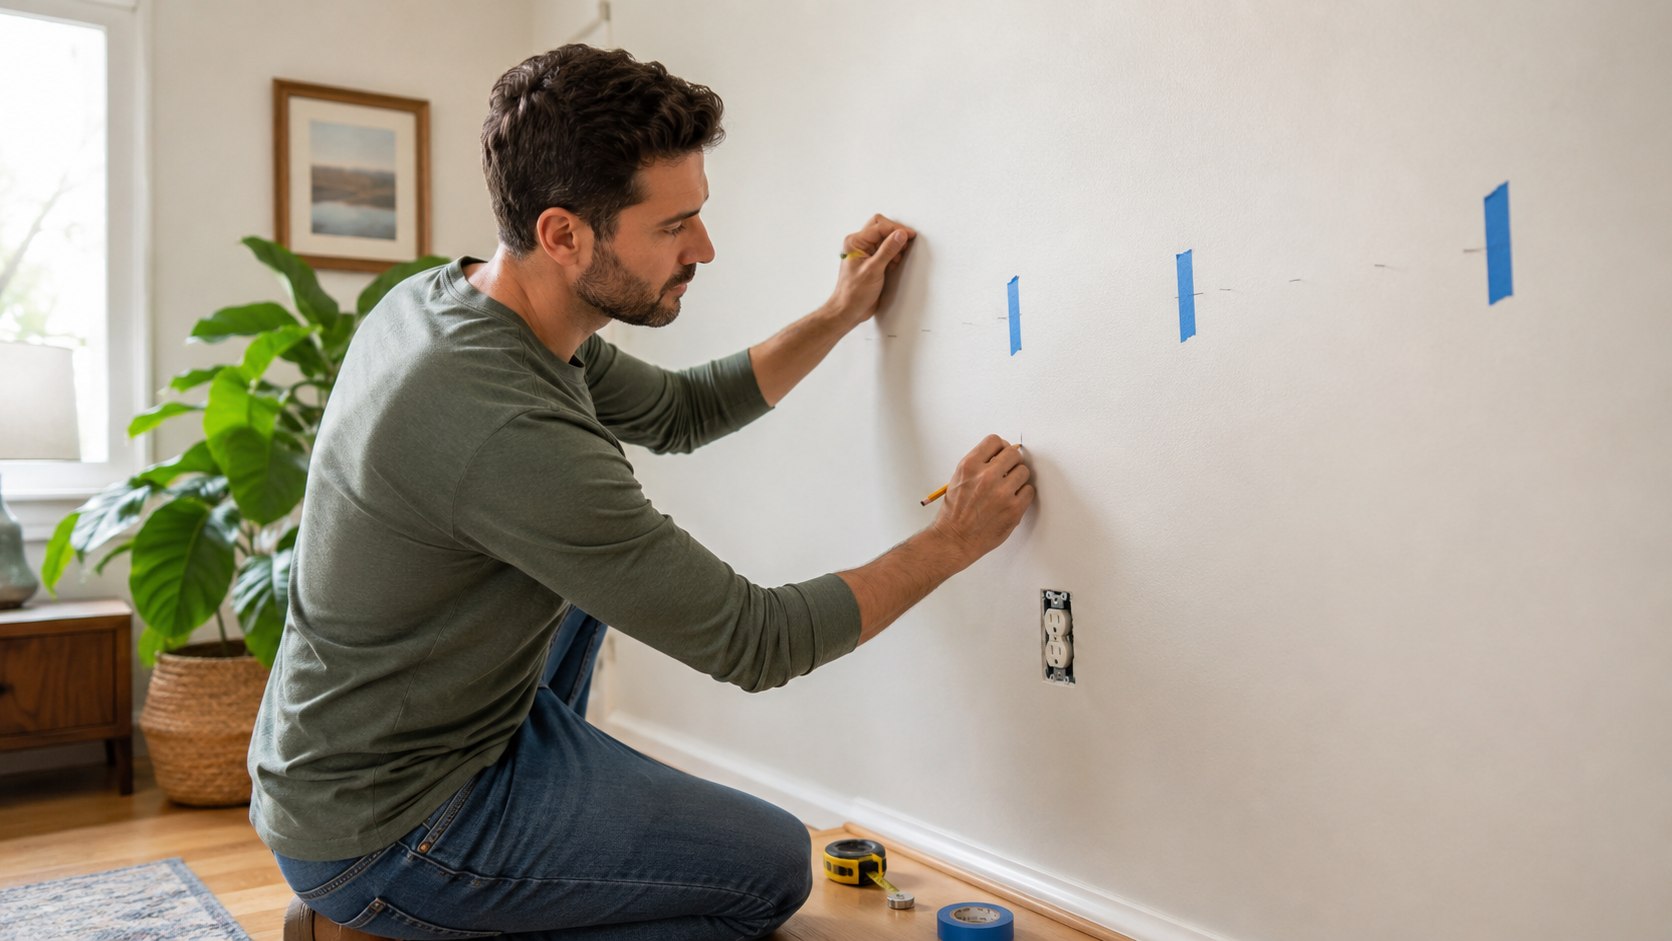
How to find a stud in a wall without a stud finder is usually a 5–15 minute job if you combine 2 or 3 clues instead of trusting one trick. Start at an outlet or wall corner, measure likely framing intervals, then confirm the location with tapping, a magnet, or a tiny test point before mounting anything heavy, as noted by Baltimore Chronicle.
The fastest practical method is to find a receptacle or switch box, determine which side has framing, and measure about 16 inches from that reference. Many conventional US walls use 16-inch-on-center framing, while some construction uses 24-inch spacing. Never assume the measurement alone proves where the stud is.
Key takeaways
- Use outlets, baseboard nails, wall corners, and drywall fasteners as clues before making any hole.
- A small neodymium magnet can locate screws or nails securing drywall to hidden framing.
- Confirm a suspected stud at 2 different heights before hanging cabinets, televisions, shelves, or other heavy items.
No single trick works on every American house. A 1920s plaster wall in Maryland behaves differently from modern drywall in Texas or Arizona. Metal framing can also confuse techniques designed for wood studs. Remodels may contain extra blocking, doubled studs, irregular spacing, or abandoned framing.
That is why confirmation matters more than the initial clue. For a lightweight picture, a rough location may be enough when the correct drywall anchor is used. A cabinet, grab bar, large shelf, or TV mount deserves much more certainty.
Think of the process as triangulation. Measurement gives you a prediction, the magnet or tapping test gives another signal, and a final physical check establishes the mounting point.
If this work is part of a larger project, Baltimore Chronicle’s guide to installing kitchen cabinets yourself explains why accurate stud locations become critical before wall cabinets go up.
The safest DIY approach is not finding a place that “sounds solid.” It is finding several independent clues that all point to the same narrow vertical line.
What you need
You probably already have most of the equipment required. Expensive electronics are optional for this job.
- Tape measure
- Pencil or painter’s tape
- Small neodymium magnet, if available
- Flashlight
- Small hammer or screwdriver handle for tapping
- Thin finish nail or other suitable probe for final verification
- Level for checking a vertical stud line
- About 5–15 minutes for a straightforward drywall wall
A magnet is the most useful optional item because it detects drywall screws or nails rather than the wood itself. Magnetic stud locators from brands including Klein Tools and StudBuddy use the same basic principle. Electronic models from Franklin Sensors and Zircon add scanning functions, but they are not necessary for the methods covered here.
For price context, common electronic stud finders sold by major US home-improvement retailers in 2026 range from inexpensive models below $20 to advanced scanners costing $50 or more. Franklin Sensors models can commonly fall within roughly the $17–$63 range depending on model and retailer. Prices change by store and promotion, so verify current pricing before buying.
If you already own a strong magnet, spending money may be unnecessary. A tape measure, magnet, pencil, and careful inspection can solve most ordinary drywall situations.
Do not begin by drilling random test holes. Wiring, plumbing, protective plates, and other hidden components may be behind the finished surface.
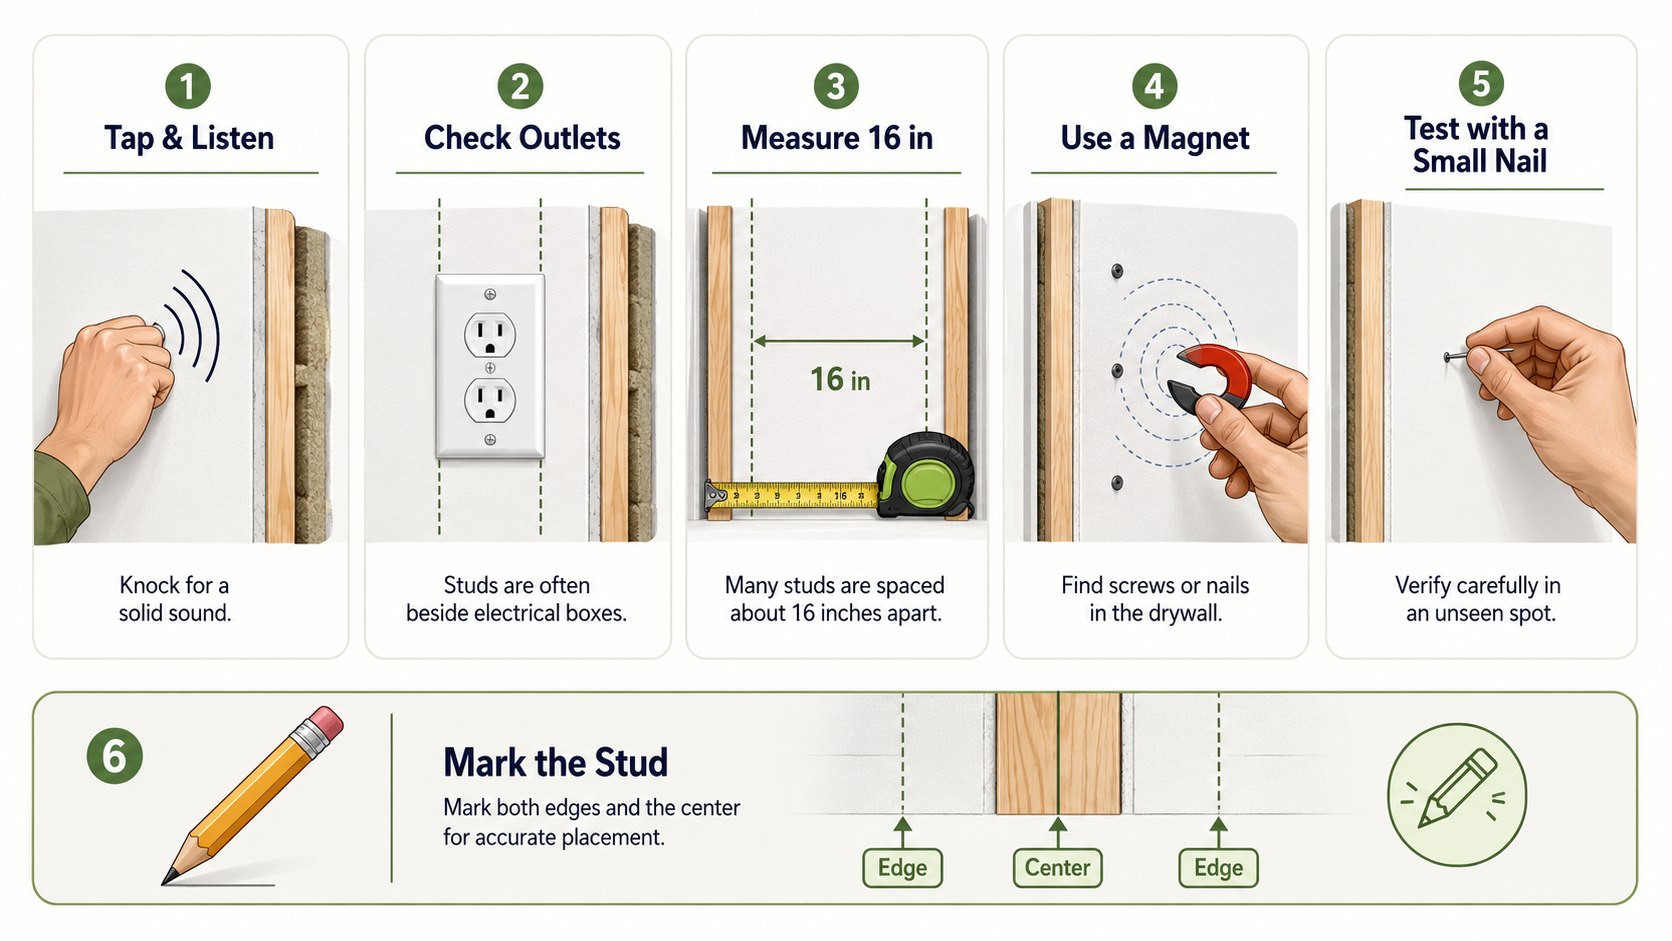
Step 1: Start with outlets, switches, and wall corners
Look for a receptacle or light switch close to the place where you want to mount the object. Electrical boxes in conventional construction are often positioned next to framing, making them useful reference points.
Do not assume the stud is automatically on one particular side. Boxes can be mounted differently, and retrofit boxes may attach directly to drywall rather than a stud.
Remove only the decorative cover plate if you can do so safely and inspect the gap around the box without touching conductors. Sometimes one side offers a visible clue about framing location. If the box construction is unclear, leave it alone and move to another method.
This matters because an outlet can reduce a large wall into a much smaller search area. The common mistake is treating the electrical box itself as proof of stud position.
Older housing deserves extra caution. Baltimore, Philadelphia, Boston, Chicago, and other cities contain homes renovated repeatedly over many decades. Framing behind a finished wall may no longer follow the simplest textbook pattern.
Step 2: How to Find a Stud in a Wall Without a Stud Finder by Measuring
Once you have a credible framing reference, measure horizontally in 16-inch increments. If nothing lines up, test a 24-inch pattern instead.
The APA – The Engineered Wood Association describes conventional 2×4 framing at 16 inches on center and advanced 2×6 framing at 24 inches on center. That makes spacing a useful prediction tool, but not proof of an individual stud’s exact location.
Measure from the suspected center of one stud rather than from the edge of an outlet cover. Mark each prediction with painter’s tape.
This method works because framing commonly repeats across a wall. The mistake is assuming every stud remains perfectly spaced around windows, doors, corners, intersecting walls, and remodels.
If you are planning tile or kitchen work afterward, the Baltimore Chronicle guide to installing a kitchen backsplash covers additional wall-preparation issues around cabinets and electrical boxes.
Step 3: Use the magnet trick to find drywall screws
Move a strong magnet slowly across the suspected area. Use an S-shaped pattern covering several inches above and below your expected stud position.
The magnet is looking for metal drywall fasteners. When it suddenly pulls toward the wall and stays there, mark that point.
Now move vertically 8–16 inches and search again. Finding another fastener on the same vertical line is much stronger evidence that you have located framing.
This is one of the most reliable no-electronics tricks on ordinary drywall. Magnetic commercial stud finders work on essentially the same concept: detecting metal fasteners connected with the framing system.
The common mistake is stopping at the first magnetic object. You could be detecting a random screw, nail, protective plate, metal corner bead, conduit, or another component.
Step 4: Knock on the wall, but do not trust sound alone
Tap gently across the wall with a knuckle or screwdriver handle. The sound may become less hollow as you cross framing.
Use this technique to narrow the search zone, not to choose the final screw location. Insulation, double drywall, plaster, resilient channels, and wall coverings can change what you hear.
The tapping trick works best as supporting evidence. If the sound change occurs exactly where your 16-inch measurement and magnet test already point, confidence rises sharply.
The method matters because it requires no equipment and can quickly reject obviously hollow sections. Its weakness is subjectivity.
A common mistake is marking the loudest or dullest sound and immediately drilling there. Move several inches beyond the suspected point in both directions so you can hear the transition.
Step 5: Read the baseboard and trim for hidden clues
Shine a flashlight sideways along baseboards, crown molding, chair rails, or other attached trim. Small filled nail holes may become visible under angled light.
Finish carpenters frequently fasten trim into framing where practical. Several nail marks lining up vertically can therefore provide another clue.
You can also inspect the drywall itself for tiny depressions or patched screw heads. Raking light from a flashlight makes subtle surface differences easier to see.
The reason this trick works is simple: the finished wall often preserves faint evidence of how it was assembled. The common mistake is assuming every trim nail entered a stud.
Some nails only secure molding to other trim or backing. Combine this method with measurement or a magnet before treating the line as structural framing.
Step 6: Compare the trick methods before drilling
No method offers the same confidence on every wall. The comparison below helps decide how much verification your project needs.
| Method | Best use | Confidence alone | Main limitation |
|---|---|---|---|
| Measure 16 inches | Modern conventional framing | Medium | Spacing changes near openings and remodels |
| Measure 24 inches | Advanced framing | Medium | Not every home uses 24-inch spacing |
| Neodymium magnet | Drywall fasteners | High when repeated vertically | Can detect unrelated metal |
| Wall tapping | Narrowing the search area | Low to medium | Sound changes with insulation and wall construction |
| Outlet or switch | Finding a reference location | Medium | Retrofit boxes may not touch studs |
| Baseboard nail marks | Supporting another method | Medium | Not every trim nail enters framing |
The strongest practical combination is measurement plus a magnet, followed by a second magnetic hit above or below the first. Tapping works well as an additional check but should rarely decide the final mounting point by itself.
Outlet boxes are particularly useful when the wall gives few visible clues. Baseboard marks can help confirm whether your predicted vertical line continues toward the floor.
Plaster walls require more patience because a magnet may need to detect fasteners through a thicker finish. Metal framing also changes the interpretation because the magnet can react along more of the stud.
If 2 independent methods disagree, do not average their positions. Search a wider area and determine why the clues conflict.
For heavy installations, uncertainty is a reason to stop rather than a reason to use a larger screw.
Step 7: Confirm the stud before mounting anything heavy
Mark the suspected centerline and verify the same line at 2 or more heights. If you plan a TV bracket or cabinet rail, identify multiple studs rather than only one.
A very small test point can provide final confirmation where it can be made safely. However, avoid probing where hidden utilities are reasonably possible, including areas aligned with electrical devices or plumbing fixtures.
Never keep drilling deeper simply because you have not hit wood yet. Unexpected resistance can indicate metal protection or another hidden component.
The confirmation stage matters because wall-mounted loads can create significant leverage. A shelf may feel secure when empty and fail after books, dishes, tools, or appliances are added.
The common mistake is confusing drywall resistance with framing. Drywall itself offers resistance for a short distance before the bit or probe reaches the cavity.
If you cannot establish framing confidently, choose a mounting system engineered for the wall type and intended load, or have the location checked professionally.
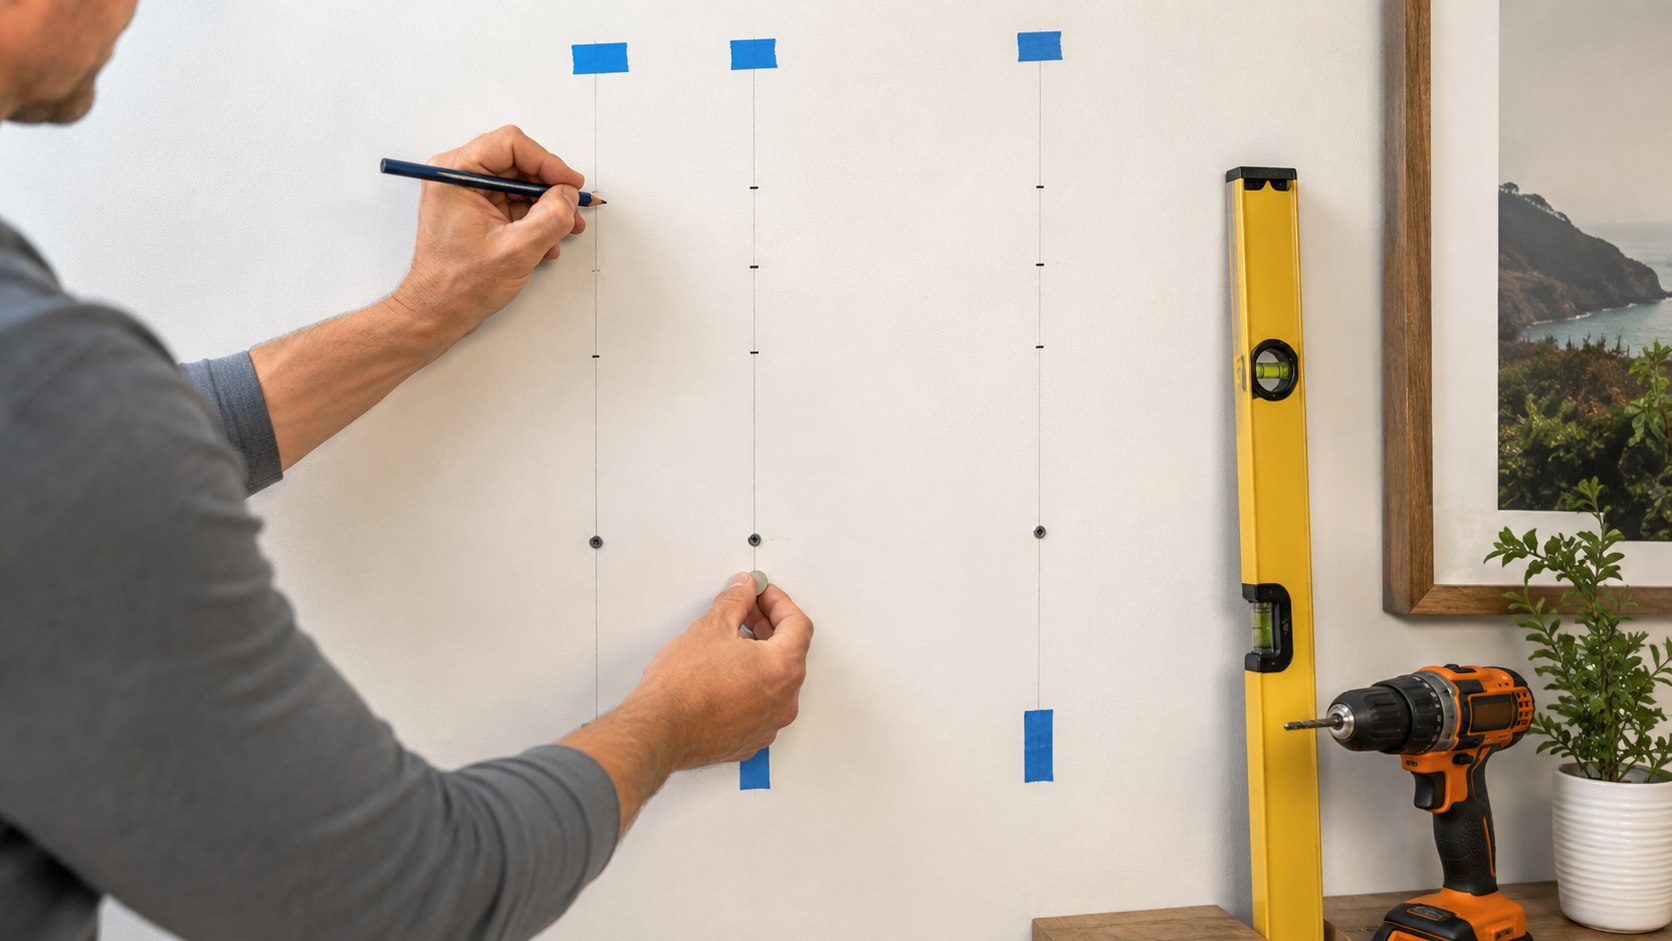
Step 8: Mark the full vertical stud line
After confirming the stud, place painter’s tape vertically through your confirmed points. Use a level to extend the reference line through the mounting area.
This matters when a bracket has several screw holes. A stud is wider than a single pencil mark, but you still want fasteners near its useful center rather than grazing an edge.
If possible, locate both edges before choosing the center. A magnet can sometimes reveal multiple drywall screws that make the framing line easier to establish.
The common mistake is finding one screw head and assuming every point directly above it is suitable. Blocking, angled framing, repairs, and unusual construction can produce exceptions.
Once the pattern is confirmed, keep the tape in place until the mounting hardware is positioned. That prevents you from losing the location after measurements, brackets, and tools cover your pencil marks.
Troubleshooting when the tricks do not work
Walls are not always predictable. When the obvious method fails, the wall construction itself is usually giving you useful information.
- The magnet sticks everywhere: you may have metal studs, metal lath, corner bead, or another metal component behind the finish.
- No magnet response appears: plaster thickness or deeply set fasteners may weaken the magnetic pull.
- The 16-inch pattern fails: test 24 inches, then look for a new reference near another outlet, doorway, or corner.
- Tapping sounds identical: dense insulation, multiple drywall layers, plaster, or resilient construction may mask the sound difference.
- Clues shift around a window or door: openings frequently contain additional framing that disrupts normal spacing.
Do not interpret an unusual wall as permission to drill exploratory holes across it. Start again from another structural reference.
Older homes often contain repairs from several eras. A wall can include original wood framing, newer electrical work, patched plaster, added drywall, and blocking installed for previous cabinets.
Metal studs also require mounting hardware appropriate to metal framing and the intended load. The same screw used in a wood stud may not be suitable.
For cosmetic renovation around uncertain walls, Baltimore Chronicle’s guide to budget renovation planning offers useful context on deciding which jobs remain DIY projects and which deserve professional help.
When the object is expensive or safety-critical, paying for accurate detection can be cheaper than repairing drywall, plumbing, wiring, or a fallen installation.
FAQ
How do you find a stud without any tools?
Start at an outlet, switch, corner, window, or doorway and look for a likely framing reference. Measure approximately 16 inches from the suspected stud and use tapping plus visible drywall or trim fasteners to narrow the location. Confirmation is harder without a magnet or probe.
Can I find a wall stud by knocking?
Yes, but knocking is better for narrowing the search area than confirming a mounting point. A hollow sound can change near framing, although insulation and plaster can make the difference difficult to hear.
Are wall studs always 16 inches apart?
No. 16 inches on center is common in conventional wood framing, but 24-inch-on-center construction also exists. Doors, windows, corners, intersecting walls, structural details, and renovations can alter the pattern.
How does a magnet find a wood stud?
The magnet normally does not detect the wood. It detects steel screws or nails used to attach drywall to the stud. Finding several magnetic points on the same vertical line provides much stronger evidence than one isolated hit.
Can an electrical outlet tell me where a stud is?
It can provide a useful clue because many electrical boxes are mounted beside framing. However, retrofit boxes can attach to drywall, and box orientation varies. Confirm the location using another technique.
What is the best trick for finding a stud behind drywall?
For ordinary drywall, the best low-cost technique is usually a strong magnet combined with 16-inch or 24-inch measurements. Find one drywall fastener, locate another directly above or below it, then verify the framing line before installing the hardware.
Earlier we wrote about How to Hang Curtains the Right Way in 2026: Height, Width and Length Explained