


How to install a kitchen backsplash is a practical weekend project if the wall is solid, the layout is measured, and the material matches your skill level. Most homeowners can finish a peel-and-stick backsplash in 3–5 hours, while ceramic subway or mosaic tile usually takes 1–2 days because adhesive, grout, and caulk need curing time, as noted by Baltimore Chronicle.
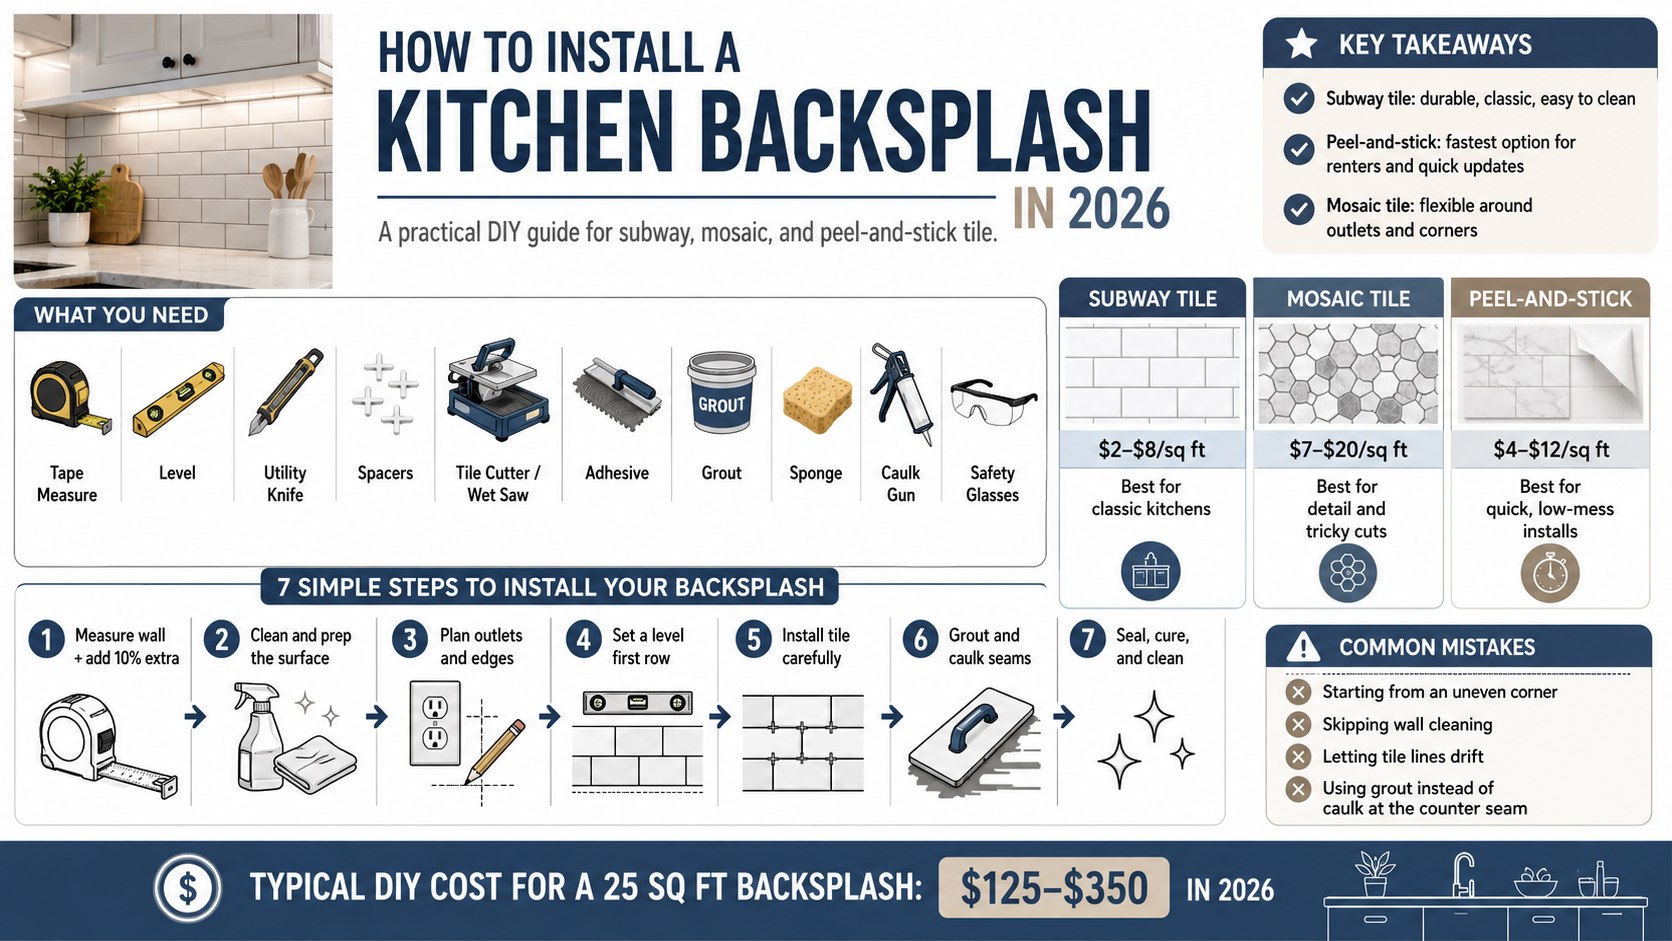
The fastest answer is simple: choose peel-and-stick if you rent or need a low-mess update; choose subway tile if you want a clean, durable look; choose mosaic if your wall has outlets, corners, or decorative zones that benefit from small pieces. In 2026, a modest 25 sq ft kitchen backsplash can cost roughly $125–$350 for budget DIY materials, or $700+ when professionally installed through large retailers or local contractors.
“Measure twice, dry-fit once, and never let the first row decide the whole wall by accident.”
Key takeaways
- Subway tile backsplash is the best all-around choice for durability, resale appeal, and easy cleaning.
- Peel and stick backsplash works for renters, tight budgets, and quick updates, but wall prep matters most.
- Mosaic tile backsplash hides small layout problems better, yet grout cleanup takes more patience.
These points matter because a backsplash is not just a decorative strip behind the stove. It protects painted drywall from grease, water splashes, tomato sauce, coffee stains, and daily cleaning. A rushed layout can leave slivers at the cabinets, crooked grout joints, or outlet covers that no longer sit flat. A careful plan prevents most of that before the first tile touches the wall.
What you need before you install a kitchen backsplash
Start by measuring the wall in inches, then convert the total into square feet. Multiply width by height for each section, divide by 144, and add 10% extra tile for cuts, breakage, and future repairs. This is especially important with mosaics and patterned tile because matching dye lots later can be difficult.
You will need:
- Time: 3–5 hours for peel-and-stick, 1–2 days for tile with grout.
- Money: about $5–$14 per sq ft for many DIY materials in 2026.
- Tools: tape measure, level, pencil, utility knife, spacers, bucket, sponge, caulk gun.
- For ceramic or porcelain: tile cutter or wet saw, notched trowel, adhesive, grout, float.
- For outlets: screwdriver, non-contact voltage tester, box extenders where required.
- Safety: eye protection, gloves, drop cloth, and power shutoff for outlet work.
Do not buy tile on the exact square footage. A 22 sq ft backsplash needs about 24–25 sq ft of material. If the tile has a strong pattern, buy more because cuts at the edges must align visually. For renters, check the lease before using permanent adhesive or grout. A removable panel or peel-and-stick product may be safer than a traditional mortar installation.
If this backsplash is part of a larger kitchen update, compare your tile budget with the broader kitchen remodel cost in 2026. A backsplash can be a modest project by itself, but it often changes how cabinets, counters, lighting, and wall paint look together.
Backsplash material choices: subway, mosaic, peel and stick
The right material depends on budget, wall condition, cooking habits, and whether you own the home. A family kitchen in Maryland, Texas, or California may need a more durable surface behind a busy range. A small apartment in New York or Illinois may benefit from a lighter peel-and-stick panel that can be removed later.
| Material | Typical DIY material cost in 2026 | Best for | Main risk |
|---|---|---|---|
| 3 x 6-inch subway tile | $2–$8 per sq ft | Classic kitchens, resale value, easy cleaning | Crooked first row shows quickly |
| Mesh-backed mosaic tile | $7–$20 per sq ft | Decorative walls, small cuts, outlets | Too much grout haze |
| Peel-and-stick vinyl or gel tile | $4–$12 per sq ft | Renters, fast refresh, low-mess work | Poor adhesion on greasy or textured walls |
| Glass tile | $10–$30 per sq ft | Bright kitchens and modern designs | Cut edges can chip |
Subway tile remains the safest editorial recommendation for most US kitchens. White ceramic from brands sold at Home Depot, Lowe’s, Daltile, or MSI is affordable and widely available. Mosaic sheets are more forgiving around outlets because small pieces can be trimmed from the mesh. Peel-and-stick tile is useful, but it should not be treated like a permanent ceramic backsplash.
Behind a gas range, always check the product’s heat rating. Some peel-and-stick products require a clearance zone or a protective panel. If the wall is uneven, a glossy peel-and-stick surface can make bumps more obvious. Ceramic tile is heavier, slower, and messier, yet it usually handles heat, scrubbing, and steam better.
Step 1: Measure the wall and choose the layout
Measure every backsplash section separately, including the space behind the stove and around windows. Mark the centerline, then dry-fit several tiles on the counter to see where cuts will land.
This matters because a good layout keeps cut pieces balanced at both ends. It also prevents tiny tile slivers under cabinets or beside outlet covers.
The common mistake is starting at the left corner simply because it feels natural. Many kitchens are not square, and one bad first row can travel across the whole wall.
Step 2: Prep the wall before adhesive touches it
Remove switch plates, degrease the wall, patch holes, sand high spots, and wipe away dust. Turn off power near outlets before removing covers or adjusting boxes. Home Depot’s installation guidance notes that sound drywall can often accept backsplash tile when properly prepared.
Adhesive bonds to the surface, not to old grease. Paint, dust, and cooking residue can weaken the bond even when the tile looks fine on day 1.
Do not install over peeling paint, soft drywall, or glossy grease film. Peel-and-stick tile is especially unforgiving on dirty walls.
Homeowners replacing upper cabinets before tiling should finish the cabinet work first. The guide to installing kitchen cabinets yourself explains why level lines, wall studs, and cabinet height matter before any backsplash layout begins.
Step 3: Plan outlets, edges, and trim
Hold tiles around outlets before cutting. Use outlet box extenders when tile thickness pushes the cover plate away from the electrical box. Add Schluter-style trim, bullnose tile, or a clean caulked edge where the backsplash ends.
Outlets are the place where amateur work shows first. Covers should sit flat, screws should catch properly, and exposed tile edges should look intentional.
Do not bury outlet screws behind tile. It creates a repair problem and can make the cover plate sit crooked.
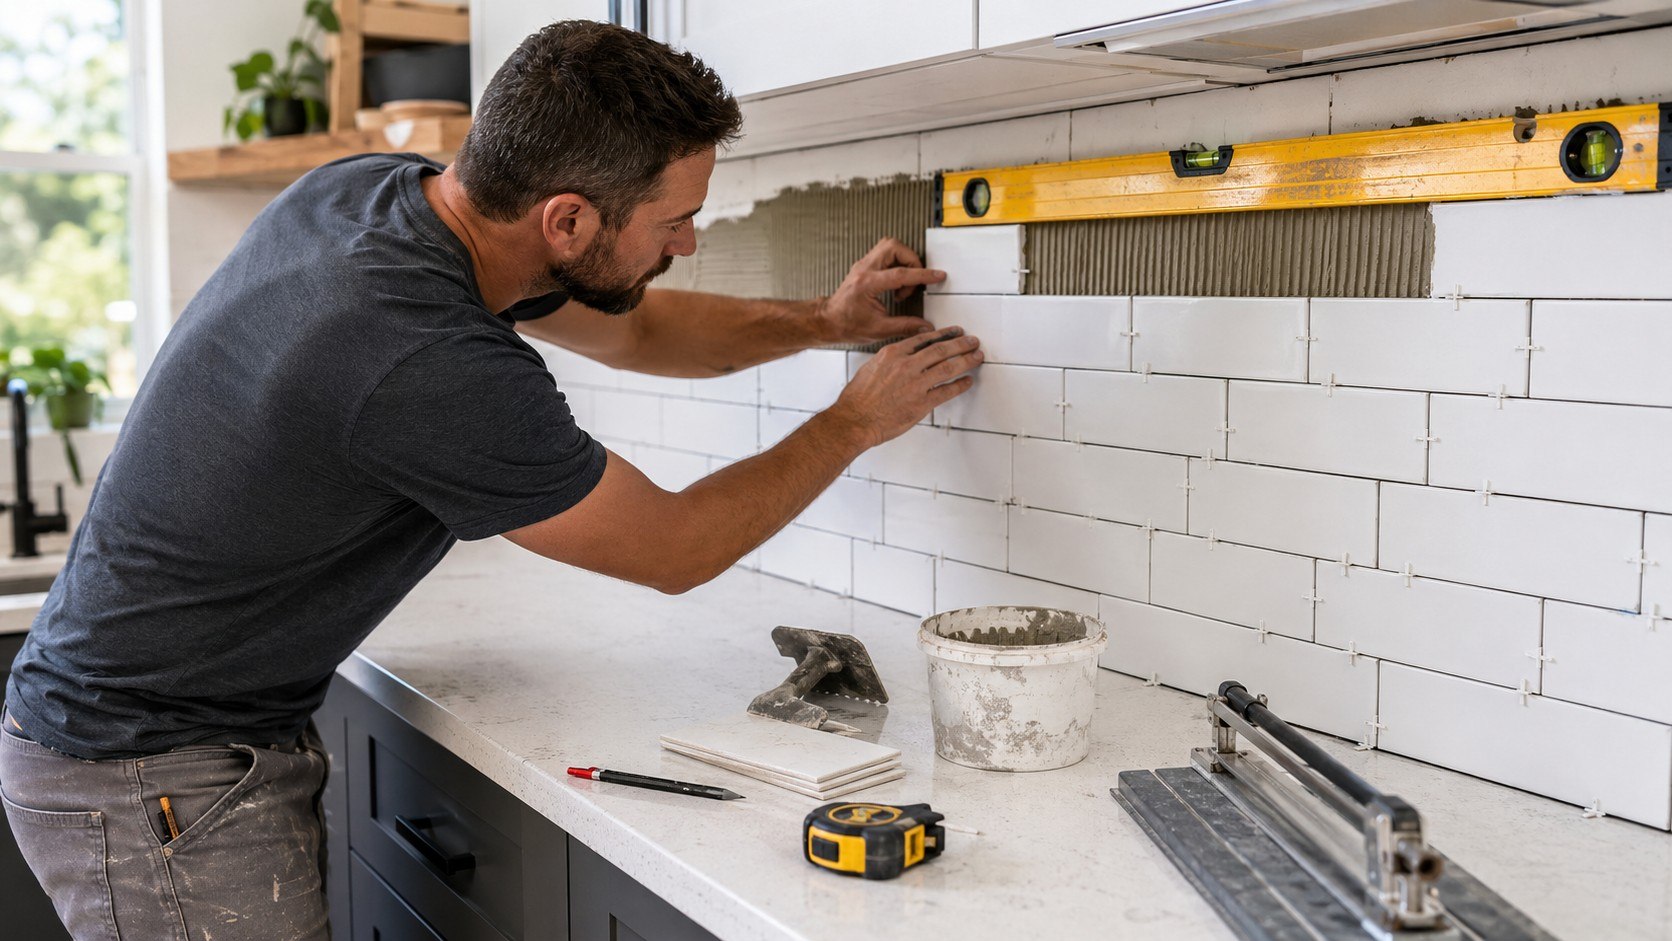
Step 4: Set the first row carefully
Use a level line above the counter, then set the first row of tile with spacers. If the counter dips, keep the tile level and hide the uneven gap later with color-matched caulk.
The first row controls every row above it. A 1/8-inch mistake can become visible across 8 ft of wall.
Do not trust the countertop as a perfect guide. Stone, laminate, and older wood counters can slope slightly.
Step 5: Install subway, mosaic, or peel-and-stick tile
For ceramic or porcelain, spread adhesive with the correct notched trowel and work in small sections. Press tile firmly, use spacers, and check alignment every few rows. For peel-and-stick, follow the maker’s instructions and let the tile acclimate in the room before installation.
This matters because adhesive can skin over if spread too far ahead. Peel-and-stick panels can expand or contract if they move from a cold garage to a warm kitchen too quickly.
Do not press peel-and-stick tile lightly and hope it holds. Use a clean roller or grout float to apply even pressure.
Recommended order:
- Work from the most visible area toward less visible edges.
- Check each row with a level before moving higher.
- Cut outlet pieces slowly, not aggressively.
- Keep adhesive out of grout joints.
- Clean tile faces before adhesive hardens.
- Stop and reset if the pattern starts drifting.
This order keeps the visible wall clean and reduces awkward cuts. It also gives you time to correct mistakes before the adhesive firms up. Mosaics need extra attention because the mesh can stretch slightly when pressed. Subway tile needs consistent spacers because the straight lines expose small errors. Peel-and-stick panels need pressure, not speed.
If the tile color looks too stark against older doors, repainting may be cheaper than replacing the whole kitchen. Baltimore Chronicle also has a practical guide on how to paint kitchen cabinets professionally at home, which pairs naturally with subway, mosaic, or peel-and-stick backsplash projects.
Step 6: Grout, clean, and caulk the backsplash
Grout only after the adhesive has cured according to the product label. Apply grout diagonally with a float, wipe with a damp sponge, then polish haze with a microfiber cloth after it dries.
Grout locks the design visually and protects the joints from kitchen grime. Caulk belongs where the tile meets the countertop, cabinets, and inside corners.
Do not use grout at the counter seam. That joint moves, and grout can crack. Use kitchen and bath silicone or siliconized acrylic caulk instead.
Step 7: Seal, cure, and clean the first week
Seal cement-based grout if the manufacturer recommends it. Avoid heavy scrubbing, steam cleaning, or splashing water on fresh grout until curing is complete.
The first week decides whether the backsplash hardens cleanly or absorbs stains early. Grout that is cleaned too aggressively can weaken or discolor.
Do not cook a grease-heavy meal against fresh grout the same evening. Give the surface time to cure before testing it with real kitchen mess.
Troubleshooting common backsplash problems
Most backsplash problems come from wall prep, rushed layout, or cleaning too late. The good news is that many issues can be corrected before the adhesive fully cures. Stop early when something looks wrong; forcing the next row usually makes the repair larger.
Common scenarios:
- Tiles are sliding: adhesive may be too wet, too thick, or spread too high. Use spacers and temporary support.
- Peel-and-stick corners lift: clean the wall again, warm the tile gently, and press with firm, even pressure.
- Grout haze will not disappear: use a haze remover approved for your tile, not harsh abrasive pads.
- Outlet covers do not fit: check whether box extenders are needed after tile thickness changes the wall depth.
- End cuts look awkward: add trim, adjust the layout, or align the ending point with cabinets.
If the wall is badly bowed, traditional tile may need more work than a beginner expects. A local tile contractor in states such as Florida, Pennsylvania, or Arizona may charge more for uneven plaster, old tile removal, or many outlet cuts. That does not mean DIY is impossible. It means the prep stage deserves more time than the pretty tile stage.
FAQ
Can a beginner install a kitchen backsplash?
Yes, a beginner can install a simple backsplash if the wall is flat and the layout is basic. Peel-and-stick is easiest. Ceramic subway tile is manageable with patience. Mosaic tile is forgiving around outlets but needs careful grout cleanup.
How long does it take to install a backsplash?
Peel-and-stick can take 3–5 hours in a small kitchen. Ceramic or porcelain tile usually takes 1–2 days because adhesive and grout need curing time. Larger kitchens, diagonal layouts, and glass tile can add time.
Is subway tile better than mosaic tile?
Subway tile is better for a clean, classic look and easier daily cleaning. Mosaic tile is better for decorative detail and tight cuts. The better choice depends on wall shape, budget, and how much grout maintenance you accept.
Can I install backsplash tile directly over drywall?
Often, yes, if the drywall is dry, clean, stable, and not damaged. Do not tile over soft drywall, peeling paint, mold, or loose paper. Wet areas like showers need different waterproofing standards than a kitchen backsplash.
How much does a kitchen backsplash cost in 2026?
A small DIY backsplash can cost about $125–$350 for budget materials. Installed projects often start around $700 and can rise with glass, stone, mosaics, old tile removal, or complex electrical cuts. Verify local quotes before ordering.
Is peel-and-stick backsplash good for renters?
It can be, but only if the lease allows it and the product removes cleanly. Test a hidden spot first. Heat, textured paint, and old grease can make peel-and-stick tile fail or damage the wall during removal.
Earlier we wrote about How to make an offer on a house in USA in 2026 without losing your deposit