


Learning how to paint kitchen cabinets professionally at home requires attention to three main steps: deep cleaning, proper priming, and applying thin finish coats. Most homeowners spend 12–20 hours on an average kitchen, spread across four to seven days. Removing and labeling doors, cleaning surfaces thoroughly, applying a compatible primer, and finishing with two thin coats ensures a durable result. Handling the doors too early is the main cause of dents, sticking, and edge damage, аs noted by Baltimore Chronicle.
Key takeaways:
- Cleaning and preparation are critical; paint cannot adhere to grease, silicone residue, or dust.
- Choose the primer that matches the cabinet material, whether laminate, glossy factory finish, or stained wood.
- Apply two thin finish coats and respect manufacturer-recommended recoat and cure times.
What You Need
Tools include a drill or screwdriver, orbital sander, sanding blocks, vacuum, 2-inch angled brush, 4-inch microfiber roller, trays, and supports for drying. Materials include degreaser, wood filler, paintable caulk, 120-, 180-, and 220-grit abrasives, bonding primer, cabinet enamel, painter’s tape, plastic, and drop cloths. Safety equipment such as gloves, eye protection, respirator, and ventilation fans is required. Keep a door diagram, product instructions, color notes, and receipts on hand.
Budget $250–$650 in 2026 for materials and basic tools, excluding optional sprayers or major repairs. Expect one day for disassembly, one for priming, two for finish coats, and several days for curing.
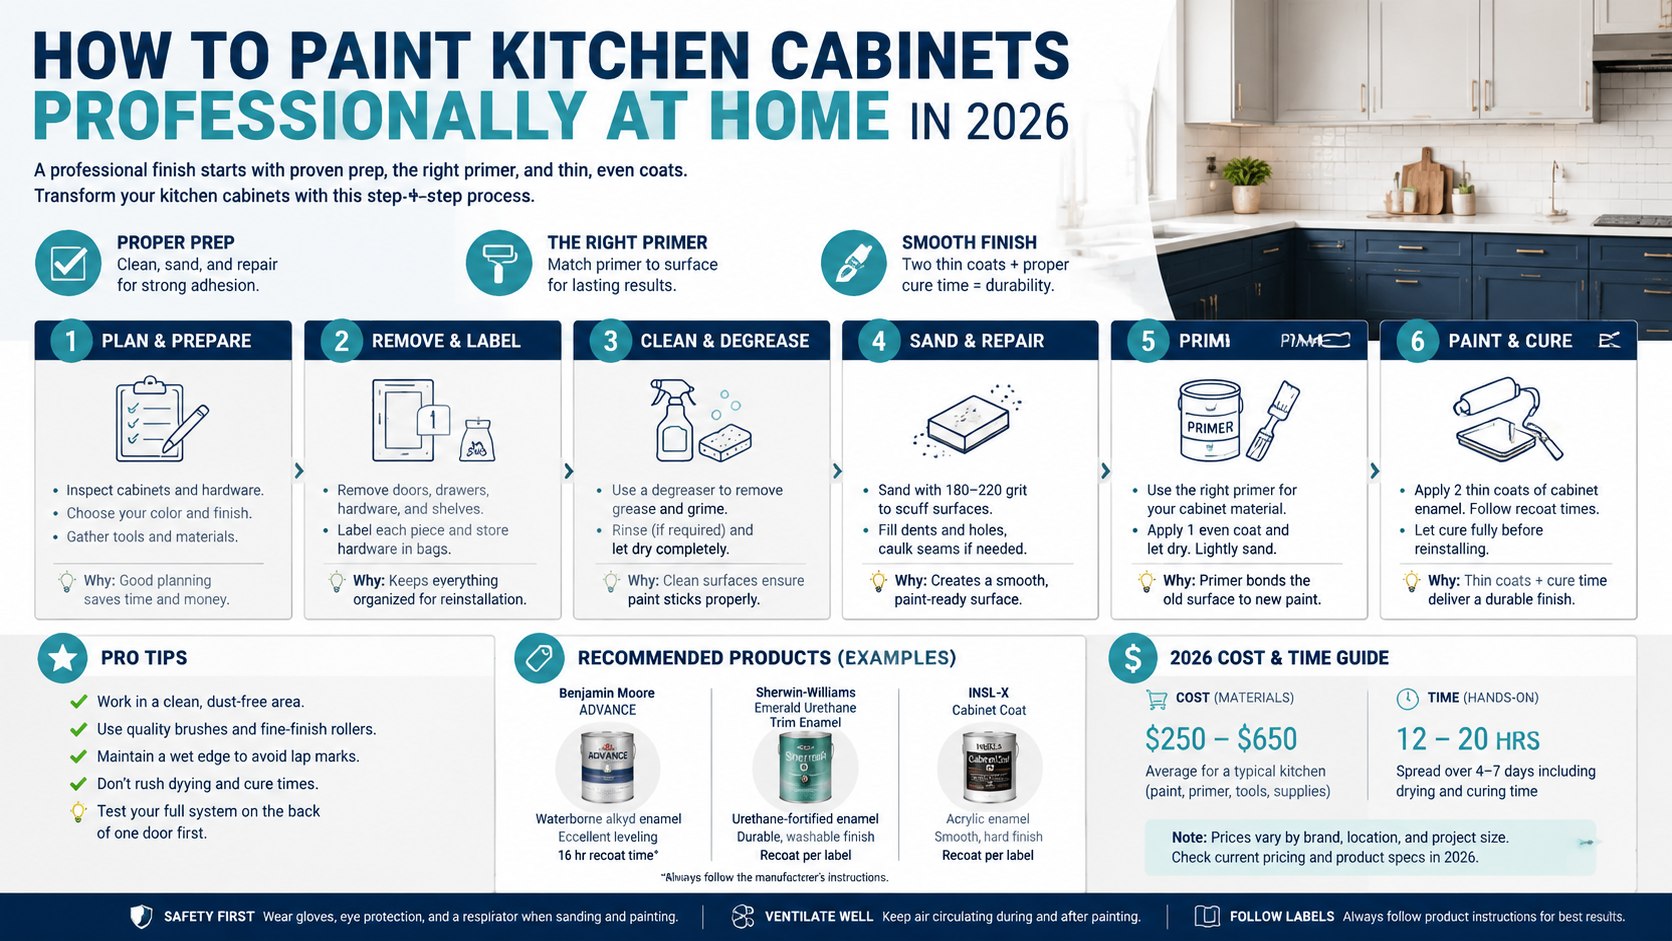
Step 1: Plan Your Project
Inspect doors, drawer fronts, face frames, and exposed cabinet ends. Solid wood, veneer, MDF, laminate, and thermofoil require different prep; damaged thermofoil may need replacement. Check cabinets for structural soundness and functioning hinges. Unrealistic scope may result in wasted paint and labor. Compare DIY refinishing costs with professional repair or replacement. For more guidance on assessing kitchen upgrades, see Baltimore Chronicle’s kitchen renovation tips.
| Budget Item | Typical US Cost | Planning Note |
|---|---|---|
| Cabinet-grade finish paint | $89–$127 per gallon | Benjamin Moore ADVANCE $88.99, Sherwin-Williams Emerald Urethane Trim Enamel $126.49 (June 2026) |
| Bonding/stain-blocking primer | $45–$85 per gallon | One gallon usually covers small/medium kitchens |
| Cleaner, filler, caulk, tape, abrasives | $60–$160 | Filler costs rise with door damage |
| Brushes, rollers, trays, supports | $50–$150 | Use fine woven or microfiber rollers |
| Optional HVLP sprayer | $150–$600+ | Spraying improves appearance but increases prep |
Include paint, hardware, countertop protection, and hinge upgrades in the total project budget. Renters need written permission specifying color and finish restoration requirements.
Step 2: Remove, Map, and Protect
Remove doors, drawer fronts, pulls, knobs, hinges, and shelves. Set up a flat work area in a garage, basement, or spare room. Number each cabinet opening and label corresponding hardware bags. Photograph the layout for reference. Protect counters, floors, appliances, and cabinet interiors with plastic or tape.
Proper labeling prevents alignment issues during reassembly. Avoid stacking unlabeled doors or leaving hinges attached, which can cause chips and missed prep areas. If you want additional insights into cabinet layout and installation, check Baltimore Chronicle’s guide on cabinet hardware installation.
Step 3: Degrease Surfaces
Vacuum loose debris, then clean every surface with a cabinet-safe degreaser or trisodium phosphate solution. Focus on areas near the stove, handles, and undersides of cabinets. Use fresh cloths and rinse as directed.
Silicone residues or aerosol cooking sprays can cause fisheyes. Repeat cleaning if water beads on the surface or test primer fails to stick. Proper cleaning ensures sanding scratches provide good adhesion. Do not substitute washing with sanding alone.
Step 4: Sand, Repair, and Remove Dust
Scuff factory finishes with 180-grit sandpaper. Use 120-grit only for leveling, then smooth with 180–220 grit. Fill dents and unused hardware holes with compatible filler. Sand flush and apply paintable caulk only at stationary joints.
Homes built before 1978 may contain lead paint; follow EPA lead-safe work practices. Vacuum with a HEPA filter and wipe with a damp microfiber cloth. Avoid waxed tack cloths that leave residue. Proper sanding ensures primer bonds and reduces imperfections. Do not skip sanding even with primers claiming adhesion to glossy surfaces.
Step 5: Apply Primer
Choose a primer based on the cabinet surface. Test on one door before committing to the whole kitchen.
| Cabinet Condition | Primer Type | Purpose |
|---|---|---|
| Sound painted wood or MDF | High-adhesion acrylic | Uniform surface, strong topcoat bonding |
| Laminate or glossy finish | Bonding primer | Adhesion on slick surfaces |
| Bare wood, knots, stains | Stain-blocking alkyd or shellac | Prevent discoloration |
| Dark cabinets to white | High-hiding tinted primer | Coverage and defect detection |
Apply thin, even coats, brushing edges first and rolling flat surfaces. After drying, lightly sand with 220-grit to remove nibs and imperfections. Thick coats cause ridges and extend drying time.
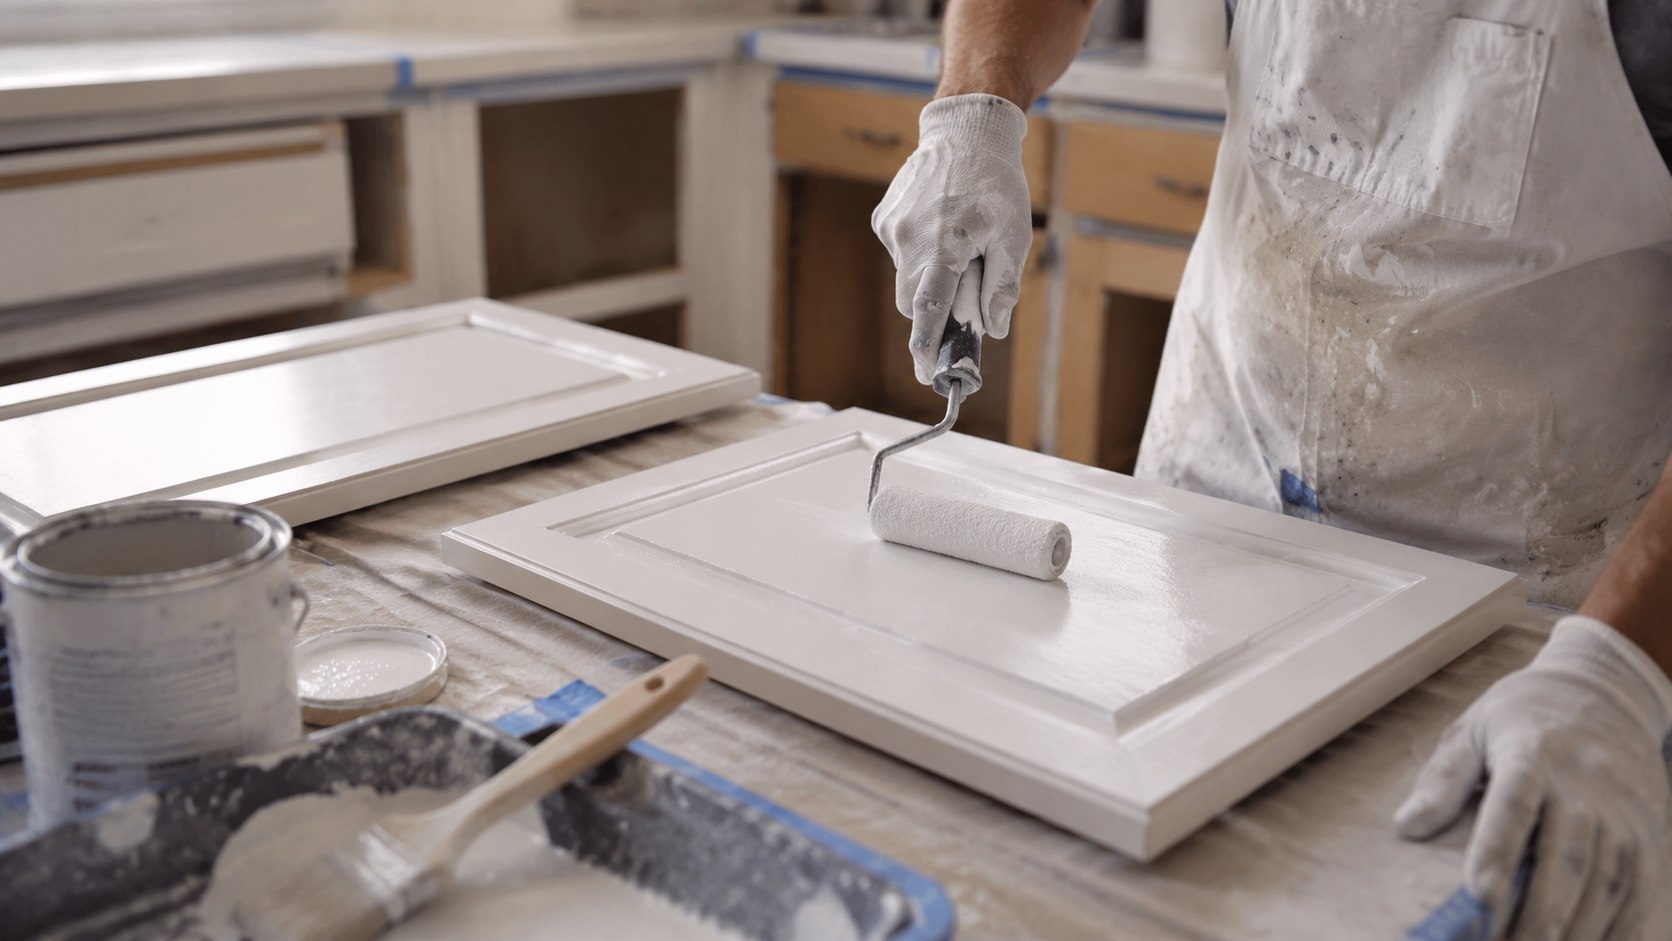
Step 6: Apply Finish, Cure, and Reinstall
Use cabinet-grade enamel instead of wall paint. Waterborne alkyds and urethane-reinforced enamels level well and cure hard. Apply a satin or semi-gloss finish for durability. Benjamin Moore ADVANCE, Sherwin-Williams Emerald Urethane Trim Enamel, and INSL-X Cabinet Coat are popular options. Follow recoat times and cure instructions for your product.
Brush corners first, roll broad areas with a fine-finish roller, lay doors flat, and maintain wet edges. Sand lightly between coats if needed. Wait at least 24 hours before handling; allow several days for full cure. Reinstall doors carefully using your numbering diagram.
Thin coats harden evenly, prevent runs, and reduce sticking. Avoid reinstalling doors too soon.
Troubleshooting Common Issues
- Paint scratches off: Usually contamination or insufficient sanding. Extend cure time and test adhesion.
- Stains bleed through: Spot-prime with stain-blocking primer and test before recoating.
- Roller texture visible: Apply thinner coats, use a finer roller, maintain wet edges, and sand cured coats.
- Paint runs in corners: Remove excess paint immediately, level once cured, and recoate thinly.
- Doors stick: Allow more cure time, use bumpers, and avoid early heavy handling.
FAQ
Can cabinets be painted without removing doors?
Yes, but results are harder to control. Removing doors allows better edge coverage and smoother finishes.
Is a sprayer necessary?
No. A quality brush and fine roller produce clean results when prep is thorough. Sprayers require masking, ventilation, and experience.
How much paint is needed?
Most small to medium kitchens need one gallon for two coats. Factors include cabinet count, color change, and surface type.
Should I seal with polyurethane?
No, unless the product label specifies. Unnecessary polyurethane can yellow, alter color, or interfere with adhesion.
How long before normal use?
Initial handling is possible after 1–3 days, but full cure may take longer. Follow manufacturer instructions for temperature and humidity.
Earlier we wrote about Construction Loan vs Traditional Mortgage 2026: Costs, Rates, and Approval Explained