


Learning how to install kitchen cabinets yourself can reduce labor costs, provided the room is measured correctly and every cabinet is anchored to solid framing. A typical 10-by-10-foot kitchen takes two capable adults about three to five days after demolition, electrical work, plumbing changes, and wall repairs are complete, аs noted by Baltimore Chronicle.
The basic sequence is straightforward: find the floor’s highest point, mark level reference lines, locate every wall stud, install upper cabinets first, and then shim the base cabinets into one level plane. Stop and call a licensed contractor when walls contain uncertain wiring, damaged framing, extensive water damage, or masonry that requires specialized anchors.
Key takeaways
- Build the layout from the floor’s highest point, not from a floor or ceiling that only appears level.
- Fasten cabinet boxes to studs or an approved mounting rail. Drywall anchors cannot support loaded kitchen cabinets.
- Clamp neighboring cabinets before joining them so face frames remain flush and door gaps stay consistent.
Cabinets are only one part of the renovation budget. The Baltimore Chronicle guide to kitchen remodeling costs in the USA covers typical 2026 spending on demolition, countertops, appliances, flooring, plumbing, and electrical work.
What You Need Before Installing Cabinets
A complete DIY kitchen cabinet installation requires more than a drill and a level. Cabinet boxes can weigh 40 to 100 pounds before dishes, cookware, or stone countertops add permanent loads.
- 25-foot tape measure, pencil, chalk line, and carpenter’s square
- Stud finder with electrical-wire detection
- 4-foot or 6-foot level, plus a compact torpedo level
- Drill/driver and impact driver
- Drill bits and a countersink bit
- Manufacturer-approved cabinet screws
- Cabinet clamps or 6-inch bar clamps
- Wood or composite shims
- Straight 1-by-3-inch or 1-by-4-inch ledger board
- Stepladder, safety glasses, hearing protection, and work gloves
- Two people for lifting wall cabinets
DeWalt, Milwaukee, Makita, Bosch, and Ryobi sell drills suitable for this type of project. The brand matters less than having enough torque, charged batteries, sharp bits, and a clutch that prevents screws from being overtightened.
Do not substitute drywall screws for structural cabinet screws. Drywall screws are brittle and are not designed to carry a loaded cabinet through its mounting rail or reinforced back.
| Budget item | Typical 2026 DIY range | Planning note |
|---|---|---|
| Basic installation tools | $150–$450 | Lower when drills, levels, and clamps are already owned |
| Screws, shims, ledger lumber, and bits | $40–$120 | Use fasteners specified by the cabinet manufacturer |
| Stock cabinet boxes | $100–$500 each | Price varies by size, material, finish, and construction |
| Professional installation | $70–$120 per linear foot | Local quotes vary by project scope and market |
These figures are planning ranges rather than contractor quotes. Costs in California and New York may exceed prices in Texas, Ohio, or Tennessee because labor, delivery, permits, and disposal charges differ.
When comparing a DIY budget with contractor bids, check whether each estimate includes demolition, wall repairs, fillers, trim, hardware, cleanup, and disposal. The guide to reading a construction estimate explains how allowances, exclusions, change orders, and separate labor charges affect the final price.
Step 1: Plan How to Install Kitchen Cabinets Yourself
What to do: Unpack every cabinet, compare its label with the approved layout, and arrange the boxes in installation order. Confirm appliance widths, door swings, filler locations, finished end panels, plumbing points, and countertop overhangs.
Why it matters: A missing 3-inch filler beside a wall can prevent drawers from opening or leave a refrigerator door unable to swing fully.
Common mistake: Do not assume the printed plan matches the room. Measure the actual walls, windows, appliances, and cabinet boxes before drilling.
Inspect every cabinet for shipping damage before installation. Check corners, face frames, doors, drawer slides, shelves, and finished panels. Replacing a damaged box is easier before it has been joined to the rest of the run.
Confirm the Installation Sequence
- Complete demolition and repair damaged drywall or framing.
- Finish rough electrical, plumbing, HVAC, and gas work.
- Paint walls where practical while keeping mounting marks visible.
- Install upper cabinets before base cabinets.
- Set base and tall cabinets.
- Install fillers, panels, trim, doors, drawers, and hardware.
- Complete countertop templating after the bases are level and secure.
Electrical and plumbing alterations may require permits or licensed trades. Requirements differ among states and municipalities, so confirm them with the local building department.
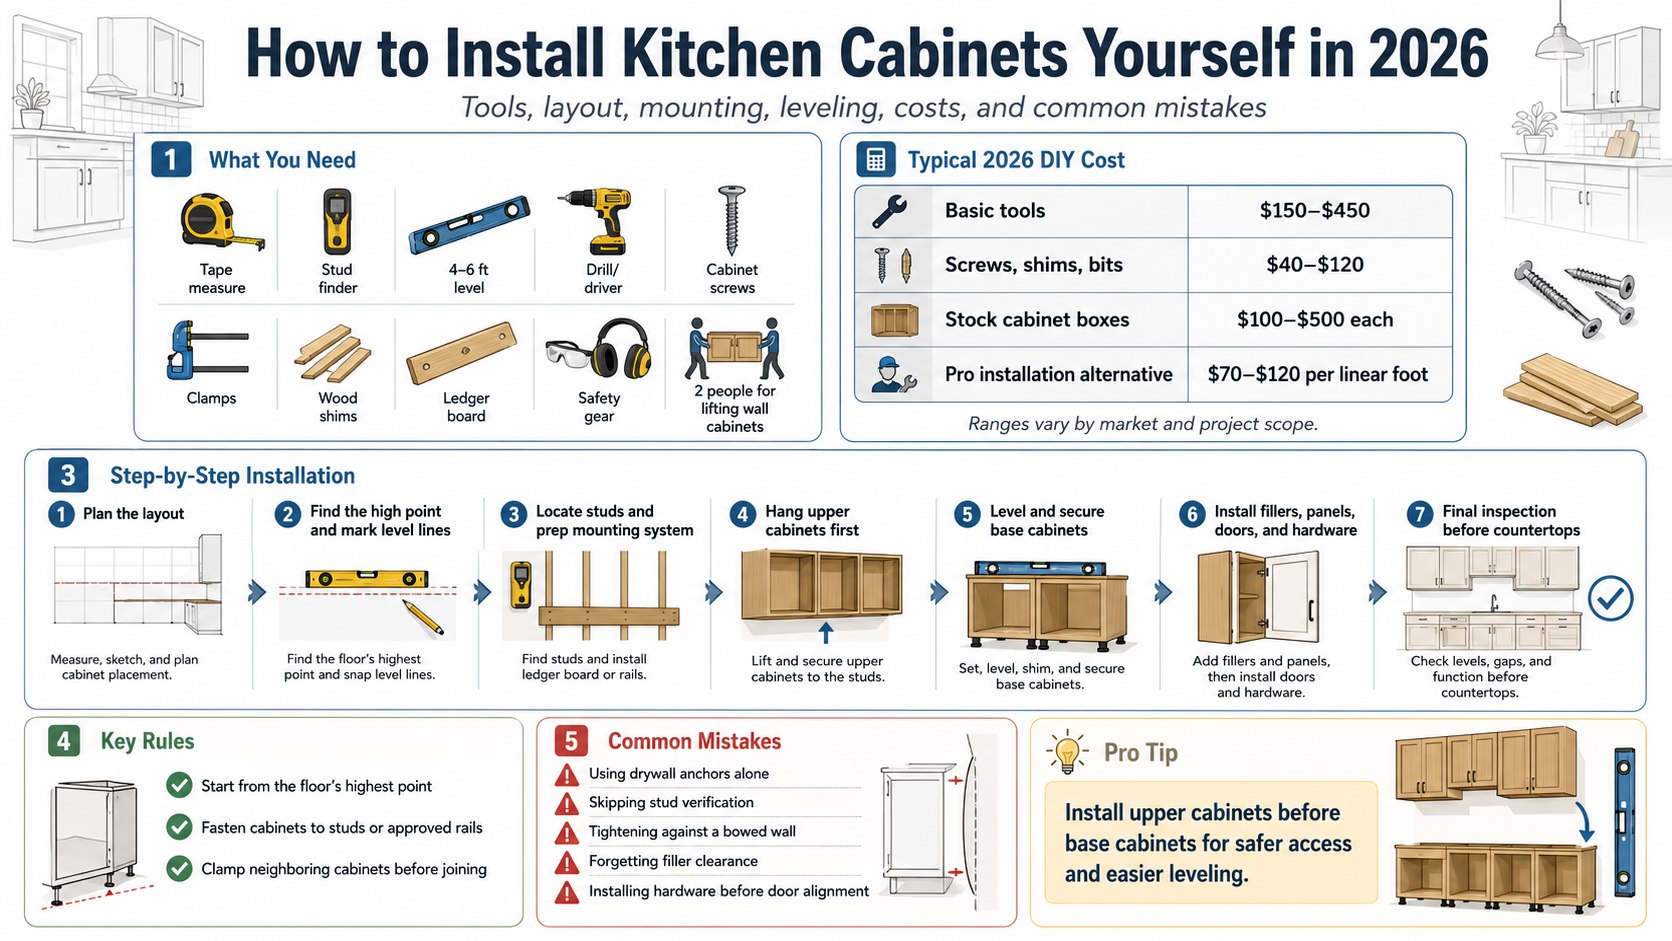
Step 2: Find the High Point and Mark the Layout
What to do: Use a long level or laser level to identify the highest point of the finished floor. Measure upward from that point and mark level reference lines for the base and upper cabinets.
Why it matters: All cabinet heights must be based on the highest floor point so the lowest cabinet does not collide with the floor before the run becomes level.
Common mistake: Do not measure cabinet height separately at each location. A sloped floor will transfer that slope into the countertop.
Many standard base cabinets are approximately 34½ inches high without a countertop. A typical finished countertop sits near 36 inches, but adjustable legs, toe-kick systems, flooring, and countertop thickness can change the final height.
Upper cabinets are commonly positioned with about 18 inches between the countertop and cabinet bottom. That dimension may need adjustment above a range, around a refrigerator, or near an appliance garage.
Follow the appliance manufacturer’s clearance requirements. A range hood, over-the-range microwave, refrigerator, or wall oven may require a specific opening and minimum distance from nearby surfaces.
Mark both edges of every cabinet on the wall. Include fillers, dishwasher openings, range openings, refrigerator panels, and any space needed for door or drawer clearance.
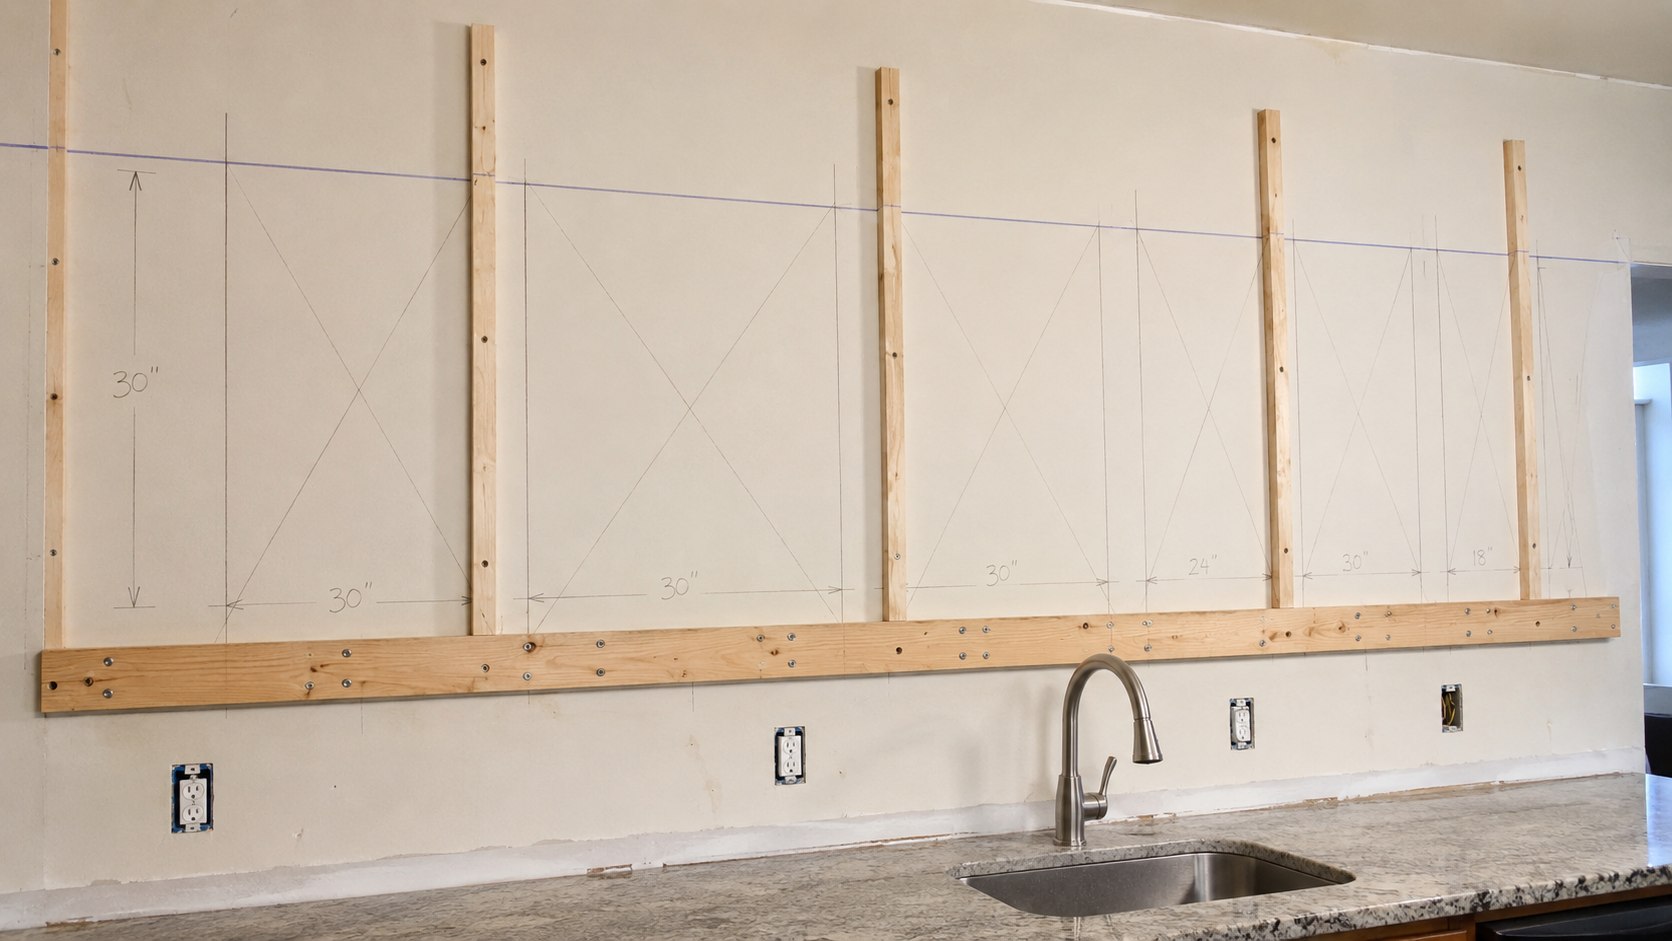
Step 3: Locate Studs and Prepare the Mounting System
What to do: Scan the wall for studs, verify each location with a small test hole where it will remain hidden, and extend the center marks above and below the cabinet area. Mark possible wiring and plumbing before selecting screw locations.
Why it matters: Proper kitchen cabinet wall mounting depends on structural framing or a manufacturer-approved rail attached with suitable fasteners.
Common mistake: Do not rely on a stud finder reading without verification. Metal corner bead, pipes, blocking, and electrical cables can produce misleading signals.
Traditional framed cabinets usually have reinforced hanging rails near the top and bottom of the box. Frameless systems may use internal braces or a separate suspension rail.
IKEA SEKTION cabinets use a metal rail that must remain straight, level, and securely attached to the wall structure. Other manufacturers use different hanging systems, so follow the instructions supplied with the cabinets rather than applying one fastening method to every brand.
Fasteners suitable for wood framing may not be suitable for concrete block, brick, steel studs, or older plaster walls. Masonry installations may require a hammer drill and anchors selected for the wall material and expected load.
A temporary ledger board can support the lower edge of traditional upper cabinets during installation. Screw the ledger into studs along the marked line and confirm that it is level before lifting the first box.
Step 4: Hang and Join the Upper Cabinets
What to do: Remove doors and shelves to reduce weight. Lift the first corner or end cabinet onto the ledger and fasten it loosely through the reinforced mounting rail into studs.
Why it matters: Installing upper cabinets first keeps base cabinets from obstructing the ladder and provides safer access to the wall.
Common mistake: Do not fully tighten the first cabinet until the adjacent box has been positioned and both faces have been aligned.
Use at least two people to lift a wall cabinet. One person should support and position the box while the other checks the level and starts the fasteners.
A cabinet jack can hold a box at the required height, but it does not replace structural fastening or safe lifting practices. Large pantry and bridge cabinets can remain difficult to control even with mechanical support.
Set the next cabinet on the ledger. Clamp the face frames together with protective pads, verify that the front edges and bottoms are flush, and drill pilot holes before installing connector screws.
Place connector screws where hinges or hardware will conceal them when practical. Do not drill too close to the edge of the face frame because the wood can split.
Continue checking three conditions during installing upper kitchen cabinets:
- The complete run remains level from end to end.
- Each cabinet remains plumb from front to back and side to side.
- The cabinet faces remain flush without twisting the boxes.
Shim between the cabinet back and wall where necessary. Tightening a box directly against a bowed wall can rack the cabinet, misalign the doors, and create uneven gaps.
Step 5: Level and Secure the Base Cabinets
What to do: Begin with a corner, tall cabinet, or fixed endpoint shown on the plan. Set the first base cabinet on the floor, raise low areas with shims, and adjust it until the box is level, plumb, and aligned with the reference line.
Why it matters: Accurate leveling base cabinets creates a flat platform for laminate, butcher-block, solid-surface, quartz, or granite countertops.
Common mistake: Do not follow an uneven wall with the cabinet fronts. Keep the fronts in a straight plane and shim the spaces behind them.
Place the next cabinet beside the first. Clamp the face frames, drill pilot holes, and join the cabinets before fastening the second box to the wall.
Recheck the entire run after every two or three cabinets. An error of only ⅛ inch at each connection can become visible across a long wall.
Place shims near cabinet sides, partitions, and other load-bearing points. A shim in the middle of a thin cabinet bottom provides less useful support than shims under structural edges.
At the sink cabinet, transfer plumbing measurements carefully and drill holes slightly larger than the pipes. A hole saw produces a cleaner opening than a reciprocating saw.
Seal exposed particleboard or fiberboard edges around plumbing penetrations to reduce moisture absorption. Do not force the cabinet against a shutoff valve or drain fitting.
Leave appliance openings at the exact dimensions required by the manufacturer. Measure at the front and back because walls and cabinets may not be parallel.
Step 6: Install Fillers, Panels, Doors, and Hardware
What to do: Scribe fillers to uneven walls, fasten finished panels from inside the cabinet, reinstall doors and drawers, and adjust the hinges. Add toe kicks, crown molding, handles, knobs, and shelf supports after the cabinet run is secure.
Why it matters: Fillers provide door and drawer clearance while finished panels conceal exposed cabinet sides and mounting gaps.
Common mistake: Do not install handles before confirming door alignment. Hardware can make uneven gaps more noticeable and may need to be repositioned.
A filler beside a wall should be wide enough for the nearest door or drawer to clear baseboards, window trim, handles, and uneven drywall. Corner layouts may need additional clearance so two sets of drawers do not collide.
Most concealed hinges allow three-way adjustment: up and down, left and right, and inward or outward. Work across the cabinet run methodically instead of adjusting each door in isolation.
Use a hardware jig when drilling for handles and knobs. Test the jig on scrap wood before drilling finished doors.
Homeowners still selecting freestanding storage, islands, or dining furniture can compare national retailers in the Baltimore Chronicle ranking of the best furniture stores in the USA for 2026. Measurements should be confirmed against the installed cabinet layout before purchasing additional pieces.
Step 7: Complete the Final Inspection
What to do: Tighten all mounting and connector screws, trim exposed shims, test every door and drawer, and check the complete base run with a long level.
Why it matters: Countertop fabricators need a stable, flat cabinet platform before measuring and installing heavy materials.
Common mistake: Do not use the countertop to pull twisted or uneven cabinets into position. Correct the cabinet installation before templating.
Confirm that fillers and finished panels are secure. Check that drawers do not rub against neighboring doors and that appliance openings remain square.
Verify that the dishwasher opening has the required width and height after flooring is considered. A dishwasher installed before a thick finished floor may become trapped beneath the countertop.
Remove screws, drill bits, and debris from every cabinet. Reinstall shelves only after all mounting hardware has been inspected.
Troubleshooting Common Cabinet Installation Problems
- The cabinet rocks after shimming: Add support near each cabinet side and load-bearing partition, then trim the shims after final fastening.
- Cabinet faces do not sit flush: Loosen the wall screws, clamp the frames, correct any twist with shims, and retighten gradually.
- The last cabinet does not fit: Recheck fillers, cumulative cabinet widths, drywall buildup, and corner clearances before cutting anything.
- Doors open into a wall or appliance: Confirm the filler width and hinge clearance. A wider filler or different hinge may be required.
- Screws miss the studs: Stop adding holes and reconfirm the framing. Install approved blocking where accessible or use the manufacturer’s mounting system.
- The cabinet run is level but the countertop gap varies: Check whether the wall is bowed and whether the cabinet fronts remain in a straight plane.
FAQ
Can One Person Install Kitchen Cabinets?
One person can measure, mark, shim, and install some base cabinets. Wall cabinets should normally be lifted by two adults or with suitable lifting equipment because the boxes are bulky and difficult to control.
Should Upper or Lower Cabinets Be Installed First?
Upper cabinets are usually installed first. This provides open floor space for ladders, reduces the risk of damaging base cabinets, and makes wall access easier.
What Screws Should Be Used to Mount Kitchen Cabinets?
Use structural cabinet screws or the fasteners specified by the cabinet manufacturer. The correct length and type depend on the mounting rail, wall finish, framing material, and required embedment into solid structure.
Can Kitchen Cabinets Be Attached Only to Drywall?
No. Loaded cabinets require attachment to studs, structural blocking, masonry with suitable anchors, or an approved rail system connected to appropriate structure. Ordinary plastic drywall anchors are not sufficient.
How Long Does a DIY Cabinet Installation Take?
A straightforward small kitchen may take two adults three to five days. Cabinet assembly, wall repair, custom fillers, plumbing changes, decorative trim, and complicated corners can extend the schedule.
When Should a Professional Installer Take Over?
Professional help is appropriate when walls contain unknown wiring or pipes, cabinets must attach to damaged framing or masonry, the layout includes complex custom panels, or the countertop warranty requires strict installation tolerances.
Earlier we wrote about How to Reset a Forgotten iPhone Passcode Without Losing Data in 2026