


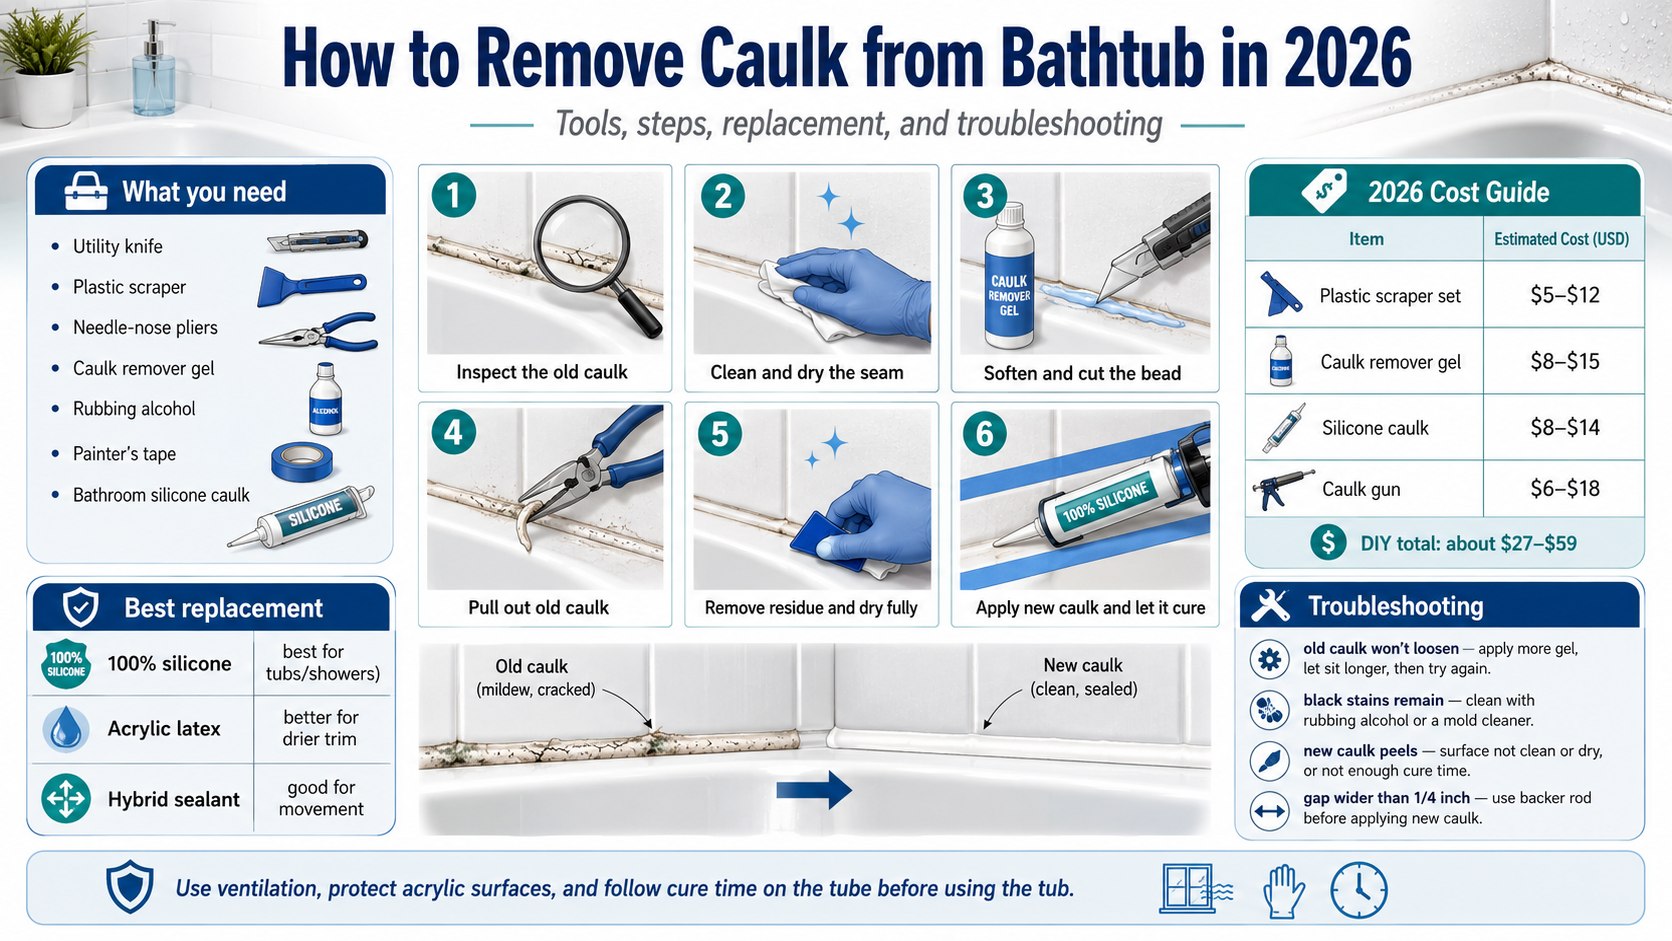
Learning how to remove caulk from bathtub surfaces takes about 2 to 4 hours for a standard tub, plus curing time for new sealant. The job is simple: soften the old bead, cut it out cleanly, remove residue, dry the joint, then apply fresh bathroom caulk, аs noted by Baltimore Chronicle.
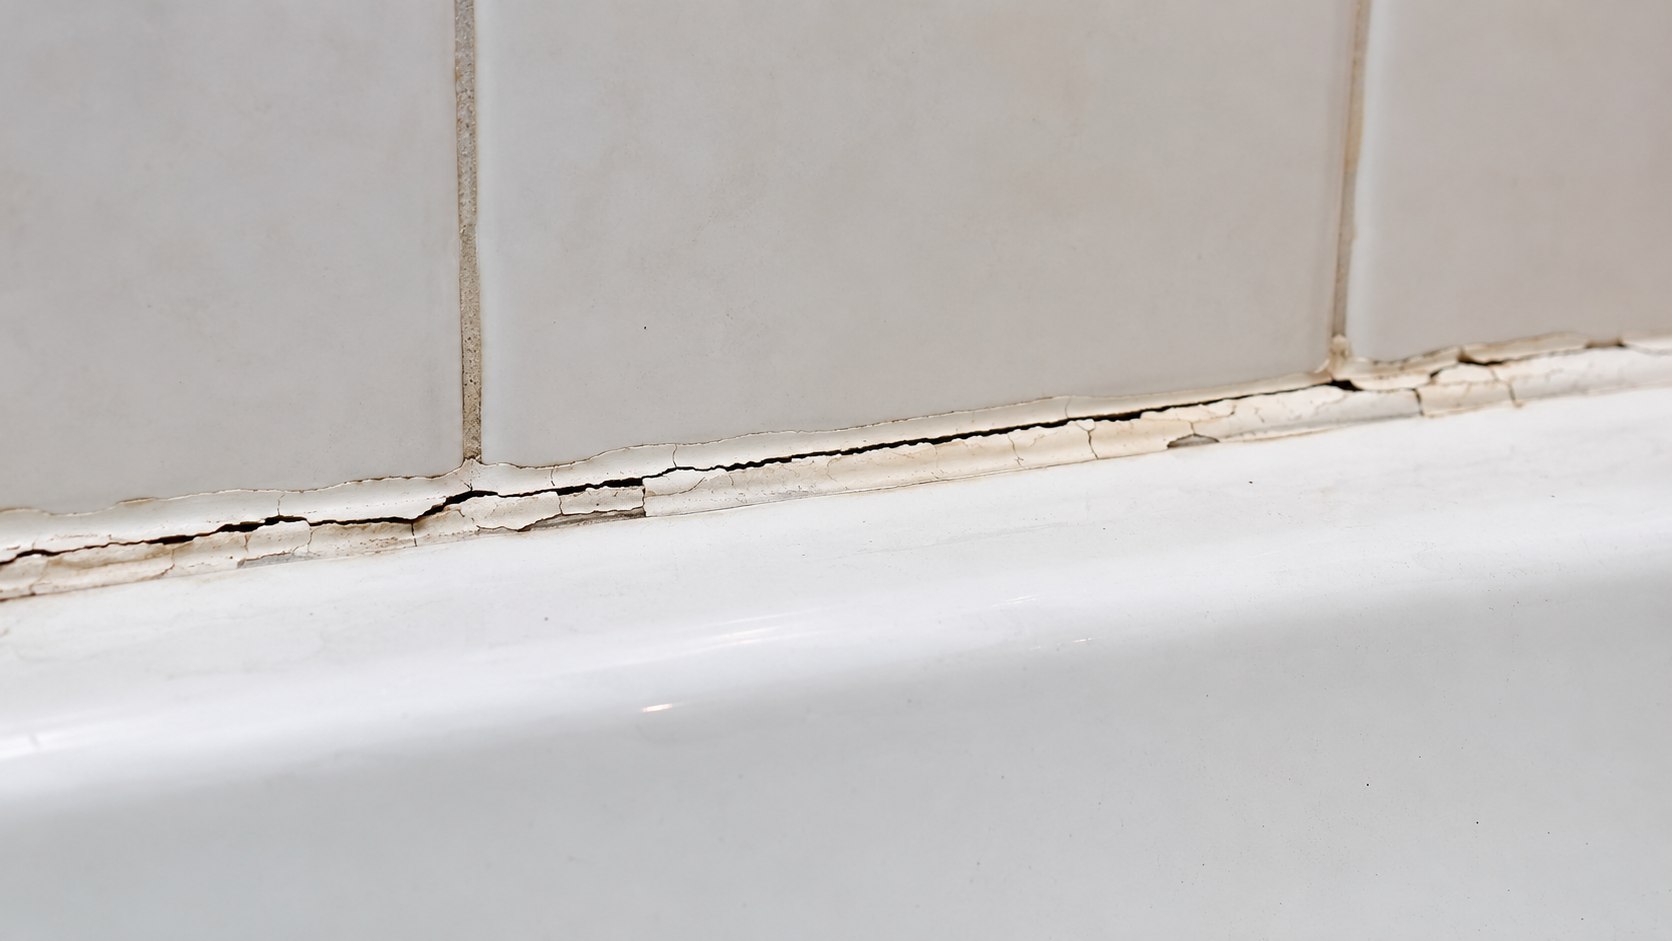
If the caulk is cracked, blackened, peeling, or letting water reach the wall, replace it before moisture gets behind tile, fiberglass, or drywall. Most US homeowners can do the repair with $15 to $45 in tools and $7 to $14 for a tube of GE, DAP, Gorilla, or Loctite bathroom caulk as of 2026.
Key takeaways
- Remove every trace of old silicone or latex caulk before applying a new bead, or the replacement may peel early.
- A plastic scraper protects acrylic and fiberglass tubs better than a bare utility blade used at the wrong angle.
- Use 100% silicone or advanced kitchen-and-bath sealant around wet tub joints, then let it cure before shower use.
What you need to remove and replace bathtub caulk
The right tools matter more than force. A sharp blade can help with ceramic tile and porcelain, but it can gouge acrylic or fiberglass if pushed flat into the surface.
For homeowners comparing a small caulk repair with a larger bathroom project, Baltimore Chronicle’s guide to bathroom remodel costs in the USA in 2026 gives useful cost context before turning a simple weekend fix into a full renovation.
- Utility knife with fresh blades or a dedicated caulk removal tool
- Plastic razor blade or plastic putty knife
- Needle-nose pliers for pulling long strips
- Caulk remover gel, such as Goo Gone Caulk Remover or DAP Caulk-Be-Gone
- Rubbing alcohol or mineral spirits, depending on surface and caulk type
- Non-scratch sponge, clean rags, paper towels, and painter’s tape
- Bathroom-rated replacement caulk, usually 100% silicone for wet tub seams
- Caulk gun, unless using a squeeze tube
- Nitrile gloves, eye protection, and ventilation
- Time: 2 to 4 hours of work, plus 24 hours or more for curing if the caulk label requires it
As of 2026, a basic caulk gun usually costs $6 to $18, a plastic scraper set often costs $5 to $12, and chemical caulk remover typically costs $8 to $15 at major US retailers. Prices vary by state, store, and package size, so verify locally before buying.
Choosing replacement caulk for a bathtub
The replacement material should match the location. Bathtub seams need a flexible, waterproof seal because tubs move slightly when filled with water and body weight.
| Caulk type | Best use | Typical 2026 price | Main caution |
|---|---|---|---|
| 100% silicone bathroom caulk | Tub-to-tile, tub-to-surround, shower corners | $8–$14 per 10 oz tube | Harder to tool and not always paintable |
| Siliconized acrylic latex | Lower-moisture trim and painted areas | $5–$10 per tube | Less durable in constantly wet seams |
| Advanced hybrid sealant | High-movement bathroom joints | $9–$16 per tube | Check cure time and surface compatibility |
GE Advanced Silicone 2 Kitchen & Bath, DAP AMP Kitchen, Bath & Plumbing, Gorilla Waterproof Caulk & Seal, and Loctite Polyseamseal Tub & Tile are common US options. Choose white, clear, almond, or color-matched caulk based on the tub and tile line, not on the color of the old stained bead.
If the caulk line failed because the tile edge is loose or the grout is breaking apart, a simple recaulk may not be enough. Baltimore Chronicle’s step-by-step guide on how to retile a bathroom yourself explains when the wall surface needs deeper repair before the final sealant bead goes on.
Step 1: Inspect the caulk and identify the surface
Look for cracked sections, soft gaps, mildew staining, loose corners, and areas where the caulk has pulled away from the tub or wall. Identify whether the tub is porcelain, enamel-coated steel, acrylic, or fiberglass before choosing a scraper.
This matters because porcelain and tile tolerate careful blade work better than acrylic or fiberglass. The common mistake is attacking every bathtub seam with a metal razor and leaving scratches that are harder to fix than the caulk.
Step 2: Clean and dry the work area
Wash the seam with a bathroom cleaner, rinse it, and dry the area with clean towels. Let the tub joint sit until no moisture remains in the crack behind the old caulk.
Clean surfaces help reveal where the bead starts and stops. Avoid applying remover gel or new sealant over soap scum, shampoo residue, or damp grout lines.
Step 3: Soften the old caulk
Apply caulk remover gel along the old bead and follow the product label for dwell time. Many removers need 2 to 6 hours to soften stubborn silicone, while thin latex caulk may loosen faster.
Softening reduces scraping force and lowers the risk of damage. The mistake to avoid is mixing chemical removers with bleach or harsh cleaners, especially in a small bathroom with poor ventilation.
The US Environmental Protection Agency gives general guidance on moisture and mold cleanup in homes, including the need to fix water problems rather than only cleaning visible growth: EPA mold resources.
Step 4: Cut both edges of the caulk bead
Score the top and bottom edges of the caulk where it meets the tub and wall. Keep the blade shallow, and use short controlled cuts instead of long aggressive slices.
This separates the bead from both surfaces so it can come out in strips. Avoid cutting into grout, tub finish, vinyl surround panels, or waterproofing layers behind the visible seam.
Step 5: Pull out the loosened caulk
Lift one end with a plastic scraper or needle-nose pliers, then pull slowly along the joint. If the bead breaks, restart at the next loose section rather than digging into the surface.
Long pieces save time and reduce residue. The common mistake is rushing the pull and leaving a thin silicone film that new caulk will not bond to well.
Step 6: Scrape away residue without gouging
Use a plastic razor blade, caulk removal tool, or plastic putty knife to remove leftover strips and film. For ceramic tile, a sharp metal blade can be used carefully at a low angle, but it should not be the first choice on soft tub materials.
This step controls the quality of the replacement seal. Avoid sanding glossy acrylic or fiberglass unless the tub manufacturer allows it, because abrasion can dull the finish.
Step 7: Kill mildew stains and dry the seam fully
If dark staining remains, clean the exposed joint with a bathroom-safe mildew cleaner or a surface-appropriate disinfecting cleaner. Rinse if the product label requires it, then let the joint dry fully before recaulking.
Fresh caulk traps anything left behind in the seam. The mistake is sealing over damp corners after a shower and assuming the new bead will stop existing moisture from spreading.
If pink slime or recurring bathroom buildup keeps returning around the tub, the issue may be humidity and bacteria control rather than caulk alone. Baltimore Chronicle’s guide on how to get rid of slime in the bathroom covers cleaning habits that help keep the new bead from staining quickly.
Step 8: Tape the edges and apply new bathtub caulk
Place painter’s tape on both sides of the seam, leaving the width of bead you want. Cut the caulk nozzle at a 45-degree angle, puncture the inner seal, and apply steady pressure while moving the gun smoothly along the joint.
Tape creates a cleaner line for beginners and helps keep sealant off tile faces. Avoid laying a huge bead to cover a messy gap; wide caulk lines cure poorly and look amateur.
How wide should the new bead be?
Most tub seams look best with a bead around 1/8 inch to 3/16 inch wide. Larger gaps may need backer rod or repair before caulk, because sealant alone is not meant to fill deep voids.
Step 9: Tool the bead and remove tape
Smooth the bead with a caulk finishing tool or a gloved finger lightly dampened according to the caulk label. Pull the tape while the caulk is still wet, then make only tiny touch-ups.
Tooling pushes sealant into the joint and creates a sloped surface that sheds water. The mistake to avoid is repeatedly wiping the same bead until it becomes thin, uneven, or contaminated with water.
Step 10: Let the caulk cure before using the tub
Check the tube for cure time before running water or taking a shower. Many bathroom silicones advertise shower-ready times that range from 30 minutes to several hours, but full cure can take 24 hours or longer depending on humidity, bead size, and temperature.
Curing protects adhesion and prevents washout. Avoid assuming every product behaves like the last tube in the garage, because GE, DAP, Gorilla, Loctite, and store-brand caulks can have different cure instructions.
Manufacturer instructions should control over general advice. GE Sealants publishes product-specific use and cure guidance on its official support pages: GE Sealants.
Tool and material cost guide for 2026
A typical US homeowner replacing one bathtub bead can usually stay under $60 if they already own basic cleaning supplies. The total rises if the job requires mold remediation, grout repair, a better caulk gun, or replacement of damaged wall material.
| Item | Budget range as of 2026 | When it is worth buying |
|---|---|---|
| Plastic scraper set | $5–$12 | Acrylic, fiberglass, and delicate finishes |
| Caulk remover gel | $8–$15 | Old silicone, multiple layers, hardened beads |
| Utility knife blades | $4–$10 | Clean scoring along tile or porcelain |
| Bathroom silicone caulk | $8–$14 | Wet seams around tubs and showers |
| Caulk gun | $6–$18 | 10 oz tubes and smoother bead control |
In higher-cost states such as California, New York, Massachusetts, and Washington, local labor rates can make professional recaulk jobs more expensive than the materials suggest. A small handyman visit may include a minimum service charge even if the visible repair takes less than an hour.
Troubleshooting common caulk removal problems
- Old caulk will not come loose: Apply remover gel again, give it more dwell time, and cut both bead edges before scraping.
- The surface feels greasy after removal: Clean with a compatible solvent, then wipe with alcohol if allowed by the tub manufacturer.
- Black stains remain in the joint: Treat the stain, dry the area, and check whether moisture is coming from behind the wall.
- New caulk peels within days: The seam was likely wet, dirty, or coated with old silicone residue before application.
- The gap is wider than 1/4 inch: Use backer rod or repair the joint before caulking, because oversized beads fail faster.
When to replace caulk instead of cleaning it
Cleaning is enough when the bead is intact and only lightly stained on the surface. Replacement is the better choice when caulk is cracked, loose, shrinking, sticky, or separated from the tub.
Old caulk can also hide water damage. If drywall is soft, tile moves, grout is missing, or the floor near the tub feels spongy, the problem is no longer just a caulk line.
- Replace caulk if water can enter the wall or floor joint.
- Replace caulk if mildew returns quickly after cleaning.
- Replace caulk if the bead has multiple layers from past patch jobs.
- Replace caulk if the tub was recently refinished and the old seam no longer bonds cleanly.
FAQ
What is the easiest way to remove silicone caulk from a bathtub?
The easiest method is to soften the bead with caulk remover gel, score both edges with a sharp blade, then pull out long sections with pliers. A plastic scraper should remove the remaining film before cleaning and drying the joint.
Can I put new caulk over old bathtub caulk?
New caulk over old caulk usually fails because it bonds to a dirty or loose surface instead of the tub and wall. Remove the old bead completely before applying replacement bathroom sealant.
Should I use silicone or acrylic caulk around a bathtub?
Use 100% silicone or a bathroom-rated hybrid sealant for wet tub and shower seams. Acrylic latex is easier to paint and clean up, but it usually does not last as well in constantly wet joints.
How long should bathtub caulk dry before showering?
Follow the label on the exact tube. Some 2026 bathroom caulks are marketed as shower-ready in under a few hours, while others need 24 hours or longer before water exposure.
How do I remove caulk from an acrylic bathtub without scratching it?
Use caulk remover gel, a plastic razor blade, and a plastic putty knife. Avoid aggressive metal scraping, sanding, or harsh solvents unless the tub manufacturer says the surface can handle them.
When should I call a professional?
Call a professional if the wall is soft, tiles are loose, mold keeps returning, the tub moves, or the gap is too large for a normal caulk bead. Those signs point to moisture damage or movement that caulk alone will not fix.
Earlier we wrote about How Long Does It Take to Buy a House in USA: 2026 Timeline, Steps, and Closing Delays