

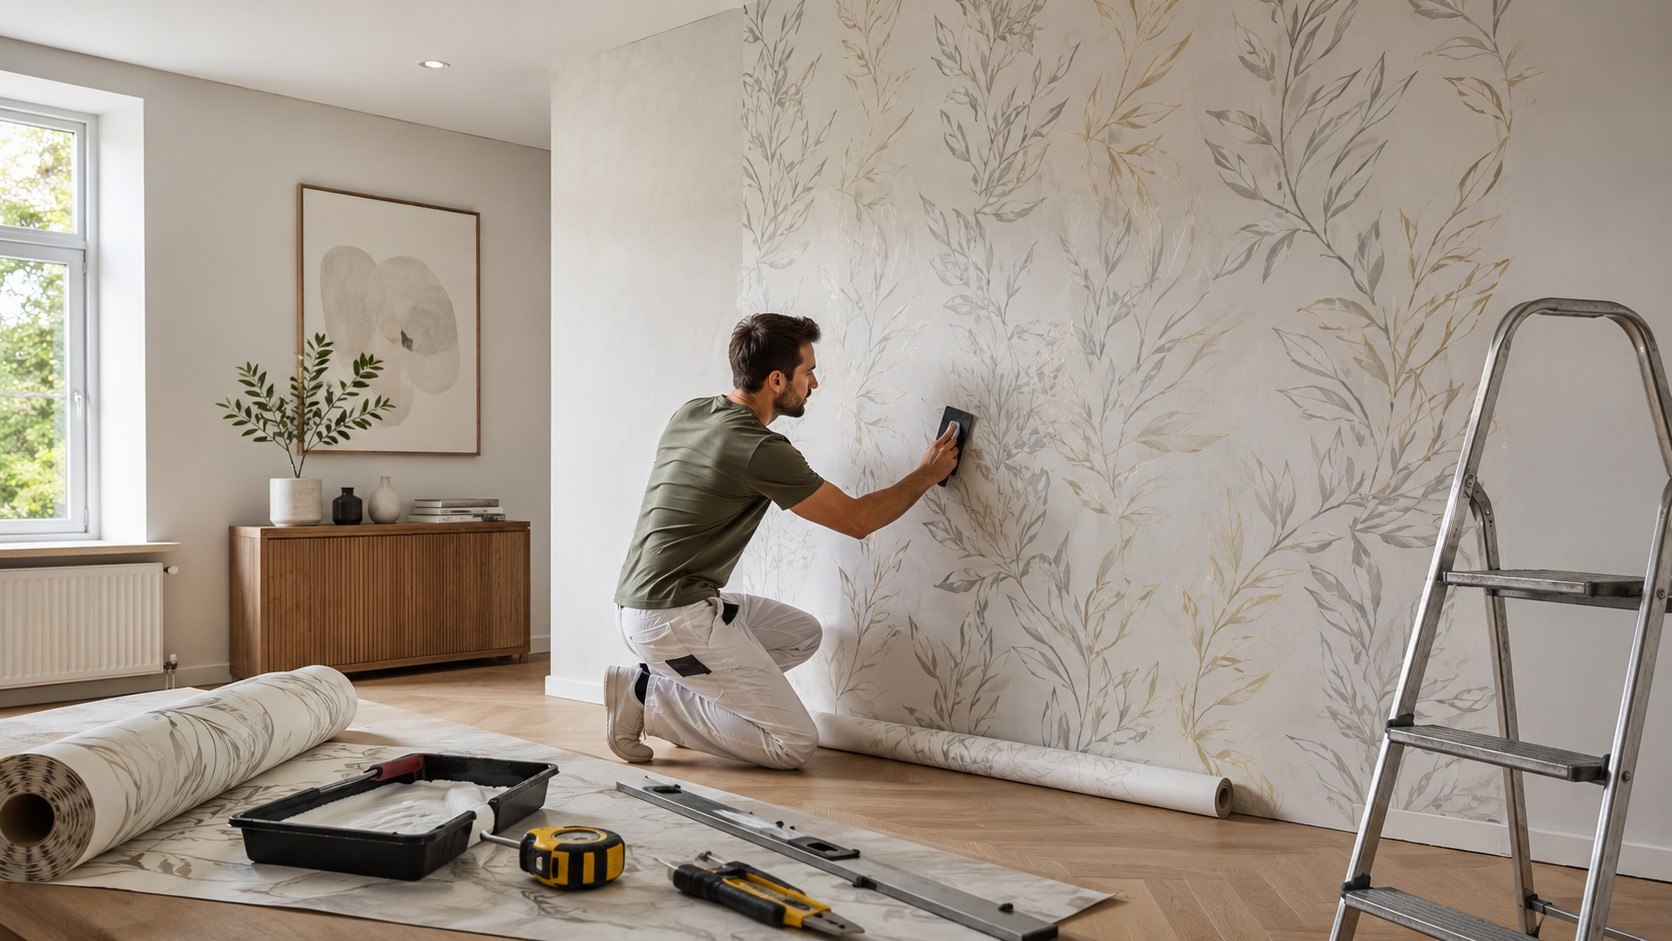
How to wallpaper a room yourself comes down to 3 things: prepare the wall, control the paste, and protect every seam. A first-time DIYer should reserve a full day for a small bedroom, plus drying time for repairs and primer. The hanging itself becomes much easier once the first strip is perfectly vertical, as the Baltimore Chronicle editorial team notes.
For most beginners, non-woven paste-the-wall wallpaper is easier than traditional paper. Do not start by unrolling expensive wallpaper across the floor. Inspect, patch, sand, clean, prime, measure, and establish a plumb line first.
“The first length or ‘drop’ of wallpaper is vital as all others will align to it.”
Graham & Brown, manufacturer installation guidance.
Starting with a crooked strip creates an error that becomes more visible with every new section.
Key takeaways before you start
- Prepare the wall until it feels smooth because wallpaper can reveal dents, ridges, dried paint, and uneven repairs.
- Use the adhesive specified for your wallpaper backing and spread it evenly without flooding corners or seams.
- Butt seams together without stretching the paper, then remove fresh paste before it dries on the finished surface.
Wallpaper can hide an old wall color, but it usually will not hide bad texture. Nail holes, rough joint compound, dried adhesive, and damaged drywall can remain visible after the paper dries. Glossy paint may also reduce adhesion unless the surface is prepared correctly.
Room design affects where the first strip should go. A fireplace, window, or other focal point may justify centering the pattern instead of beginning near a corner. Similar planning matters when using room dividers in modern interiors, where alignment changes how the room looks.
The wall must also be completely dry. Wallpaper should never be used to cover active dampness, damaged drywall, or an unresolved leak. Fix the source first and restore the surface before installation.
What you need for DIY wallpaper installation
A basic wallpaper kit is relatively inexpensive compared with the wallpaper itself. Homeowners who already own painting and drywall tools can reduce the setup cost. In 2026, common wallpaper adhesives in the US may cost roughly $9 for a quart and around $20–$35 for selected 1-gallon products, depending on brand and retailer.
- Wallpaper rolls from the same production or dye lot when applicable
- Wallpaper primer or sealer suitable for the wall
- Correct wallpaper paste
- Tape measure and pencil
- 4-ft. level, laser level, or plumb line
- Wallpaper smoother or hanging brush
- Seam roller if permitted by the manufacturer
- Sharp utility knife with spare blades
- Metal straightedge or broad taping knife
- Clean bucket, roller, brush, sponge, and lint-free cloths
- Step ladder and floor protection
Do not assume every adhesive works with every wallcovering. Vinyl, non-woven, natural fiber, traditional paper, and specialty coverings can require different products. The instructions supplied with the wallpaper should take priority over generic DIY advice.
Pattern repeat also affects how much material is needed. A large drop match can create much more waste than plain wallpaper. Buying all rolls together reduces the chance of discovering that a matching dye lot is unavailable halfway through the room.
Homeowners coordinating wallpaper with trim and doors may also find this guide to interior door materials and finishes useful when planning the final look.
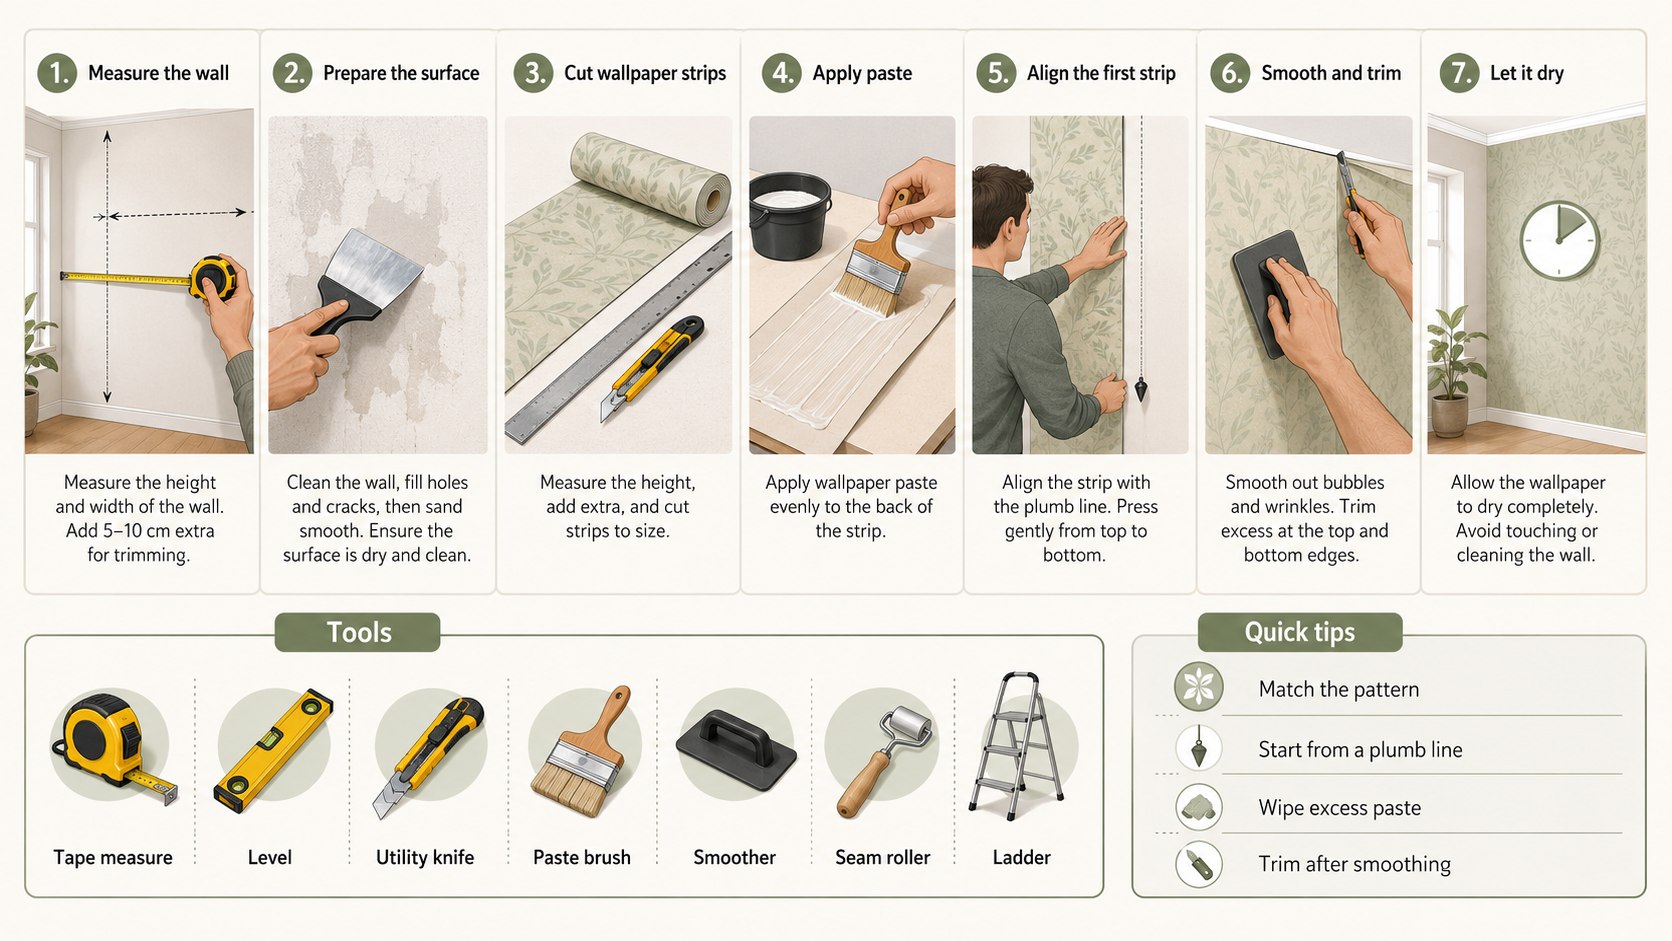
How to wallpaper a room yourself step by step
Step 1: Inspect and prepare the walls
Remove loose wallpaper, nails, hooks, switch plates, and visible debris. Fill dents and holes, allow the compound to dry, then sand repaired areas until the edges blend into the wall.
Good wallpaper wall preparation determines whether the finished surface will look flat. Thick wallpaper does not automatically hide poor drywall repairs. In some lighting, it can make defects easier to see.
Older US homes require extra caution during sanding. According to the US Environmental Protection Agency, homes built before 1978 are more likely to contain lead-based paint. Renovation work can create hazardous lead dust.
“Homes built before 1978 are more likely to have lead-based paint.”
US Environmental Protection Agency, Renovation, Repair and Painting Program guidance.
Step 2: Clean, prime, and let the wall dry
Remove sanding dust, grease, and residue with a cleaner suitable for the existing finish. Allow the surface to dry completely before applying primer or another preparation product recommended by the wallpaper manufacturer.
Primer helps create more even absorption and can make future wallpaper removal easier. Skipping it may cause adhesive to dry differently across patched drywall, bare areas, and painted surfaces.
A clean wall is not automatically ready for wallpaper because porosity and surface stability also affect adhesion.
Step 3: Measure the room and plan the pattern
Measure wall height in several locations because ceilings and floors are rarely perfectly level. When cutting strips, leave roughly 2–3 inches of extra material at the top and bottom unless the manufacturer specifies another allowance.
Understanding how to measure wallpaper means looking beyond basic square footage. Pattern repeat, usable roll length, wall height, and matching method all affect how many rolls are needed.
Plan where major motifs will fall near doors, windows, fireplaces, and other focal points. Avoid creating a tiny final strip beside a prominent corner or doorway. Moving the starting point slightly may produce a cleaner result.
Step 4: Mark a true vertical starting line
Use a level, laser, or plumb line instead of assuming the corner is straight. Mark a vertical line approximately 1 strip width from the starting point, adjusting it so excess paper can be trimmed into the corner.
This line controls every strip that follows. A common beginner mistake is aligning the first drop with an uneven corner and allowing later seams to drift farther from vertical.
Step 5: Apply the correct paste
For paste-the-wall wallpaper, spread adhesive over an area slightly wider than 1 strip. Use a brush near the ceiling, baseboard, and corners so narrow dry areas are not missed.
Traditional wallpaper often requires paste on the back of the paper and a manufacturer-specified booking period. Graham & Brown explains that its non-woven paste-the-wall products do not require soaking because the backing remains dimensionally stable. Its official wallpaper installation guide explains the different methods.
Using the wrong application method can lead to stretching, bubbles, stains, weak adhesion, or damaged backing.
| Wallpaper type | Where adhesive goes | Main DIY concern |
|---|---|---|
| Non-woven paste-the-wall | Wall | Even paste coverage |
| Traditional unpasted paper | Back of paper | Correct booking time |
| Pre-pasted paper | Factory adhesive is activated | Correct activation method |
| Peel-and-stick | No separate paste | Clean surface and careful positioning |
The backing type should be confirmed before opening any adhesive. Some manufacturers also specify a particular primer, paste, or surface condition.
Do not coat several walls at once. Work in manageable sections so the adhesive remains fresh when the paper reaches it. Keep rollers and brushes clean because dried paste particles can create visible bumps.
Paste on the finished surface should be removed using the cleaning method approved by the manufacturer. Delicate natural fibers and specialty papers may not tolerate heavy wiping. Test unfamiliar materials on an offcut first.
Peel-and-stick wallpaper may seem easier for renters, but removal depends heavily on the paint and substrate beneath it. Testing a hidden area can prevent damage later.
Step 6: Hang, smooth, and trim the first strip
Position the first strip against the plumb line while leaving extra material at the ceiling and baseboard. Smooth from the center outward with gentle pressure and keep the edge aligned with the vertical guide.
The goal of DIY wallpaper installation is strong contact without stretching the material. Pulling a wet strip sideways to force alignment may cause it to shrink toward its original shape during drying.
Crease the paper at the ceiling and baseboard before trimming against a metal straightedge. Use a fresh utility blade. A dull blade can pull wet fibers and tear an otherwise clean edge.
Step 7: Match the next strips and control the seams
Bring the next strip toward the previous one until the pattern matches. Most modern wallpaper seams are butted edge to edge rather than overlapped, unless the manufacturer instructs otherwise.
Wallpaper seams should meet without a visible gap and without one strip sitting on top of another. Use a seam roller lightly when the wallpaper allows it. Excessive pressure can squeeze adhesive away from the seam or flatten textured surfaces.
Remove fresh paste with a clean damp sponge when the wallpaper surface allows it. Do not scrub aggressively. Adhesive left until later may dry into a shiny patch.
Step 8: Handle corners, outlets, and the final strip
Inside corners are rarely square enough for a full-width strip to wrap cleanly. Measure to the corner, carry only a small amount of paper onto the next wall, then create another vertical reference before continuing.
Turn electrical power off before working around outlets and switches. Keep wet paste away from electrical boxes. Cut cautiously around each opening and reinstall covers after the wallpaper is positioned correctly.
For owners planning broader repairs before decorating, this Baltimore Chronicle guide to home inspections and common property defects gives additional context about problems worth addressing before cosmetic work.
The cleanest seam usually comes from accurate positioning, not from trying to repair a badly stretched strip afterward.
Wallpaper prep, paste, and seam mistakes that cost the most
Many visible wallpaper failures begin before the material has dried. Rushing repairs, using the wrong adhesive, or forcing a pattern into alignment can turn a manageable project into repeated seam repairs.
- Hanging wallpaper over dusty or chalky walls reduces reliable adhesion.
- Starting from a crooked corner sends later strips progressively out of plumb.
- Using too little paste can create dry edges and loose seams.
- Applying too much adhesive increases squeeze-out and cleanup problems.
- Stretching wet wallpaper can create gaps after drying.
- Pressing a seam roller too hard may damage texture or displace adhesive.
- Using a dull blade can tear damp wallpaper during trimming.
Patterned wallpaper deserves slower installation than plain paper. Match the design near normal eye level before smoothing the entire strip. Once a large section has been firmly pressed into adhesive, repositioning becomes more difficult.
Keep several replacement blades nearby and change them frequently. Wallpaper, adhesive, and drywall residue can dull an edge quickly. A small pack of blades costs far less than replacing a damaged strip.
Stop working if alignment begins deteriorating from fatigue. Paste-the-wall products make breaks easier because only the immediate working area requires fresh adhesive. Resume by checking the last seam and reestablishing the next drop carefully.
Do not judge every minor bubble while the adhesive remains wet. Some shallow moisture pockets settle during normal drying. Persistent bubbles may indicate poor contact beneath the paper.
Troubleshooting common wallpaper problems
Small defects are usually easier to correct before the paste fully sets. The repair should address the cause instead of simply applying more pressure.
- Seam opens while drying: check for stretching or insufficient adhesive. Lift carefully and use compatible seam adhesive if permitted.
- Bubble remains: lift the nearest edge when possible, restore adhesive contact, and smooth trapped air toward that edge.
- Pattern drifts: stop and establish a new vertical line instead of compensating across several strips.
- Paste appears on the surface: remove it promptly using the wallpaper maker’s approved cleaning method.
- Paper lifts near trim: check for a dry adhesive band near the ceiling, baseboard, window, or door casing.
Do not automatically puncture every bubble. A visible pocket may be caused by moisture beneath the wallpaper and may change as drying continues. Follow the manufacturer’s guidance before cutting the material.
Repeated open seams usually indicate a broader installation problem. Possible causes include an absorbent unprimed wall, incorrect adhesive, stretched paper, or too little paste along the edge.
Pattern mismatch cannot always be hidden by rolling the seam. If the mistake is obvious while the paste remains workable, lifting and repositioning the strip is usually cleaner than forcing the design sideways.
Grasscloth, flocked coverings, and other specialty materials can require different installation methods. When wallpaper costs hundreds of dollars per roll, professional installation may cost less than replacing damaged material.
How much DIY wallpapering can cost in 2026
Wallpaper itself creates the largest price difference between projects. Basic rolls may cost well under $100, while designer and specialty wallcoverings can cost several times more. Always check actual roll coverage because manufacturers use different dimensions and packaging conventions.
| Item | Typical 2026 planning range | What affects the cost |
|---|---|---|
| Wallpaper adhesive | About $9–$35 | Container size and formula |
| Wallpaper primer | About $30–$60 per gallon | Surface and product type |
| Smoother or basic tool kit | About $8–$60 | Number and quality of tools |
| Wallpaper | Varies widely | Brand, material, roll size, pattern |
Current US retail pricing in 2026 commonly places small containers of wallpaper adhesive near $9, while selected gallon-size products may fall around $20–$35. Primer often adds another $30–$60 per gallon. Local store prices and product availability can differ.
Do not estimate wallpaper solely from wall square footage. Doors and windows reduce the covered area, but matching a repeating pattern increases waste. Those factors do not always cancel each other.
Ordering 1 additional roll may make sense for complicated patterns or later repairs, particularly when matching production batches matters. Check the retailer’s return policy before intentionally purchasing extra material.
Keep useful offcuts after installation. A matching piece can help repair future damage near switches, furniture impact points, or access openings.
FAQ
Can a beginner wallpaper an entire room?
Yes. Non-woven paste-the-wall wallpaper is generally one of the easier options for first-time installers. Start with careful preparation and spend extra time on the first 2 strips.
Should wallpaper seams overlap?
Most modern wallpaper uses butt seams, where the edges meet without overlapping. Specialty wallcoverings may use a different method, so follow the product instructions.
Do walls need primer before wallpaper?
Primer is commonly recommended because it creates a more uniform surface and can improve later removal. Fresh drywall, patched surfaces, and porous walls benefit most from proper preparation.
Is paste-the-wall wallpaper easier for beginners?
Usually. The strip remains dry during installation, and there is no traditional booking stage. The correct technique still depends on the specific wallpaper.
How long does it take to wallpaper a room yourself?
A beginner should generally reserve a full working day for a straightforward small bedroom. Wall repairs, primer drying, complex patterns, alcoves, and uneven corners can extend the project.
Why do wallpaper seams open after drying?
Common causes include stretched paper, insufficient adhesive, poor wall preparation, or incorrect installation technique. Correcting the cause is more effective than simply pressing the seam harder.
Earlier we wrote about Rent Increase Laws 2026: How Much Landlords Can Raise Rent and When Notice Is Required