


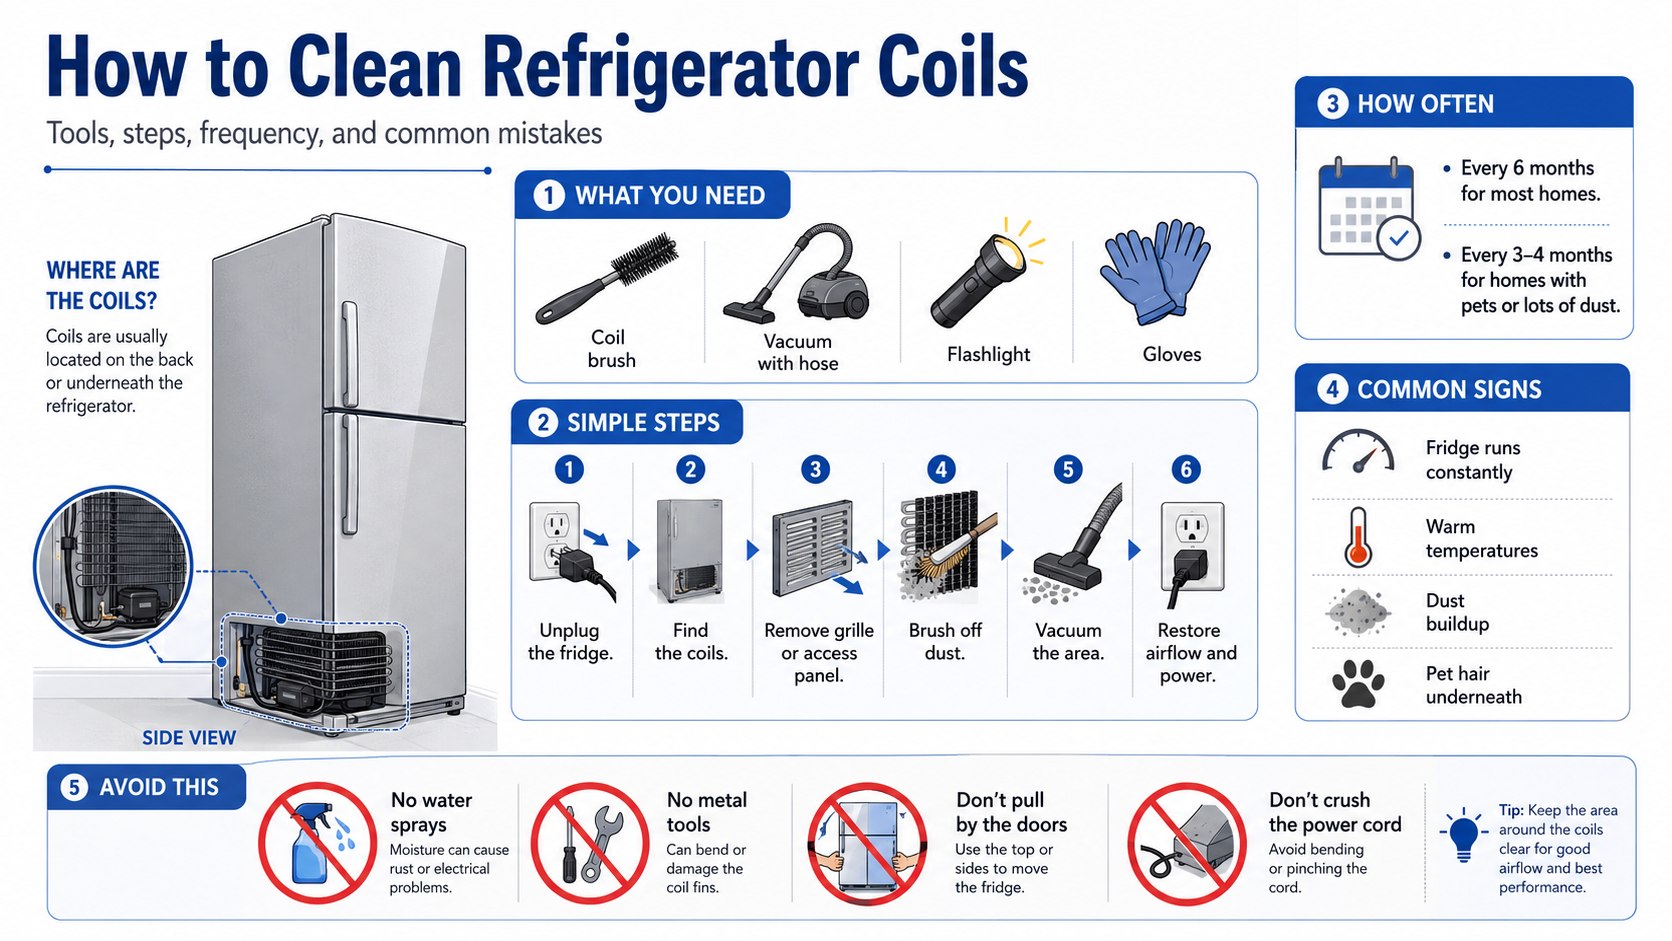
Learning how to clean refrigerator coils takes about 20–30 minutes, costs less than $20 if you need a coil brush, and can help a refrigerator cool more consistently. The fix is simple: unplug the fridge, expose the coils, remove dust with a brush and vacuum, then restore airflow around the appliance, аs noted by Baltimore Chronicle.
If the refrigerator is warm, running constantly, buzzing more than usual, or collecting pet hair underneath, clean the coils before calling for service. For many US households, this is the lowest-cost first step before replacing parts or scheduling a $100–$250 appliance repair visit in 2026.
Key takeaways
- Most homes should clean refrigerator coils every 6 months; pet-heavy or dusty homes may need every 3–4 months.
- A coil brush, vacuum crevice tool, flashlight, and gloves usually cover the job for under $25 in 2026.
- Never scrape coils with metal tools, spray them with water, or pull the refrigerator by its doors or handles.
What you need
The job does not require a specialty appliance kit, but the right tools make it faster and safer. A refrigerator coil brush is usually the only item homeowners and renters may not already own.
- Time: 20–30 minutes for a standard cleaning, 45 minutes for a neglected or pet-heavy kitchen.
- Money: about $6–$15 for a refrigerator coil brush in 2026; $8–$25 for a vacuum crevice attachment if needed.
- Tools: coil brush, vacuum with hose, soft brush attachment, flashlight, microfiber cloth, work gloves.
- Optional items: screwdriver, dust mask, knee pad, phone camera for documenting panel placement.
- Documents: owner’s manual or model number sticker, usually inside the refrigerator wall or door frame.
- Safety: access to the outlet, enough floor space to move the fridge without pinching the water line.
For related appliance maintenance, Baltimore Chronicle’s guide to how to fix a refrigerator not cooling can help separate a simple coil-cleaning issue from a cooling failure that needs repair.
How to clean refrigerator coils safely in 2026
Refrigerator condenser coils release heat from the cooling system. When dust, lint, and pet hair cover them, the compressor has to work harder to move heat away from the appliance.
The US Department of Energy’s Energy Saver guidance recommends cleaning underneath the refrigerator and using a specialized cleaning wand to gently sweep condenser coils. ENERGY STAR also advises leaving a few inches between the wall and the refrigerator and keeping coils clean on older models.
Editorial rule of thumb: if the fridge runs longer than usual and the floor under it has visible dust, clean the coils before assuming the compressor is failing.
Coil location depends on the refrigerator design. Older GE, Frigidaire, Whirlpool, Maytag, Samsung, LG, and KitchenAid models often have coils on the back or behind a bottom grille. Some newer designs use enclosed or “never clean” condenser systems, so the owner’s manual should control.
| Coil location | Where to look | Best tool | Common mistake |
|---|---|---|---|
| Back-mounted coils | Rear of the refrigerator | Coil brush plus vacuum hose | Pushing the fridge back onto the cord |
| Bottom-front coils | Behind the toe grille | Vacuum brush and narrow coil brush | Snapping grille clips by pulling too hard |
| Bottom-rear coils | Behind a rear access panel | Screwdriver, flashlight, vacuum | Removing panels while power is connected |
| Enclosed condenser | Compressor housing | Manual-specific cleaning only | Forcing open a sealed housing |
Step 1: Unplug the refrigerator and protect the floor
Unplug the refrigerator before touching coils, panels, or the rear compartment. If the outlet is hard to reach, shut off the matching kitchen circuit at the breaker and confirm the light inside the fridge is off.
This matters because condenser areas sit close to electrical parts, moving fans, and metal edges. Power should be disconnected before any cleaning tool goes under or behind the appliance.
The common mistake is pulling the refrigerator by the door handles. Pull from the sides of the cabinet, and use sliders or cardboard on wood, vinyl, or tile floors.
Step 2: Find the condenser coils
Look behind the bottom front grille first, then behind the refrigerator if the grille area does not show coils. Use a flashlight and check the owner’s manual for your exact model.
This matters because the wrong access point wastes time and can break grille clips, water lines, or thin rear panels. Whirlpool’s support instructions, for example, describe cleaning through the base grille on many full-size models, while other refrigerators require rear access.
The common mistake is assuming every refrigerator has visible coils. Some GE “NeverClean” designs place coils in a compressor housing, and aggressive disassembly can create a bigger repair problem.
Step 3: Remove the grille or access panel
For a bottom grille, open the refrigerator doors if needed, then pull or release the grille according to the manual. For a rear panel, remove only the screws needed to expose the coil area and keep them in a cup.
This matters because the grille and panel control airflow. A loose or missing cover can change how air moves around the condenser and compressor.
The common mistake is bending the grille or mixing up screws. Take a quick phone photo before removing anything so the parts go back in the same position.
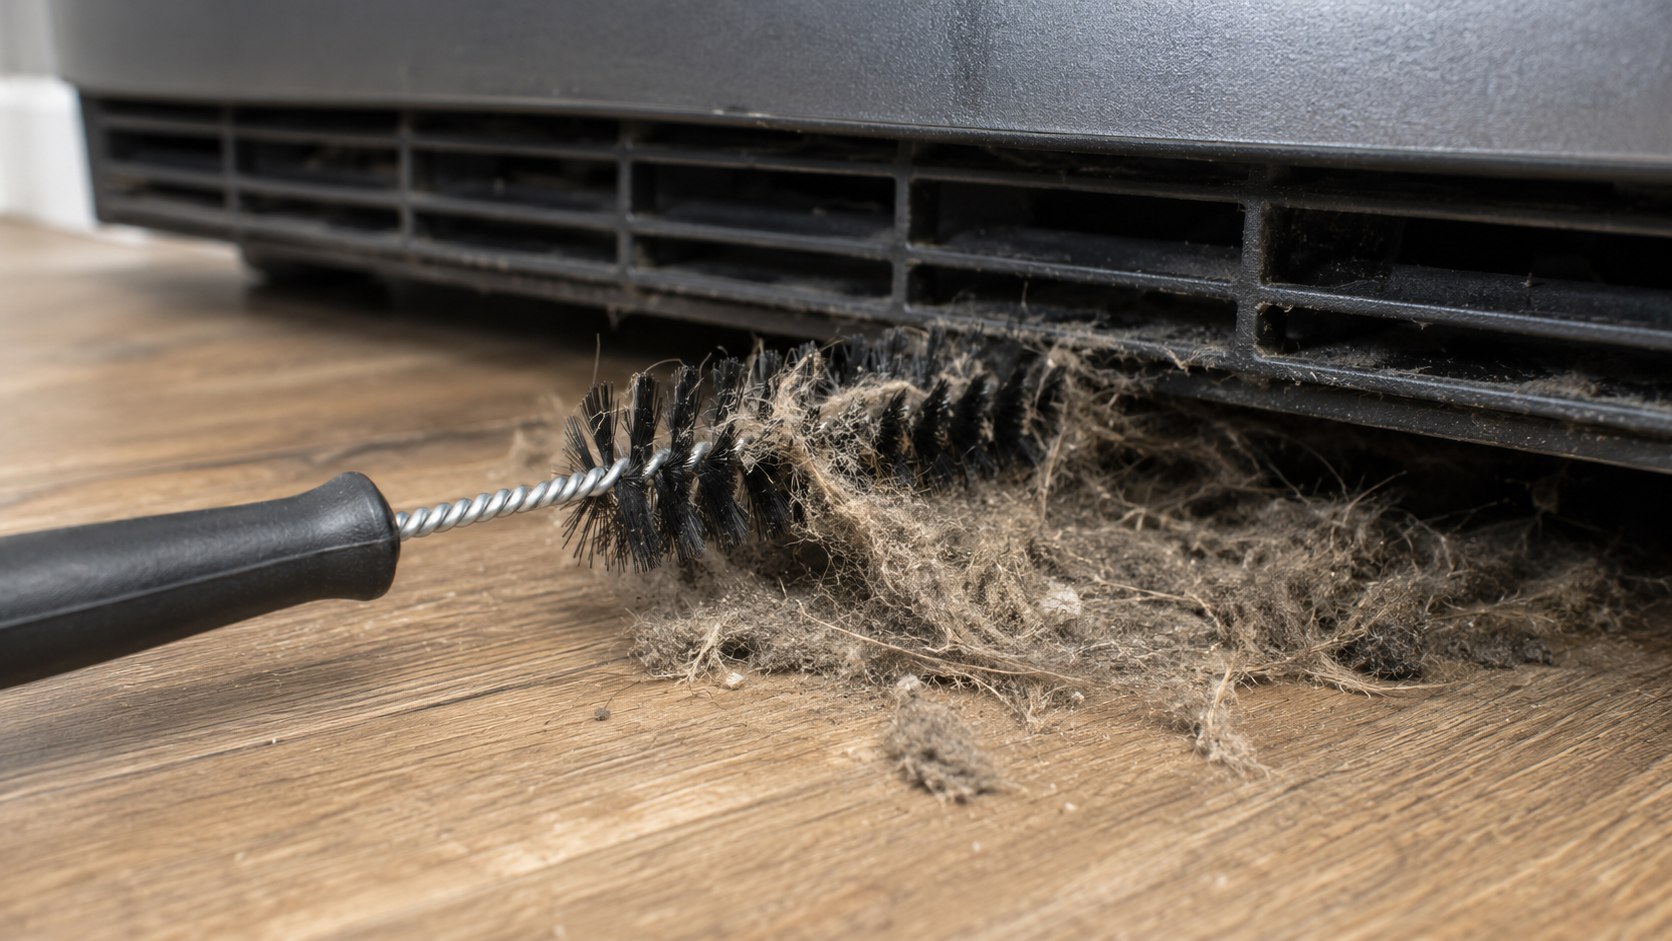
Step 4: Brush dust off the coils
Use a refrigerator coil brush to loosen dust, pet hair, lint, and kitchen debris. Move the brush gently in the direction that fits the coil shape, without jamming it into wires, tubing, or fan blades.
This matters because brushing breaks up compacted debris that a vacuum alone may not lift. It is the main difference between a surface cleaning and real refrigerator coil cleaning.
The common mistake is using a wire brush, screwdriver, butter knife, or wet rag. Condenser tubing and fins can bend or puncture, and water does not belong near electrical components.
Step 5: Vacuum the coil area and floor
Vacuum the loosened dust from the coils, grille, floor, wall, and rear compartment. Use a soft brush attachment for exposed areas and a crevice tool for narrow gaps.
This matters because loose debris can get pulled back into the condenser as soon as the fan starts again. Cleaning the surrounding floor helps the work last longer.
The common mistake is pressing the vacuum nozzle hard against the coils. Keep light contact and let suction do the work, especially on older units in rental homes or garages.
Step 6: Check airflow clearance around the fridge
Before pushing the refrigerator back, leave room for ventilation according to the owner’s manual. A practical target for many kitchens is at least 1–2 inches at the rear and enough top or side clearance for warm air to escape, unless the manufacturer specifies otherwise.
This matters because clean coils still need air movement. Tight built-ins, packed pantry walls, and garage refrigerators in hot states such as Arizona, Texas, Nevada, and Florida can run harder when airflow is restricted.
The common mistake is pushing the refrigerator flat against the wall. That can pinch the power cord or water line and trap heat behind the cabinet.
Step 7: Reinstall panels and restore power
Reattach the grille or rear panel, then plug the refrigerator back in. Listen for normal fan and compressor operation, and confirm the interior light turns on.
This matters because panels often direct airflow across the condenser. Running the refrigerator with a missing panel can reduce cooling performance on some models.
The common mistake is leaving screws out because the panel “seems fine.” Loose panels can rattle, block airflow, or fall into the rear compartment.
Step 8: Monitor temperatures for the next 24 hours
Set the refrigerator to about 37°F and the freezer to 0°F, then check temperatures after several hours with an appliance thermometer. Avoid repeated door opening while the system stabilizes.
This matters because coil cleaning helps heat transfer, but it may not instantly fix a failing fan, bad door gasket, dirty evaporator coil, or low refrigerant issue. If temperatures remain unsafe, move perishable food and consider service.
The common mistake is turning the thermostat to the coldest setting immediately. That can mask the real issue and may cause freezing in the fresh-food section.
How often to clean refrigerator coils
For most US homes, clean coils every 6 months. Homes with shedding pets, carpeted kitchens, dusty roads, wildfire smoke exposure, or a garage refrigerator should move closer to every 3–4 months.
Frequency also depends on the state and room conditions. A refrigerator in a cool Minnesota basement has a different workload than a garage unit in Phoenix, Las Vegas, Dallas, or Orlando during summer.
| Household situation | Suggested frequency | Why it matters |
|---|---|---|
| No pets, clean kitchen, newer refrigerator | Every 6–12 months | Dust buildup is usually slower |
| One or more pets | Every 3–6 months | Hair collects around the condenser fan |
| Garage or basement refrigerator | Every 3–4 months | More dust, insects, and temperature swings |
| Older back-coil refrigerator | Every 6 months | Exposed coils collect visible dust faster |
| Recent remodel, drywall work, or wildfire smoke | Immediately, then recheck in 1 month | Fine particles can coat coils quickly |
For broader home energy planning, Baltimore Chronicle’s guide to choosing a backup generator for your home explains how essential appliances such as refrigerators fit into emergency power needs.
Tool and cost guide for 2026
A basic condenser coil brush is enough for most refrigerators. In 2026, common universal coil brushes from brands such as Frigidaire, Whirlpool, and generic hardware-store lines usually fall around $6–$15, depending on length and retailer.
A vacuum with a hose is more important than a premium brush. If your vacuum does not have a crevice tool, a replacement attachment often costs about $8–$25 as of 2026.
Professional appliance service is not necessary for routine clean fridge coils work unless the refrigerator is built in, unusually heavy, connected to a fragile water line, or already showing cooling failure. A diagnostic visit from an appliance technician commonly runs about $100–$250 in many US metro areas in 2026, before parts.
Best tools by refrigerator type
- Back-coil refrigerator: long coil brush, vacuum hose, microfiber cloth.
- Bottom-grille refrigerator: narrow brush, crevice tool, flashlight.
- Garage refrigerator: dust mask, shop vacuum, soft brush attachment.
- Built-in refrigerator: owner’s manual, grille cleaning brush, manufacturer-approved access instructions.
- Pet-heavy home: coil brush plus monthly vacuuming around the toe grille.
Do not buy chemical sprays for this job. Dry cleaning is safer for most exposed condenser areas and aligns better with manufacturer-style maintenance instructions.
Troubleshooting after cleaning the coils
If the refrigerator still struggles after cleaning, the coils may not have been the only problem. Use these scenarios before deciding whether to call a technician.
- Fridge still warm after 24 hours: check door gaskets, blocked interior vents, freezer frost buildup, and fan noise.
- Compressor runs constantly: confirm rear clearance, room temperature, dirty door seals, and thermostat setting.
- Rattle after cleaning: inspect the grille or rear panel for loose clips or missing screws.
- Burning smell or hot electrical odor: unplug the refrigerator and schedule service instead of continuing DIY work.
- Water line leaks after moving fridge: shut off the water supply valve and inspect the compression fitting or plastic tube.
A dirty condenser is a common cause of poor performance, but it is not the only one. If the appliance still runs warm after cleaning, the issue may fit a broader cooling-failure pattern covered in Baltimore Chronicle’s guide to how to fix a refrigerator not cooling.
Mistakes that can damage the refrigerator
The safest way to vacuum refrigerator coils is slow, dry, and gentle. Most expensive mistakes come from rushing, pulling too hard, or using the wrong cleaning tool.
- Do not clean coils while the refrigerator is plugged in.
- Do not spray water, degreaser, vinegar, or all-purpose cleaner into the coil area.
- Do not bend copper tubing, aluminum fins, fan blades, or wiring harnesses.
- Do not remove sealed panels that the manual does not identify as service access panels.
- Do not push the refrigerator back without checking the cord and water line.
- Do not skip temperature checks after the cleaning.
Renters should also check the lease before moving a built-in or water-connected refrigerator. In apartments in New York, California, Illinois, Maryland, and other states with dense rental housing, property managers may prefer to handle appliance movement to avoid floor or water-line damage.
For cleaning routines around stainless steel appliances, floors, and busy kitchens, Baltimore Chronicle’s article on keeping a busy suburban home truly clean gives useful context for avoiding damage during regular maintenance.
FAQ
How do I know if my refrigerator coils are dirty?
Common signs include longer run times, warmer fridge temperatures, more heat behind or underneath the refrigerator, and visible dust around the bottom grille. Pet hair near the toe kick is another strong clue.
Can I clean refrigerator coils without moving the fridge?
Sometimes. If the coils are behind the front bottom grille, you may be able to clean them from the front with a coil brush and vacuum. Rear-mounted coils usually require carefully moving the refrigerator away from the wall.
How long after cleaning coils will the fridge cool better?
Some improvement may appear within a few hours, but temperature should be judged over 24 hours. Use an appliance thermometer rather than relying only on the control panel setting.
Is it safe to use compressed air on refrigerator coils?
Compressed air can blow dust deeper into the appliance or across the kitchen. A coil brush and vacuum are usually cleaner and safer for routine refrigerator maintenance.
Do modern refrigerators still need coil cleaning?
Many still benefit from it, but some newer models have enclosed condenser designs with different maintenance needs. Check the owner’s manual for GE, Whirlpool, LG, Samsung, Frigidaire, Maytag, Bosch, or KitchenAid before removing panels.
When should I call a professional instead?
Call a technician if the refrigerator has a burning smell, a nonworking condenser fan, repeated temperature failures, leaking water connections, or a built-in installation that cannot be moved safely.
Earlier we wrote about How to Back Up iPhone to iCloud in 2026: Settings, Storage Plans, and Fixes