


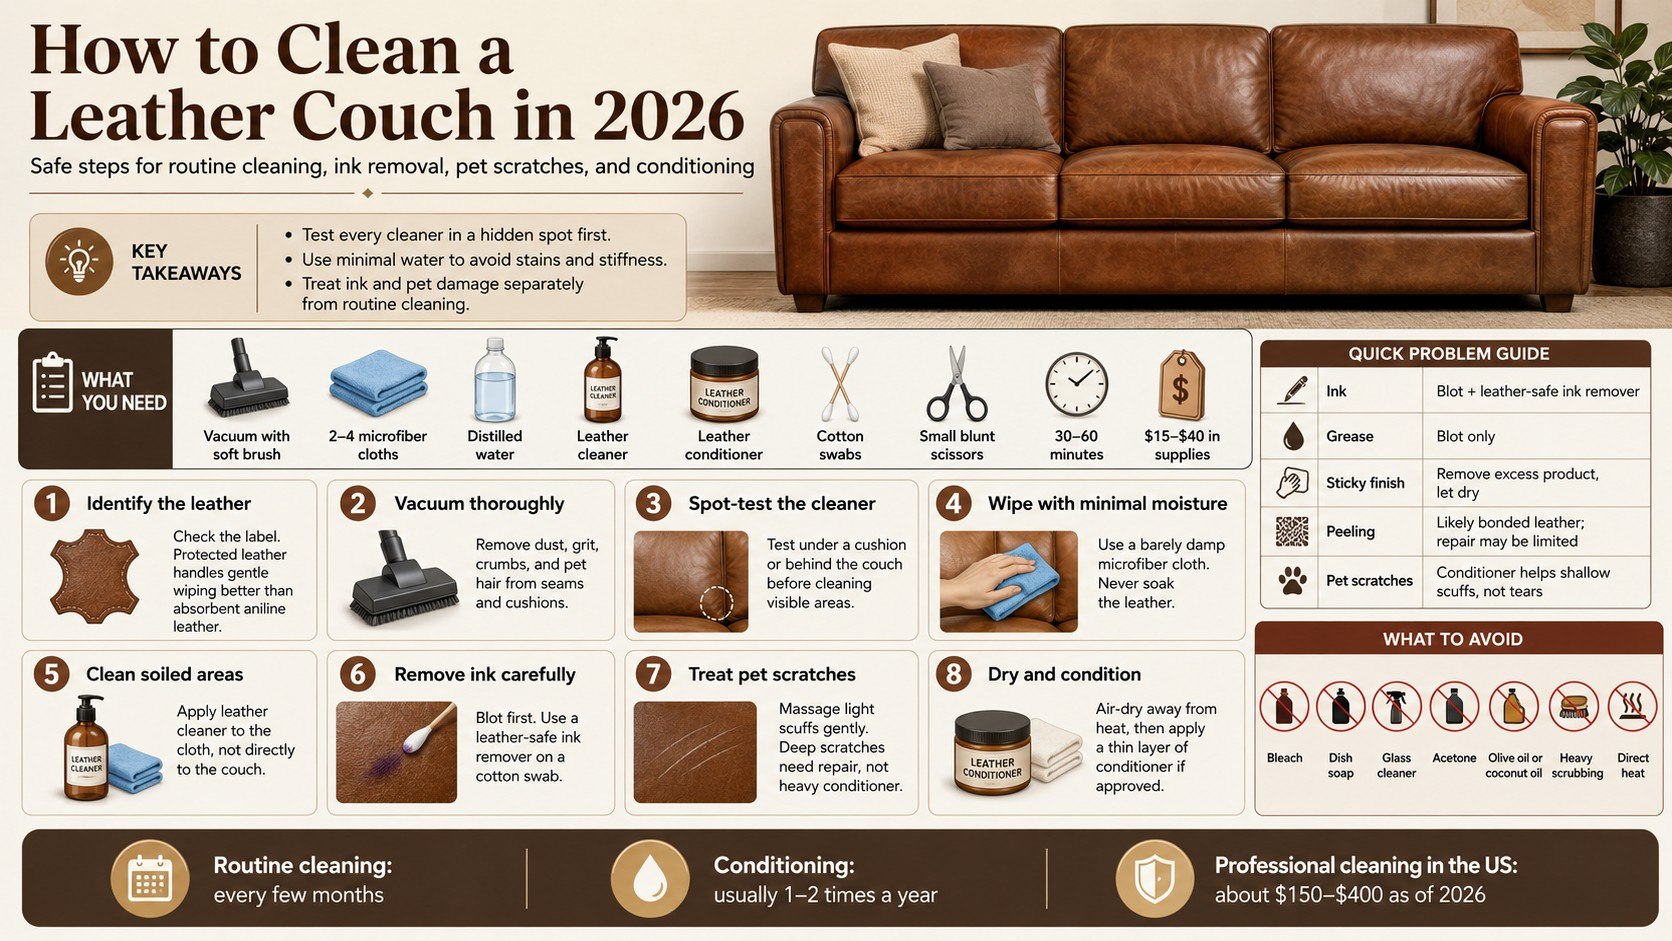
How to clean a leather couch safely begins with identifying its finish, removing abrasive dirt, and using as little moisture as possible. A routine cleaning takes about 30 minutes, while conditioning and drying may require several hours, as noted by the Baltimore Chronicle.
For most protected leather couches, vacuum the seams, wipe each panel with a barely damp microfiber cloth, and use a cleaner designed for leather furniture. Treat ink separately, inspect pet scratches before applying conditioner, and never soak the upholstery.
Key takeaways
- Test every cleaner behind a cushion because coatings, dyes, and previous repairs may react differently.
- Use minimal water because saturated leather can develop dark patches, stiffness, rings, or uneven color.
- Treat ink and pet damage separately instead of scrubbing them during routine couch cleaning.
What You Need to Clean a Leather Couch
A safe cleaning session does not require expensive equipment. Most homeowners and renters already have several of the necessary tools.
- A vacuum with a soft upholstery brush and crevice attachment
- 2 to 4 clean white microfiber cloths
- A bowl of distilled water
- A leather-specific furniture cleaner
- A compatible leather conditioner
- Cotton swabs for precise ink treatment
- Small blunt-tip scissors for detached fibers
- Clean towels and 30 to 60 minutes of working time
- A budget of about $15 to $40 for products in 2026
White cloths make dirt and transferred dye easier to detect. Distilled water also reduces the risk of mineral residue in regions with hard tap water.
Common US brands include Leather Honey, Lexol, Weiman, Chemical Guys, and Furniture Clinic. In 2026, a cleaner and conditioner set usually costs about $20 to $40, depending on bottle size and retailer.
Do not assume that a higher price means the product suits every leather type. Some conditioners work well on absorbent leather but leave coated upholstery greasy or sticky.
Keep paper towels, disinfecting wipes, furniture polish, bleach, and degreasers away from the couch. These products may dry the finish or create permanent shiny patches.
Before cleaning, read the care label beneath the cushions. If the couch is fabric rather than leather, follow Baltimore Chronicle’s separate guide on how to clean a fabric couch at home.
Step 1: Identify the Leather Type
Check the manufacturer’s tag, purchase receipt, or product page. Determine whether the couch uses protected leather, aniline leather, semi-aniline leather, nubuck, suede, bonded leather, or synthetic material.
This matters because leather sofa cleaning methods are not interchangeable. Protected leather usually tolerates gentle wiping, while aniline leather absorbs moisture and stains quickly.
Place 1 small drop of distilled water in a hidden area. If it remains on the surface, the leather probably has a protective coating.
If the test area darkens immediately, stop. The couch may have an absorbent finish that requires professional cleaning or manufacturer-approved products.
Do not treat bonded leather like full-grain leather. Bonded surfaces can peel when exposed to aggressive rubbing, solvents, or oily treatments.
Step 2: Vacuum the Couch and Inspect Its Condition
Remove loose cushions and vacuum the couch using a soft upholstery attachment. Clean the seams, piping, reclining mechanisms, and spaces between the seat and back.
This removes sand, crumbs, pet hair, and grit that could scratch the finish during wiping. It also reveals concealed stains and damaged areas.
Do not press a hard plastic nozzle directly against the surface. Stiff attachments and metal edges may leave marks that resemble pet scratches.
Inspect the couch in natural daylight after vacuuming. Look for ink, grease, sticky residue, fading, peeling, punctures, scratches, and previous repairs.
Photograph serious damage before treatment. The images will help a repair technician assess the couch if home cleaning does not work.
Step 3: Test the Cleaner in a Hidden Area
Apply a small amount of cleaner behind the couch or under a removable cushion. Use the same cloth and technique planned for visible surfaces.
Allow the test area to dry completely. Check for lightening, darkening, stickiness, gloss changes, dye transfer, or a visible border.
A hidden test reduces the risk of damaging an entire panel. It may also reveal whether an older couch has been recolored.
Do not evaluate the result while the leather remains wet. Temporary darkening can disappear, while chemical damage may emerge during drying.
Stop using the product if the couch color transfers heavily onto the cloth. Continuing may strip the protective finish.
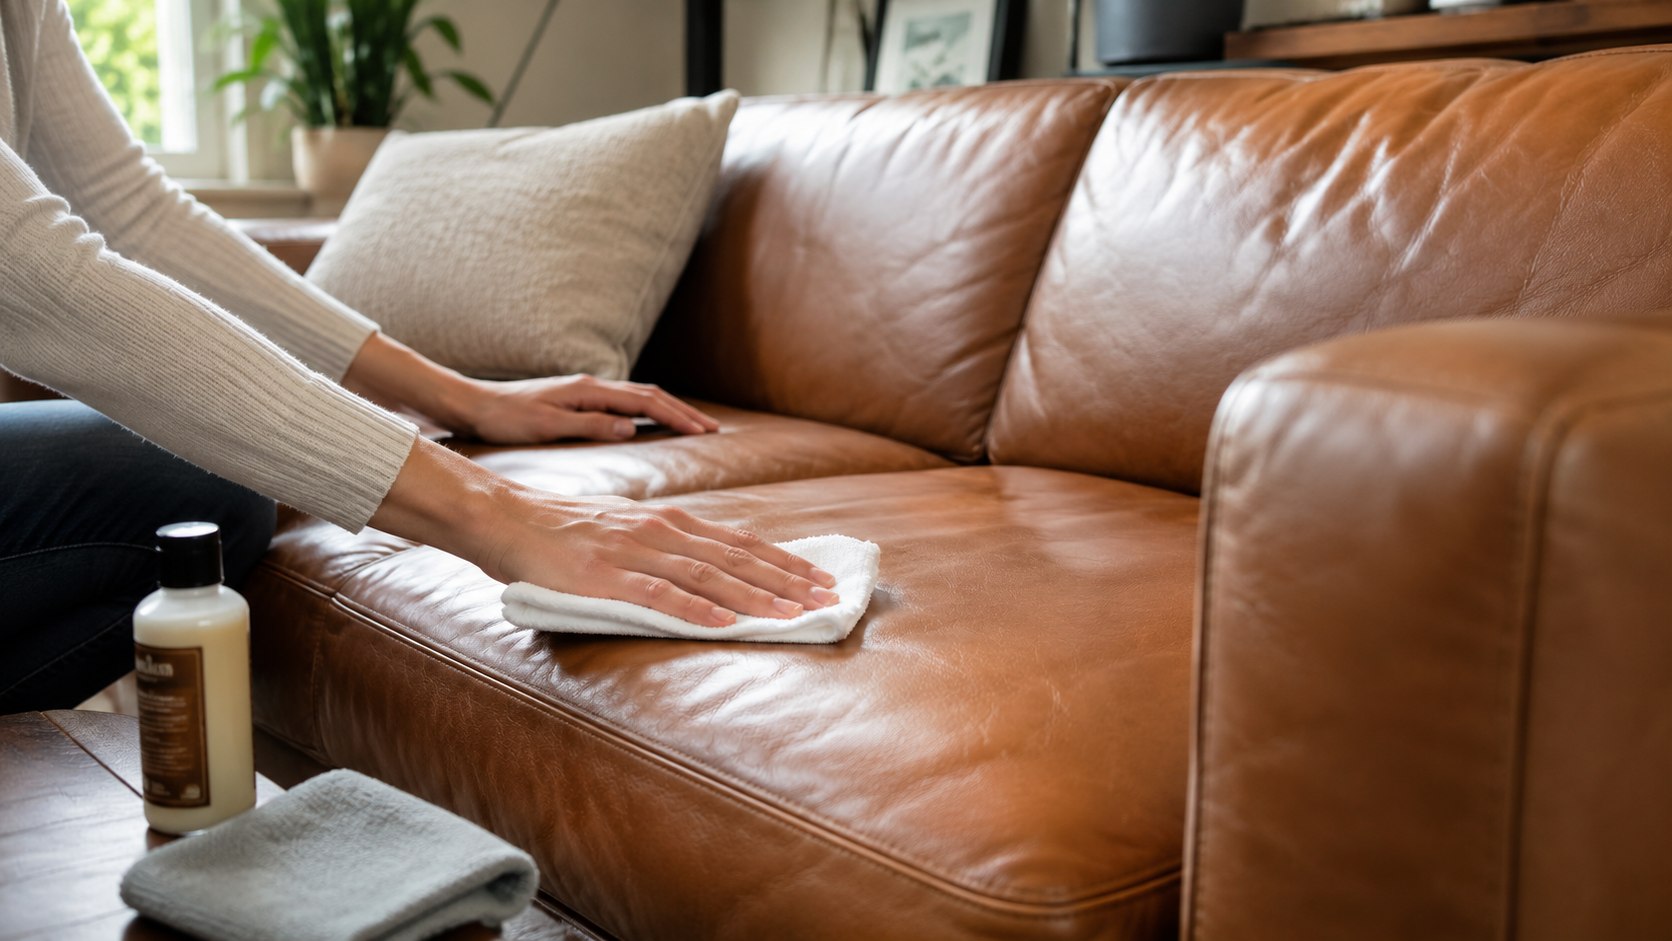
Step 4: Remove Surface Dirt With Minimal Moisture
Dampen a microfiber cloth with distilled water and wring it thoroughly. The cloth should feel cool but should not drip when squeezed.
Wipe one small panel at a time with light, overlapping passes. Follow the grain and support loose cushion edges with your free hand.
This removes ordinary dust, light residue, and some body oils without flooding the upholstery. Work from the cleaner upper sections toward heavily used seats and armrests.
Do not scrub rapidly from side to side. Aggressive friction can polish matte leather, weaken bonded material, or push dirt deeper into textured grain.
If the couch already has extensive peeling or structural damage, compare repair costs with current replacement options. Baltimore Chronicle’s ranking of the best furniture stores in the USA for 2026 covers sofa retailers across several price ranges.
Step 5: Clean Heavily Soiled Areas
Apply the leather cleaner to a cloth or foam applicator rather than spraying it directly onto the couch. Work across complete panels instead of treating only the darkest spot.
Use small circular movements with light pressure. Remove loosened residue with another barely damp cloth and change cloth surfaces frequently.
This controlled technique reduces water rings and uneven patches. It is especially useful on armrests, headrests, and seats exposed to skin oils.
Do not use dish soap, acetone, bleach, glass cleaner, or multipurpose household spray. These products can remove protective coatings or leave sticky residue.
Clean seams carefully but do not force liquid into them. Moisture trapped inside cushions may create odor and slow drying.
Step 6: Remove Ink From the Leather Couch
Fresh ink requires immediate blotting with a clean white cloth. Work from the outside edge toward the center to prevent the mark from spreading.
Use a manufacturer-approved leather ink remover on a cotton swab after testing it in a hidden area. Touch only the stained section and blot away lifted pigment.
This narrow application protects the surrounding dye. Ink can penetrate unfinished or aniline leather quickly, making professional treatment safer than repeated experiments.
Do not pour rubbing alcohol directly onto the couch. Alcohol may dissolve ink, but it can also strip color and leave a pale ring.
The safest first response depends on the type of stain or damage.
| Problem | Safest first action | What to avoid |
|---|---|---|
| Fresh ballpoint ink | Blot and apply approved ink remover | Wiping across the stain |
| Old ink mark | Contact a leather repair technician | Repeated solvent applications |
| Grease stain | Blot without adding water | Heat and aggressive scrubbing |
| Sticky residue | Use a tested leather cleaner | Household degreaser |
| Unknown dark mark | Photograph and test discreetly | Mixing several products |
Ink removal becomes less predictable after the stain dries. Blue and black ballpoint inks may also contain different pigments and solvents.
A stain on protected leather may remain near the surface. The same ink can migrate deeply into unfinished aniline leather.
Stop treatment when the couch color begins transferring onto the swab. Continuing may replace a small ink mark with a larger faded area.
Professional repair is usually preferable for valuable couches from Stickley, Hancock & Moore, Restoration Hardware, or similar brands. Ask for a written estimate before authorizing recoloring.
In California, Texas, Florida, Maryland, and New York, a local repair visit may cost about $100 to $300 in 2026. Extensive panel replacement or recoloring can cost considerably more.
Step 7: Treat Pet Scratches and Claw Damage
Clean the damaged section gently and allow it to dry. Separate shallow surface scuffs from punctures, tears, peeling, and missing material.
For light scratches, massage the leather carefully with a clean fingertip. Mild pressure may reduce contrast on some aniline finishes.
A compatible conditioner can soften minor scuffs, but it cannot rebuild missing leather. Deep claw marks usually require filler, colorant, and a protective topcoat.
Trim only fibers that are fully detached. Never cut raised leather that remains connected to the couch.
Use this sequence before attempting a home repair:
- Photograph the damage in daylight.
- Vacuum and clean the surrounding area.
- Trim only loose, detached fibers.
- Test conditioner away from the scratch.
- Apply a minimal amount when permitted.
- Stop if the color becomes uneven.
- Call a technician for punctures or open tears.
Pet scratches are easier to repair before dust and body oils collect inside them. A clean groove creates a better surface for filler and colorant.
Do-it-yourself leather repair kits usually cost $15 to $40 in 2026. They perform best on small areas of protected leather with simple, solid colors.
Large cushions and two-tone finishes are harder to match. A poor repair may remain visible in daylight even when indoor lighting hides it.
Place a washable throw over your pet’s preferred seat afterward. Cat owners can add a stable scratching post near the couch.
If repair costs exceed the couch’s practical value, Baltimore Chronicle’s guide on how to sell used furniture fast in the USA explains pricing, photographs, descriptions, and local marketplace listings.
Step 8: Dry and Condition the Leather
Let the couch air-dry away from direct sunlight, fireplaces, and heating vents. Use normal room ventilation without pointing hot air at the surface.
Once the couch is completely dry, apply a thin layer of leather conditioner if the manufacturer permits it. Spread the product evenly with a clean applicator.
Conditioner can replace some oils lost through age, heat, and cleaning. Too much product may darken the leather or create a greasy finish.
Do not use olive oil, coconut oil, petroleum jelly, shoe polish, or hair conditioner. Household oils may oxidize, attract dust, and create uneven dark patches.
Allow the conditioner to absorb for the period stated on its label. Buff lightly afterward with a clean microfiber cloth.
Wait before replacing blankets or allowing pets onto the couch. Product residue can transfer to fabric, clothing, and animal fur.
Troubleshooting Common Leather Couch Problems
Stop cleaning when the surface reacts unexpectedly. Applying more product rarely corrects damage caused by an incompatible cleaner.
- The couch feels sticky: Remove excess product with a barely damp cloth and extend drying time.
- The color looks uneven: Stop immediately and allow the area to dry completely.
- The leather still smells: Ventilate the room and inspect the cushion foam.
- The surface is peeling: It may be bonded leather or vinyl rather than repairable full leather.
- Scratches remain visible: Request color-matched repair instead of applying more conditioner.
Sticky leather often results from excess conditioner, accumulated body oils, or incompatible cleaner residue. Remove the residue gradually.
Uneven color may improve as moisture evaporates. Wait several hours before applying another product.
Peeling usually indicates structural failure in a coated or bonded surface. Cleaning cannot permanently reconnect separating layers.
Persistent pet odor may originate inside the cushion foam. Surface treatment alone will not remove contamination below the upholstery.
When several problems appear together, send clear photographs to a leather technician. Many specialists can identify the likely material remotely.
How Often Should You Clean and Condition a Leather Couch?
Vacuum a frequently used couch every week or 2. Remove spills immediately and complete a more thorough cleaning every few months.
Conditioning frequency depends on leather type, climate, sunlight, heating, and manufacturer instructions. Many couches require conditioning only 1 or 2 times annually.
Arizona and Nevada homes may expose leather to dry air and intense sunlight. Florida and Louisiana homes may create slower drying conditions because of humidity.
Keep the couch at least 24 inches from strong heat sources when possible. Rotate removable cushions to distribute wear and light exposure.
Do not follow an automatic conditioning schedule without checking the finish. Some heavily protected leathers require less conditioner than absorbent materials.
FAQ
Can I clean a leather couch with soap and water?
A barely damp cloth may remove light dirt from protected leather. Avoid general household soap unless the manufacturer specifically approves it.
What is the safest homemade leather couch cleaner?
Distilled water on a thoroughly wrung microfiber cloth is the lowest-risk basic option. Vinegar and oil mixtures can damage finishes.
How do I remove pen ink from a leather couch?
Blot fresh ink and test a leather-specific ink remover in a hidden area. Do not pour alcohol directly onto the couch.
Can leather conditioner remove pet scratches?
Conditioner may reduce the appearance of shallow scuffs. It cannot repair punctures, tears, missing color, or peeling bonded leather.
Why did my leather couch become darker after cleaning?
Moisture can temporarily darken absorbent leather. Permanent darkening may indicate saturation, oil migration, or an incompatible cleaner.
How much does professional leather couch cleaning cost?
As of 2026, basic US service may cost about $150 to $400. Couch size, leather type, stains, repairs, and travel affect the quote.
Earlier we wrote about DIY Garbage Disposal Installation: Wiring, Plumbing, and Costs