


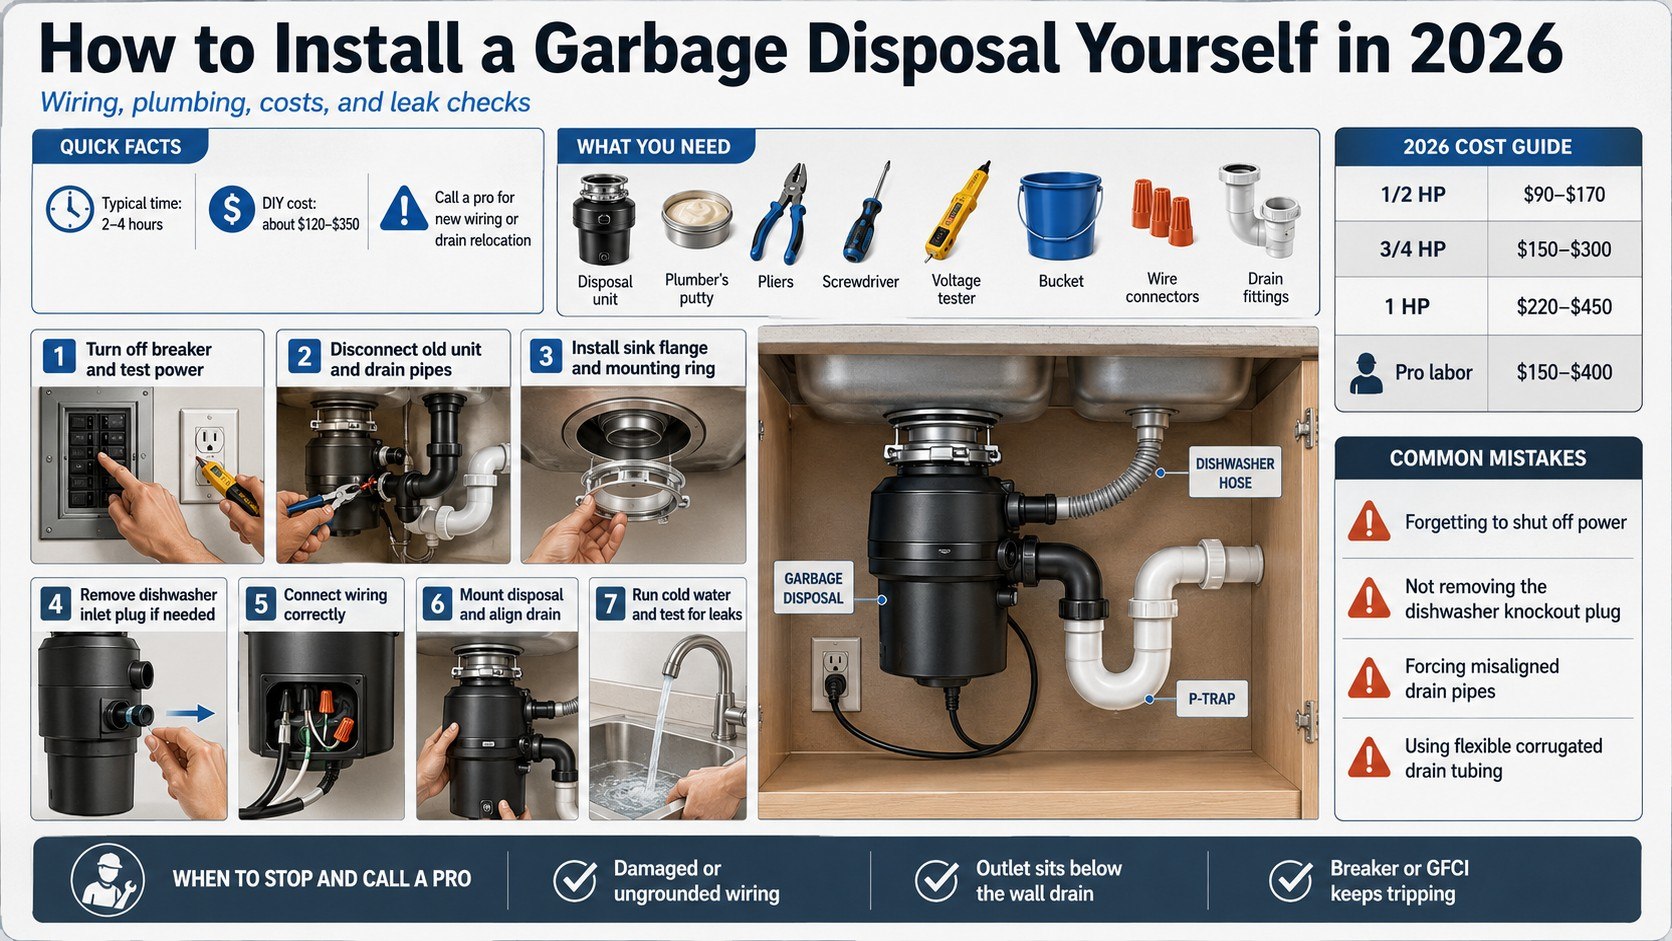
How to install a garbage disposal yourself comes down to 3 checks: safe electrical power, compatible sink hardware, and a drain outlet positioned below the disposal discharge. A direct replacement usually takes 2 to 4 hours, while new wiring or major plumbing changes require licensed help, as the Baltimore Chronicle editorial team notes.
This guide explains how to remove the old unit, mount the replacement, connect the wiring, align the drain, attach a dishwasher, and test for leaks. Stop immediately if you find damaged insulation, scorched wiring, corroded pipes, standing water near electrical connections, or an ungrounded circuit.
Key takeaways
- Turn off the breaker and verify that no voltage remains before opening the disposal’s electrical compartment.
- Measure the discharge height before buying a unit because wastewater cannot flow upward into the wall drain.
- Remove the dishwasher inlet plug only when a dishwasher hose will connect to the new disposal.
What You Need to Install a Garbage Disposal
A straightforward replacement requires common hand tools, a dry work area, and enough cabinet space to lift the motor into position. Plan for about 2 to 4 hours if the existing wiring and drain layout are compatible.
In 2026, a basic 1/2-horsepower disposal commonly falls within a planning range of about $90 to $170. Quieter 3/4-horsepower models from InSinkErator, Moen, Waste King, or Kraus may cost roughly $150 to $300.
You will need:
- A new disposal with a sink flange, gaskets, mounting ring, and instructions
- Plumber’s putty or manufacturer-approved silicone sealant
- Channel-lock pliers and an adjustable wrench
- Phillips and flathead screwdrivers
- A noncontact voltage tester
- A bucket, towels, flashlight, and putty knife
- Wire connectors and a listed cable clamp for hardwiring
- A compatible power cord kit when the unit plugs into a receptacle
- A discharge tube, slip-joint washers, and drain fittings
- A hacksaw or plastic tubing cutter when a pipe requires shortening
Check the contents of the box before removing the old disposal. Some models include a factory-installed cord, while others require a separately purchased cord or hardwire adapter.
Inspect the mounting system as well. Several brands use a 3-bolt mounting assembly, but similar-looking components are not always interchangeable.
Measure the distance from the sink bottom to the center of the wall drain. Compare that measurement with the new unit’s discharge height and required pipe clearance.
A deeper sink can lower the disposal outlet enough to prevent proper drainage. Flexible corrugated tubing does not correct that problem and often collects debris.
Homeowners changing cabinets during the same project can use the Baltimore Chronicle guide on how to install kitchen cabinets yourself. It covers sink-cabinet openings, plumbing clearances, cabinet alignment, and safe mounting.
Garbage Disposal Installation Costs in 2026
The final cost depends on whether you are completing a direct replacement or adding a disposal where none existed. New wiring, a switched receptacle, an air switch, or drain relocation can cost more than the appliance.
| Item or service | Typical 2026 planning range | When it may be needed |
|---|---|---|
| 1/3- or 1/2-HP disposal | $90–$170 | Light or regular household use |
| 3/4-HP disposal | $150–$300 | Frequent cooking and stronger grinding |
| 1-HP premium disposal | $220–$450 | Larger households or quieter operation |
| Power cord or wiring kit | $15–$35 | When no compatible cord is included |
| Putty and drain fittings | $10–$45 | When existing plumbing does not align |
| Professional replacement labor | $150–$400 | Direct replacement without major alterations |
| Electrical or plumbing changes | $200–$800+ | New switch, receptacle, circuit, or drain route |
These figures are national planning ranges, not guaranteed contractor quotes. Labor may cost more in New York City, San Francisco, Seattle, Boston, and Washington, D.C.
A low shelf price can also be misleading. The disposal may exclude the power cord, dishwasher connector, sink flange finish, or drain parts needed for installation.
Motor size affects more than grinding strength. A large sound-insulated unit may interfere with a water filter, pullout trash system, or dishwasher hose.
Keep plumbing in its existing location whenever practical. Moving a wall drain or electrical box can significantly increase the project scope.
For a wider budget comparison, review Baltimore Chronicle’s breakdown of kitchen remodel costs in the USA in 2026. The guide covers appliances, plumbing, electrical work, cabinets, labor, and hidden expenses.
Step 1: Shut Off and Verify the Power
What to do: Turn the wall switch off, then shut off the correct breaker at the electrical panel. Test the receptacle or incoming cable before touching any conductor.
Why it matters: A wall switch in the off position does not prove that the wiring compartment is de-energized.
Common mistake to avoid: Never trust a handwritten breaker label without testing the circuit. Panel directories are often incomplete or outdated.
If the disposal plugs into a receptacle, unplug it after turning off the breaker. If it is hardwired, remove the wiring cover only after confirming that no voltage remains.
Stop when you find damaged insulation, aluminum branch wiring, an ungrounded cable, loose conductors, or moisture inside the electrical box. A licensed electrician should inspect those conditions.
Step 2: Disconnect the Old Disposal
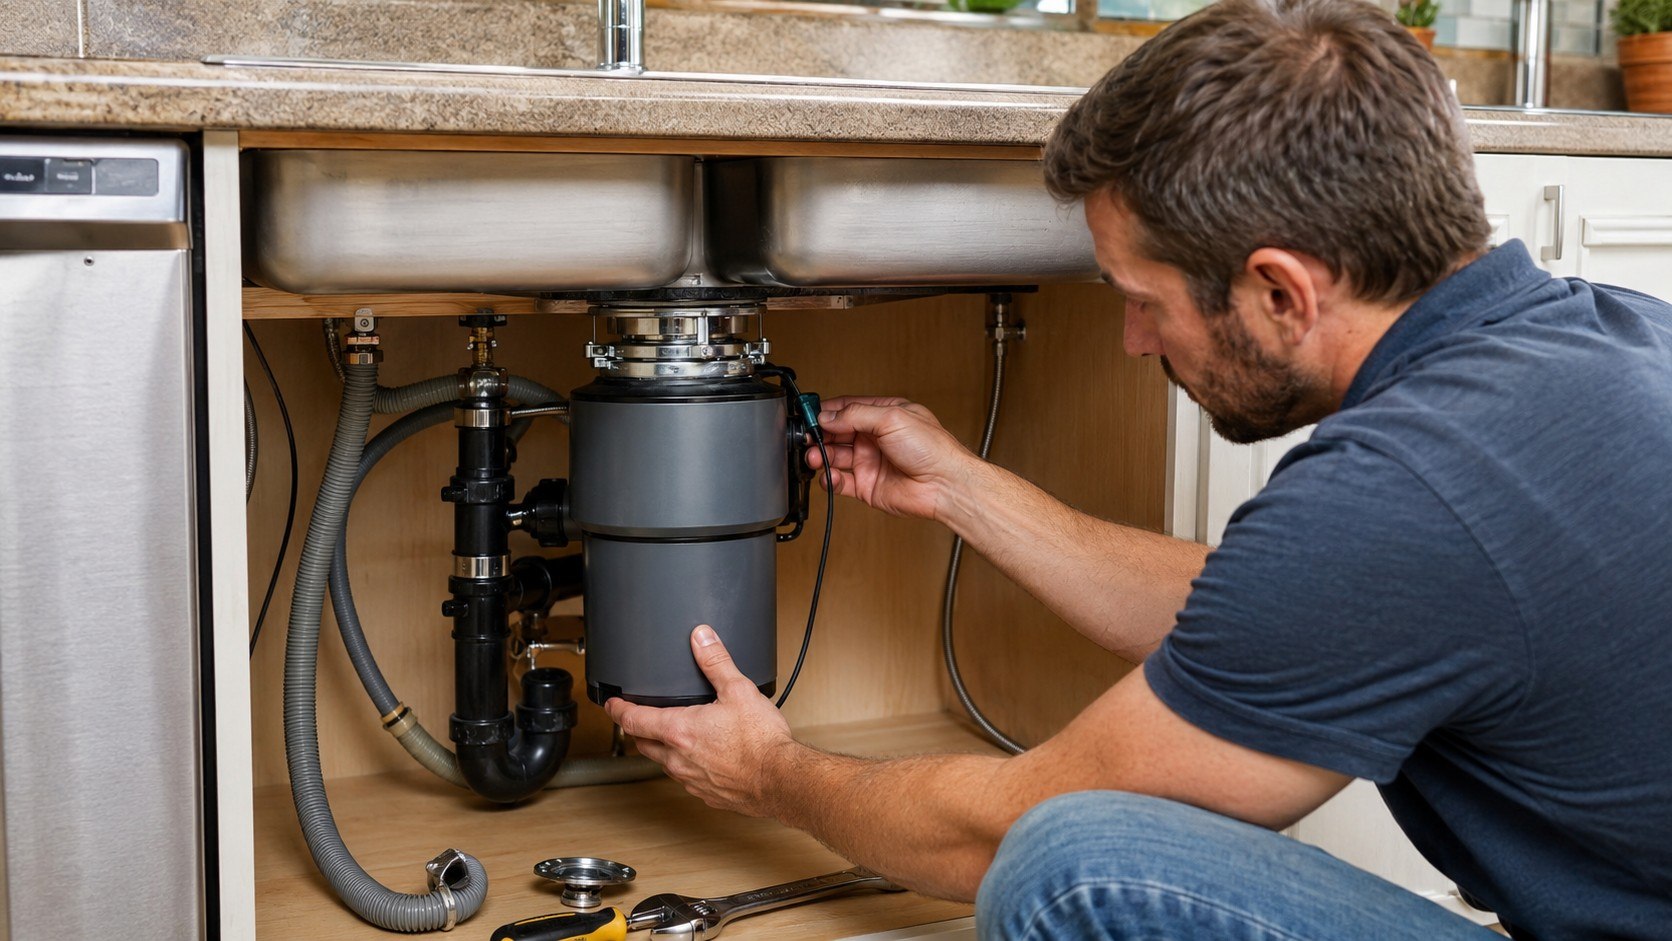
What to do: Place a bucket under the trap. Disconnect the discharge tube, dishwasher hose, and electrical connection before releasing the motor from its mounting ring.
Why it matters: Attached pipes and cables can break when the heavy disposal drops from the sink mount.
Common mistake to avoid: Support the old unit with one hand or a stable object. The motor can release suddenly when the lower ring turns.
- Loosen the slip-joint nut connecting the discharge tube to the P-trap.
- Remove the dishwasher hose clamp when a dishwasher is connected.
- Open the wiring compartment and photograph the existing connections.
- Disconnect the conductors or unplug the power cord.
- Rotate the lower mounting ring and lower the unit carefully.
Water and food residue may remain inside the old disposal. Keep the bucket in place until the discharge tube and trap stop draining.
Photograph the plumbing before removing washers and fittings. The image can help when reassembling the drain.
Inspect plastic nuts and slip-joint washers for cracks or permanent flattening. Reusing damaged parts often causes a slow leak.
Clean grease and sediment from the P-trap while it is accessible. A partly blocked trap can make a new disposal appear defective.
Protect disconnected conductors from water and sharp metal. Never leave exposed cable ends resting on a wet cabinet floor.
Step 3: Install the Sink Flange and Mounting Ring
What to do: Remove the old sink flange unless the new manufacturer confirms compatibility. Clean the sink opening and apply a continuous ring of plumber’s putty beneath the replacement flange.
Why it matters: The flange creates the main seal between the sink basin and disposal assembly.
Common mistake to avoid: Do not fully tighten one mounting screw before the others. Uneven pressure can pull the flange off-center.
Press the flange into the sink opening from above. From below, install the fiber gasket, backup flange, mounting ring, and retaining components in the manufacturer’s order.
Tighten the mounting screws gradually and evenly. Remove the excess putty that squeezes out around the flange inside the sink.
Some composite, fireclay, granite, and porous sinks require silicone rather than plumber’s putty. Follow both the sink and disposal manufacturers’ instructions.
Step 4: Prepare the Dishwasher Connection
What to do: When connecting a dishwasher, locate the molded inlet on the disposal. Use a screwdriver and light hammer taps to remove the internal knockout plug.
Why it matters: A dishwasher cannot drain through an inlet that remains factory-sealed.
Common mistake to avoid: Do not knock out the plug when no dishwasher hose will be attached. The open inlet will leak during sink use.
Remove the loose plug from inside the grinding chamber before mounting the disposal. Leaving it inside can cause loud rattling or damage during startup.
Route the dishwasher hose in a high loop beneath the countertop unless local requirements call for an air gap. Secure the hose so sink water cannot easily flow backward toward the dishwasher.
Step 5: Connect the Garbage Disposal Wiring
What to do: Follow the wiring diagram supplied with the appliance. Connect the grounded, neutral, and switched hot conductors exactly as directed.
Why it matters: Correct grounding and strain relief reduce shock, overheating, and cable damage in a damp cabinet.
Common mistake to avoid: Never pass an unprotected cable through a metal opening. Install the listed clamp or manufacturer-supplied wiring adapter.
A typical 120-volt disposal may use black for hot, white for neutral, and green or bare copper for grounding. Never rely on color alone when the existing wiring is old or has been altered.
Some InSinkErator EZ Connect models use a removable adapter or separately purchased cord. Many Moen and Waste King models include a factory-installed cord, but specifications vary.
A receptacle beneath a kitchen sink may require GFCI protection under the electrical code enforced locally. The Electrical Safety Foundation International provides additional GFCI safety guidance.
Call an electrician when no suitable switched power source exists. Adding a circuit, wall switch, air switch, or receptacle is not a simple appliance replacement.
Step 6: Mount the Disposal and Align the Drain
What to do: Lift the disposal onto the mounting assembly and rotate it until the locking tabs engage. Turn the unit so the discharge opening faces the P-trap.
Why it matters: A fully locked and correctly aligned disposal resists vibration, separation, and leaks.
Common mistake to avoid: Do not force the discharge tube into position. Side pressure can loosen the mount or distort a slip-joint washer.
Dry-fit the discharge tube before cutting anything. The tube should enter the P-trap without twisting the disposal or pulling the wall connection sideways.
If the straight tube is too long, mark and trim it squarely. Remove burrs before inserting it through the washer and slip-joint nut.
If the disposal outlet sits below the wall drain, wastewater cannot flow correctly. That layout requires drain modification rather than flexible tubing or an improvised upward connection.
Reconnect the dishwasher hose with a suitable clamp. Keep it away from sharp edges and from areas where the disposal may vibrate against it.
Hand-tighten plastic slip-joint nuts first. Use pliers only for a small additional turn because excessive force can split the nut or deform the washer.
Step 7: Test the Disposal and Check for Leaks
What to do: Confirm that the electrical cover is installed and the cabinet is dry. Restore power, run cold water, and operate the disposal briefly.
Why it matters: Testing with both standing and moving water exposes different leaks and alignment problems.
Common mistake to avoid: Never place a hand inside the grinding chamber, even when the switch and breaker appear off.
- Fill the sink with several inches of water.
- Inspect the flange seal before removing the stopper.
- Release the water and check the discharge tube and P-trap.
- Run cold water and operate the disposal for 15 to 30 seconds.
- Start a dishwasher drain cycle and inspect the hose connection.
- Test and reset the GFCI protection when applicable.
A dry paper towel can reveal moisture around a fitting before a visible drop forms. Wipe each joint first, then hold the paper against it during testing.
Minor vibration may come from a discharge tube touching the cabinet wall. Reposition the tube instead of tightening every connection harder.
A metallic rattle may mean the dishwasher knockout plug remains inside the chamber. Disconnect power before removing any object.
Inspect the cabinet again after several hours of normal use. Heat, vibration, and a full sink can reveal a slow leak missed during the first test.
Keep the supplied disposal wrench or hex key near the sink. Many models use it to release a jam from beneath the motor.
When to Hire a Plumber or Electrician
A direct replacement is manageable when the new unit fits the existing mount, drain, and power arrangement. The job changes when the outlet height, electrical system, or cabinet layout is incompatible.
Professional help is appropriate when the wall drain must be relocated, metal pipes are heavily corroded, or shutoff valves leak. A plumber should also inspect repeated backups beyond the P-trap.
Hire an electrician for a new circuit, damaged wiring, missing grounding, repeated breaker trips, or a receptacle that lacks required protection. Electrical rules vary by state and municipality.
Before approving professional work, request a written scope that separates labor, materials, permits, disposal, and possible change orders. Avoid accepting a vague single-price estimate.
The Baltimore Chronicle guide on how to read a construction estimate explains line items, allowances, exclusions, payment terms, and warning signs. It can help homeowners compare plumbing and electrical quotes on equal terms.
Troubleshooting a New Garbage Disposal
Startup problems usually involve power, a jammed grinding mechanism, an incomplete mount, or an incorrectly connected drain. Shut off the breaker before making corrections near wiring or moving parts.
- The disposal does not run: Check the breaker, wall switch, plug, GFCI, and reset button beneath the motor.
- The motor hums but does not turn: Disconnect power and use the supplied wrench to free the grinding mechanism.
- Water leaks near the sink: Remove and reseal the flange instead of tightening unrelated drain fittings.
- The dishwasher will not drain: Confirm that the knockout plug was removed and the hose is not kinked.
- The sink drains slowly: Inspect the P-trap, discharge height, and branch drain for obstruction.
Pressing the reset button repeatedly will not repair a jammed motor or electrical fault. Identify the cause before restoring power.
A leak through the disposal body can indicate a failed internal seal. A new unit with that symptom should be disconnected and handled under its warranty.
Repeated GFCI or breaker trips can signal moisture, damaged wiring, a motor fault, or an overloaded circuit. An electrician should diagnose persistent tripping.
Slow drainage is not always caused by weak horsepower. The blockage may be in the trap or farther inside the branch drain.
Stop using the disposal if water reaches the wiring compartment. Turn off the breaker and arrange professional inspection.
Frequently Asked Questions
Can I install a garbage disposal myself?
Yes. Many homeowners can complete a compatible replacement with basic plumbing and electrical skills. Hire licensed help when new wiring, drain relocation, permits, or unsafe conditions are involved.
How long does garbage disposal installation take?
A direct replacement usually takes 2 to 4 hours. A first-time installation takes longer because it may require a switch, receptacle, new drain fittings, or dishwasher changes.
Does a garbage disposal need a dedicated circuit?
The answer depends on the appliance rating, connected loads, manufacturer instructions, and locally adopted electrical code. Verify the requirements with the local building department or a licensed electrician.
Should a garbage disposal be plugged in or hardwired?
Either arrangement may be acceptable when the model is listed for it. Use the approved cord, grounding method, strain relief, switch, and receptacle configuration.
What horsepower is best for a typical household?
A 1/2-horsepower unit can handle moderate use. A 3/4-horsepower model usually provides stronger grinding and better sound insulation for frequent cooking.
Why is my new garbage disposal leaking?
Common causes include a poorly sealed flange, reversed washer, loose dishwasher clamp, cracked fitting, or misaligned discharge tube. Dry each connection before tracing the exact source.
Earlier we wrote about Canceling HBO Max in 2026: How to Stop Charges or Downgrade to Ads