


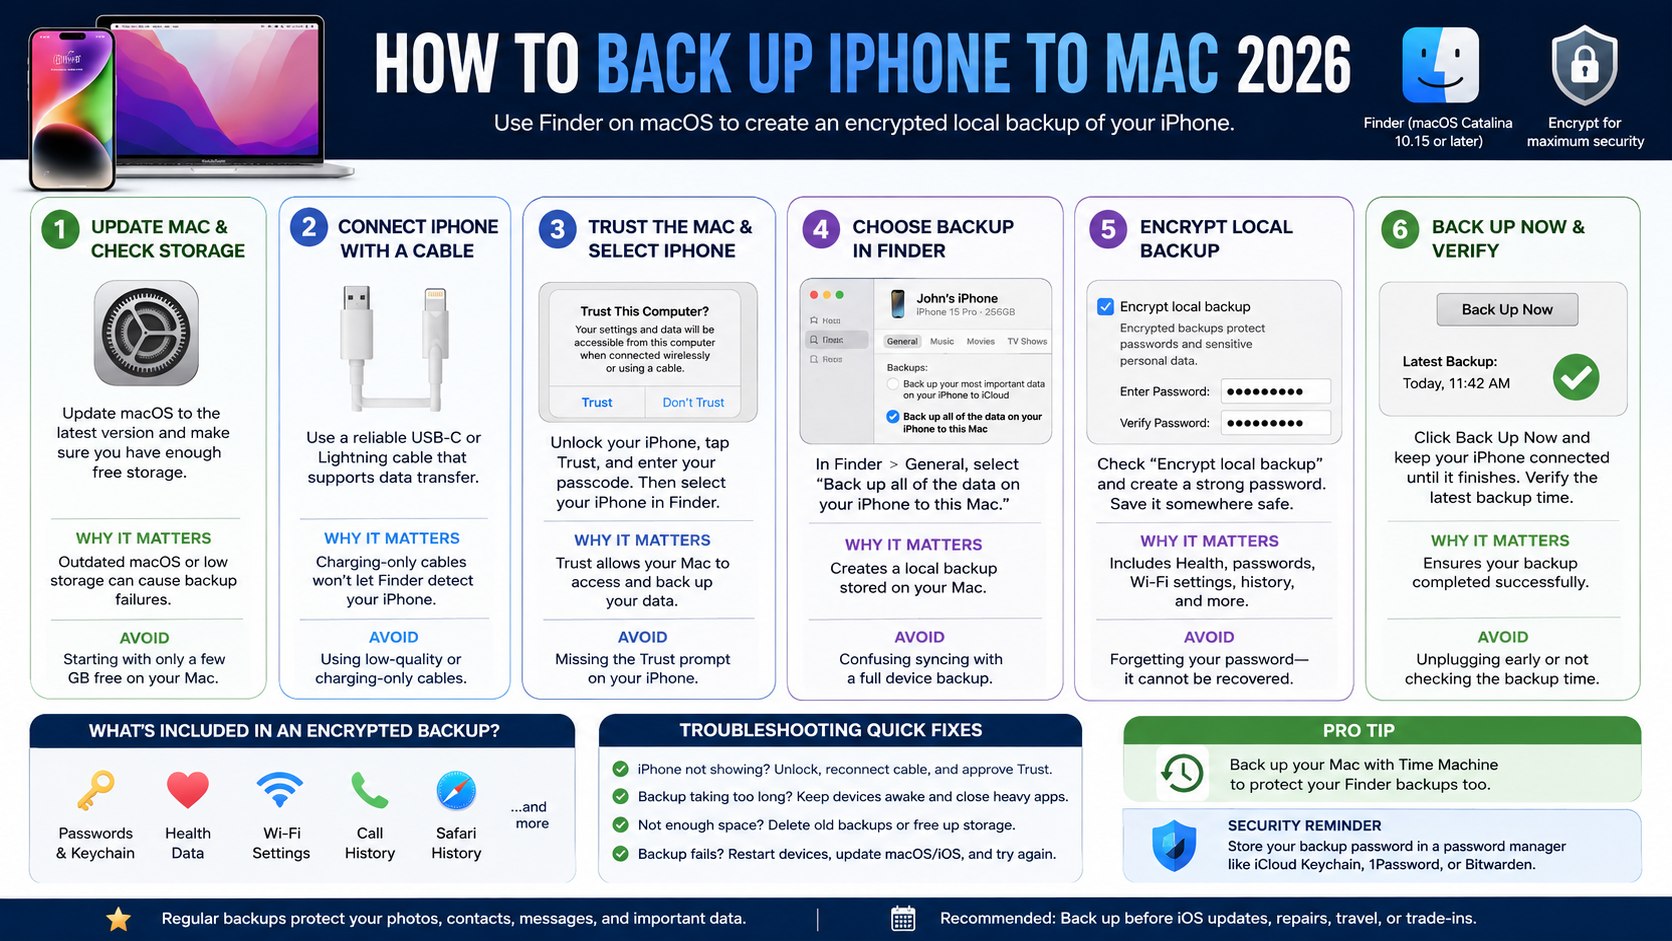
How to back up iphone to mac 2026 comes down to one reliable path: connect the iPhone to a Mac, open Finder, choose “Back up all of the data on your iPhone to this Mac,” turn on encryption, and click Back Up Now. The first backup usually takes 10–45 minutes, depending on storage size, cable speed, and how much local data needs to be copied, аs noted by Baltimore Chronicle.
Use Finder on macOS Catalina 10.15 or later, use a working USB-C or Lightning cable, and choose an encrypted local backup if Health data, Wi-Fi settings, saved passwords, website history, and call history need to be included. Apple’s official iPhone backup guidance confirms that Finder is the Mac method for macOS Catalina or later, and encrypted backups must be selected separately.
Key takeaways
- Finder is the standard Mac backup tool in 2026 for most US iPhone owners using macOS Catalina or later.
- Encrypted backups protect more categories of iPhone data and require a password that cannot be recovered if forgotten.
- A local Mac backup is useful before repairs, trade-ins, iOS updates, travel, or replacing a damaged iPhone.
How to back up iphone to mac 2026 with Finder and encryption
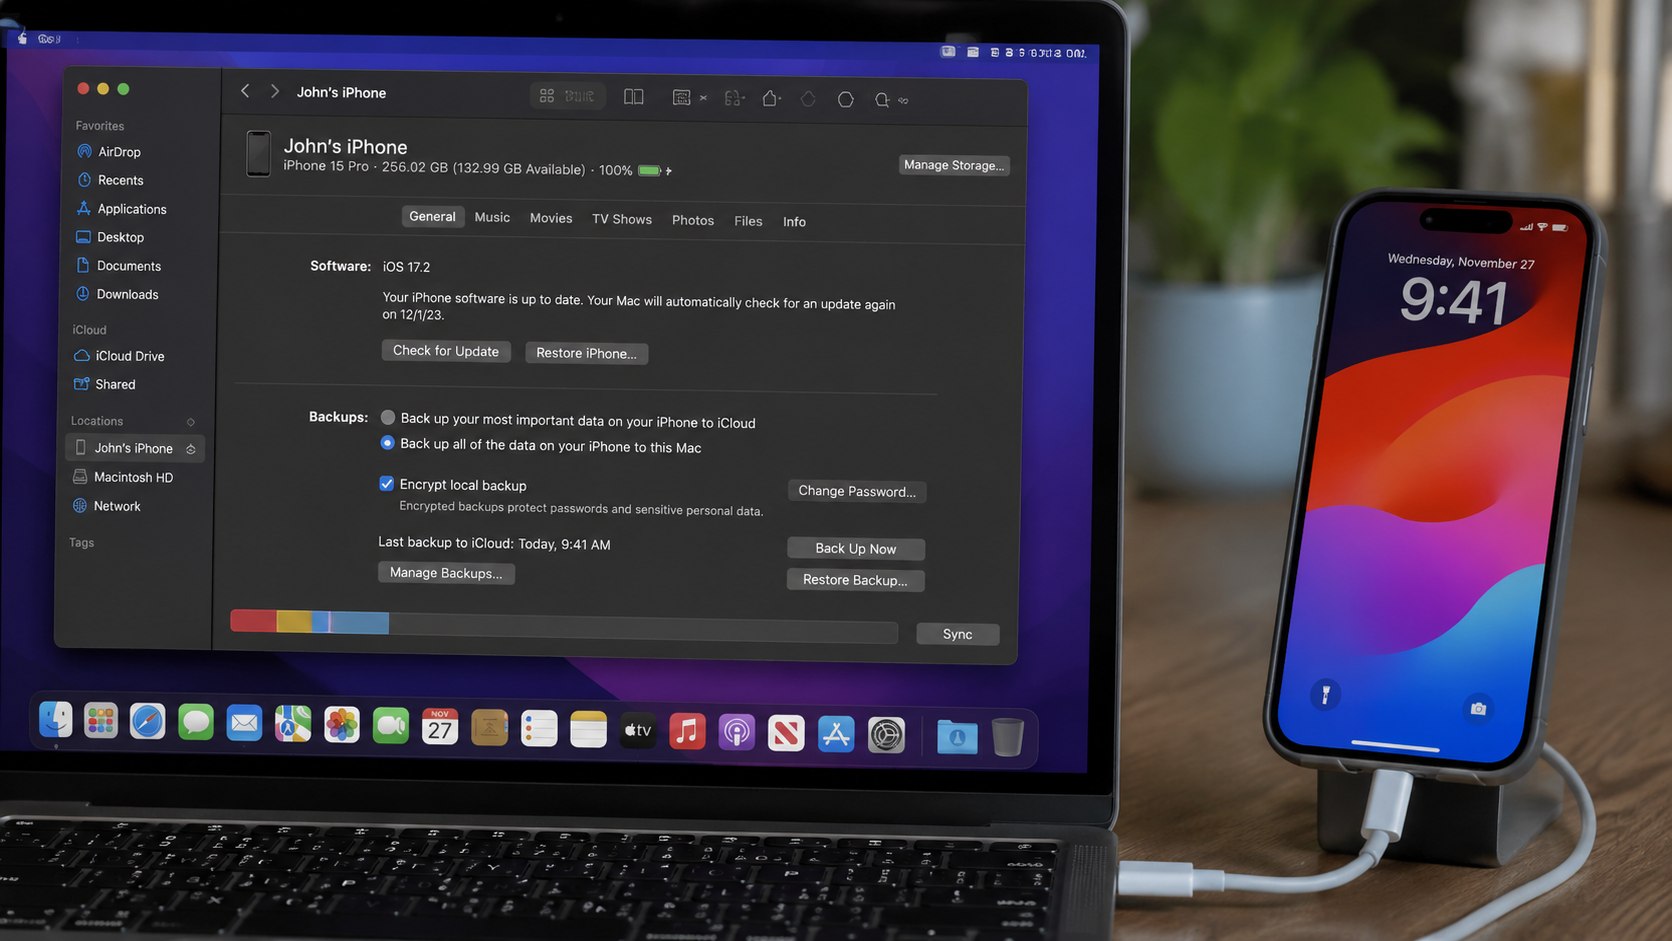
Finder replaced iTunes for iPhone backups on modern Macs. On a MacBook Air, MacBook Pro, iMac, Mac mini, Mac Studio, or Mac Pro running macOS Catalina 10.15 or later, the iPhone appears in the Finder sidebar after it is connected and trusted.
The most important decision is whether to encrypt the backup. A standard local backup copies a large part of the iPhone, but an encrypted backup stores more private categories and is the better choice for most parents, freelancers, renters, drivers, and homeowners who use the iPhone for work, banking, two-factor authentication, medical apps, and family photos.
A Finder backup also fits naturally into the upgrade process. Anyone replacing an older device can pair this guide with Baltimore Chronicle’s step-by-step article on how to transfer iPhone data in 2026, especially before moving from an old iPhone to a new one.
What you need
- A Mac running macOS Catalina 10.15 or later.
- An iPhone with enough battery to stay on during the backup.
- A USB-C, USB-C to Lightning, or Lightning to USB cable that supports data transfer.
- The iPhone passcode.
- The Mac login password if macOS asks for permission.
- Enough free Mac storage for the backup.
- A backup password saved in a password manager or written somewhere secure.
- No fee: Finder local backups are free as of 2026, aside from any cable, drive, or Mac storage costs.
| Backup choice | Best for | What to watch |
|---|---|---|
| Finder encrypted backup | Most US users who want a fuller local copy before repair, trade-in, or upgrade | Password must be saved; Apple says forgotten encrypted backup passwords cannot be used to access older backups |
| Finder unencrypted backup | Quick basic copy when sensitive categories are not needed | Leaves out some protected data categories |
| iCloud backup | Automatic cloud backup when the iPhone is charging and connected to Wi-Fi | May require paid iCloud storage if the free tier is not enough |
Apple’s official instructions for Mac backups are available on Apple Support’s iPhone backup page. Apple’s encryption instructions are listed separately on Apple Support’s encrypted backup page.
Step 1: Update the Mac and check free storage
Open System Settings on the Mac, check General, then Software Update. Finder backups work on macOS Catalina 10.15 or later, but newer macOS versions usually handle device trust prompts, USB-C connections, and iPhone detection more smoothly.
This matters because a backup can fail if macOS is outdated, if the Mac is nearly full, or if Finder cannot complete the device handshake. A 256 GB iPhone does not always need 256 GB free on the Mac, but a photo-heavy phone can still require a large amount of space.
The common mistake is starting a major iOS update or iPhone repair appointment with only a few GB free on the Mac. Clear downloads, move large video files, or use Apple’s storage management tools before the backup.
Step 2: Connect the iPhone with a data-capable cable
Plug the iPhone directly into the Mac using a reliable Apple, Belkin, Anker, or other reputable USB-C or Lightning cable. Avoid low-quality charging-only cables because they can power the phone without allowing Finder to see the device.
Finder needs a stable data connection for the first trust step and for the full backup transfer. A loose hub, car adapter cable, or worn airport cable can interrupt the process halfway through.
The common mistake is assuming every cable in a drawer supports data. If the iPhone charges but never appears in Finder, the cable or hub is the first thing to test.
Step 3: Trust the Mac and select the iPhone in Finder
Open Finder and look for the iPhone under Locations in the left sidebar. If the iPhone shows a Trust This Computer prompt, tap Trust on the iPhone and enter the passcode.
The trust step authorizes the Mac to read device information, create backups, and restore the iPhone later. Without trust approval, Finder cannot complete a local iPhone backup to Mac.
The common mistake is leaving the iPhone locked on the table after plugging it in. Many failed “Finder does not see my iPhone” cases come from a missed trust prompt on the phone screen.
Step 4: Choose local backup settings in Finder
In Finder, click the iPhone, open the General tab, and choose “Back up all of the data on your iPhone to this Mac.” This tells macOS to create a local device backup instead of relying only on iCloud.
A back up iPhone to Mac Finder workflow gives a restore point that stays on the computer and can be useful when Wi-Fi is slow, iCloud storage is full, or the iPhone is being replaced at an Apple Store or carrier location in states such as California, Texas, Florida, or New York.
The common mistake is confusing syncing with backing up. Syncing music, photos, or files through Finder is not the same as creating a full device backup.
Step 5: Turn on encrypted local backup
Check “Encrypt local backup,” then create a password. Use a strong password and store it in iCloud Keychain, 1Password, Bitwarden, Dashlane, or another password manager already used for important accounts.
An encrypted iPhone backup Mac includes more protected information than an unencrypted backup. Apple states that encrypted backups can include saved passwords, Wi-Fi settings, website history, Health data, and call history.
The common mistake is creating a password that cannot be recovered. Apple says that if the encrypted backup password is forgotten, that password cannot be used to access previous encrypted backups.
A practical backup password is not clever; it is recoverable by the person who will need it during a stressful repair, trade-in, or lost-phone situation.
A backup is also useful before setting up a replacement phone for a child, spouse, or work line. Baltimore Chronicle’s guide on how to set up a new iPhone in 2026 covers the next stage after the Finder backup is complete.
Step 6: Run, verify, and manage the backup
Click Back Up Now and keep the iPhone connected until Finder finishes. After the backup completes, check the latest backup date and time in Finder to confirm that the Mac saved the copy.
A local iPhone backup on Mac is only useful if it actually completed. Verification matters before mailing a phone for repair, installing a major iOS release, or erasing a device for resale.
The common mistake is unplugging the phone just because the screen looks idle. Watch Finder until the progress indicator is gone and the latest backup timestamp has changed.
How to manage older backups
In Finder, select the iPhone, open General, and use Manage Backups to see stored backups. Delete old device backups only after confirming they are no longer needed for a previous iPhone, child’s device, or work phone.
A Mac backup can also be protected indirectly by backing up the Mac itself with Time Machine. That does not replace the Finder backup, but it helps protect the Mac’s stored data if the laptop is stolen from a car, damaged in an apartment leak, or lost during travel.
Mac users who rely on newer desktop apps and Apple ecosystem tools may also want to follow Baltimore Chronicle’s coverage of native macOS apps and AI integration, since system updates and app permissions can affect daily Mac workflows.
Troubleshooting iPhone backup problems on Mac
- Finder does not show the iPhone: unlock the iPhone, reconnect the cable, try a different USB port, skip the hub, and approve the Trust prompt.
- The backup is taking too long: keep both devices awake, close heavy Mac apps, use a direct cable, and avoid Wi-Fi syncing for the first large backup.
- The Mac says there is not enough space: delete old iPhone backups, empty the Trash, move large video files to an external SSD, or use a Mac with more storage.
- The encrypted backup password is lost: Apple says previous encrypted backups cannot be accessed without the password; reset settings on the iPhone only to create a new encrypted backup going forward.
- The backup fails before finishing: restart both devices, update macOS and iOS, test another cable, and try again while the iPhone is plugged into power.
Users searching for iPhone backup not showing in Finder should start with the trust prompt and cable. Those two issues account for many home troubleshooting sessions because charging and data transfer look similar from the outside.
Finder backup checklist
- Mac is running macOS Catalina 10.15 or later.
- iPhone is unlocked before connecting.
- Cable supports data transfer, not charging only.
- Trust prompt is accepted on the iPhone.
- Finder shows the iPhone under Locations.
- “Back up all of the data on your iPhone to this Mac” is selected.
- “Encrypt local backup” is checked for a fuller backup.
- Backup password is saved somewhere secure.
- Back Up Now completes without interruption.
- Latest backup date and time are verified.
The safest routine for many US households is a layered one: backup iPhone before iOS update, keep iCloud Backup on for daily coverage, and create a fresh encrypted Finder backup before repairs, trade-ins, international travel, or handing a phone to a child.
FAQ
Is Finder better than iCloud for backing up an iPhone?
Finder is better when a local copy on a Mac is needed, internet speed is unreliable, or an encrypted backup is required before a repair or upgrade. iCloud is better for automatic daily backups when the phone is charging and on Wi-Fi.
Does an encrypted Finder backup include photos?
An encrypted Finder backup can include photos stored locally on the iPhone. Photos already stored in iCloud Photos are handled through iCloud and may download again after restore when the device reconnects to Wi-Fi.
Can I back up an iPhone to an external drive in 2026?
Finder does not offer a simple built-in button to choose an external drive as the backup destination. Advanced users sometimes move backup folders with symbolic links, but that approach can break and is not the cleanest choice for most home users.
How often should I back up my iPhone to my Mac?
Back up before iOS updates, repairs, trade-ins, long trips, and any device reset. A monthly encrypted Finder backup is a reasonable baseline for people who also use iCloud Backup.
What happens if I forget the encrypted backup password?
Apple says forgotten encrypted backup passwords cannot be used to access older encrypted backups. The practical fix is to reset the relevant iPhone settings and create a new encrypted backup with a password that is stored securely.
Do I still need iCloud if I back up to a Mac?
Many users benefit from both. A Mac backup gives local control, while iCloud helps when the Mac is not nearby, the phone is lost away from home, or a family member needs a simpler restore path.
Earlier we wrote about Mortgage Pre-approval in USA 2026: Documents, Timeline and Steps to Qualify