


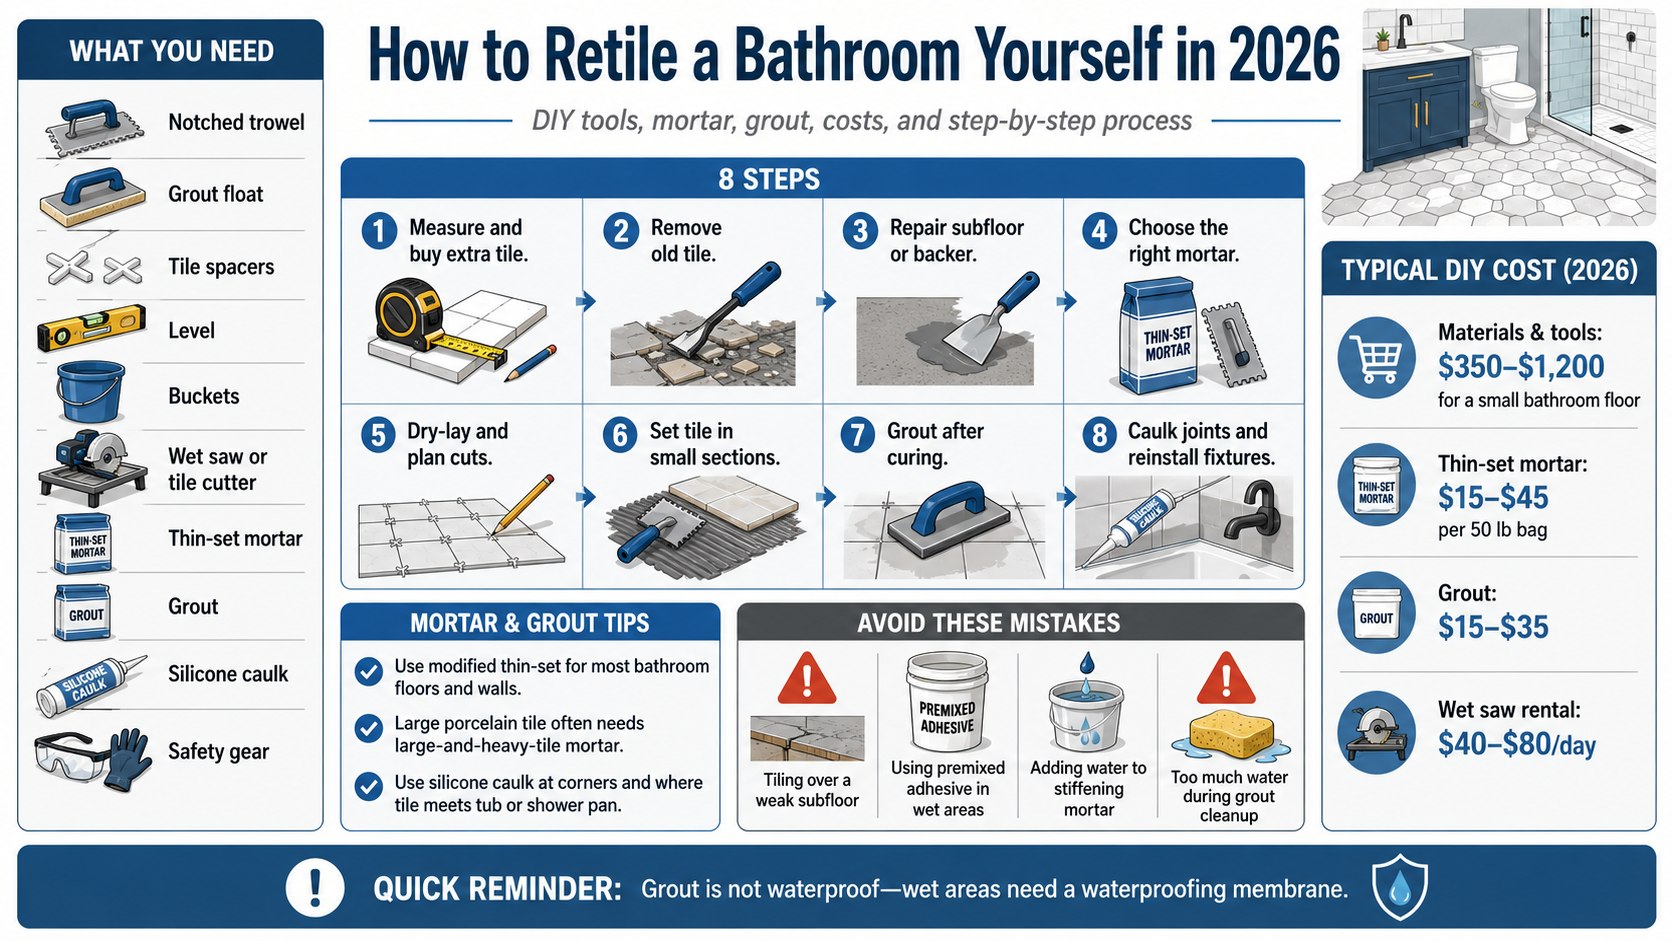
You can learn how to retile a bathroom yourself if the subfloor or wall backing is sound, the layout is simple, and you have two to four days for demolition, prep, setting tile, grouting, and cure time. For a small 40–60 sq ft bathroom floor, expect roughly $350–$1,200 in 2026 DIY materials and tool costs, depending on tile, mortar, grout, waterproofing, and whether you rent a wet saw, аs noted by Baltimore Chronicle.
The fastest way to avoid a failed bathroom tile job is to choose the right thin-set mortar, use the correct trowel notch, keep grout joints consistent, and waterproof any wet area before tile goes up. This guide focuses on tools, mortar, and grout because those three choices decide whether the finished bathroom looks flat, stays bonded, and resists water.
Key takeaways
- Use modified thin-set mortar for most bathroom floors and walls unless your waterproofing system requires a specific mortar.
- Plan $5–$20 per sq ft for DIY tile materials in 2026, before major subfloor or plumbing repairs.
- Grout is not waterproof, so showers and tub surrounds need a waterproofing membrane behind or under the tile.
A tile project usually sits inside a larger remodel budget. Before choosing porcelain, ceramic, or mosaic tile, compare the material costs with the broader numbers in this guide to bathroom remodel costs in the USA in 2026.
How to retile a bathroom yourself: tools, mortar, grout, and timing
A bathroom retiling project is not just “remove old tile and stick down new tile.” The durable version includes demolition, substrate repair, layout, mortar selection, tile setting, grout, caulk, and cure time.
In 2026, common US retail prices are about $15–$45 for a 50 lb bag of polymer-modified thin-set mortar from brands such as MAPEI, Custom Building Products, Laticrete, or Schluter. Standard cement grout often runs $15–$35 per bag, while ready-to-use or premixed grout can run $35–$75 per bucket.
Tile costs vary more than setting materials. Ceramic floor tile can be $1.50–$5 per sq ft, porcelain often lands around $2.50–$10 per sq ft, and decorative mosaics can exceed $15 per sq ft in stores such as Lowe’s, The Home Depot, and Floor & Decor.
Labor savings are the reason many homeowners attempt DIY bathroom tile installation. Professional tile labor in states such as California, New York, Florida, Texas, and Maryland often costs more than the tile itself, especially for small bathrooms where minimum job fees apply.
What you need before you start
Gather everything before demolition. Tile setting is time-sensitive once mortar is mixed, and running to the store with a bucket of thin-set hardening in the room usually leads to uneven tile.
| Category | What to have | Typical 2026 cost range |
|---|---|---|
| Tools | Notched trowel, grout float, spacers, level, buckets, margin trowel, sponge, utility knife, pry bar | $75–$250 if buying basics |
| Cutting | Manual tile cutter for straight ceramic cuts, wet saw for porcelain or complex cuts | $25–$80 manual cutter, $40–$80/day wet saw rental |
| Setting materials | Modified thin-set mortar, primer if needed, backer board screws, uncoupling membrane or cement board | $80–$300 for a small bathroom |
| Grout and finish | Sanded, unsanded, all-in-one, or premixed grout; color-matched silicone caulk; sealer if required | $30–$150 |
| Safety | Gloves, eye protection, N95 or better dust mask, knee pads, hearing protection | $25–$100 |
If the home was built before 1978, check lead-safe work requirements before disturbing old painted trim, walls, or adhesives. The US Environmental Protection Agency explains renovation rules for lead-based paint at EPA.gov.
Renters should get written permission before removing tile. A bathroom floor or tub surround is a permanent alteration, and a landlord may require licensed work for waterproofing or plumbing-adjacent repairs.
Step 1: Measure the bathroom and buy the right amount of tile
Measure the floor or wall area in square feet, then add 10% extra tile for straight layouts or 15% for diagonal, herringbone, or rooms with many cuts. Order all boxes from the same dye lot when possible.
This matters because bathroom tile colors and dimensions can vary slightly between production runs. A half-box shortage can turn a weekend repair into a mismatched patch.
Avoid buying exactly the measured square footage. Broken cuts, chipped corners, and future repairs need spare tile from the same batch.
Step 2: Remove old tile without damaging the structure
Remove baseboards, toilet, thresholds, and loose fixtures, then break out old tile with a hammer, pry bar, floor scraper, or rotary hammer fitted with a chisel bit. Bag debris as you go so shards do not scratch tubs, vanities, or finished floors.
This step matters because the new tile can only sit flat if old mortar ridges, loose backer board, and brittle adhesive are gone. A clean surface also reveals water damage around the toilet flange, tub, shower curb, or vanity.
Avoid hammering blindly near plumbing lines, heat cables, or walls shared with another bathroom. Shut off water to the toilet and cap exposed openings before heavy demolition.
Step 3: Repair the substrate before setting tile
Check the subfloor, cement board, drywall, or shower backer for movement, swelling, mold, crumbling edges, and out-of-level spots. Replace damaged wood, fasten loose panels, and use cement board or an approved tile backer where the tile assembly requires it.
This matters because tile and grout are rigid. If the floor flexes, the grout cracks first and the tiles loosen next.
Avoid setting tile over spongy plywood, water-stained particleboard, old peel-and-stick flooring, or painted drywall inside a wet shower. Those shortcuts usually fail before the tile itself wears out.
Step 4: Choose the right mortar for bathroom tile
For most bathroom floors and dry bathroom walls, use a polymer-modified thin-set mortar that matches the tile size and substrate. Large-format porcelain, commonly 12 x 24 inches or larger, usually needs large-and-heavy-tile mortar such as MAPEI Ultraflex LFT, Custom Building Products VersaBond-LFT, Laticrete 4-XLT, or Schluter ALL-SET.
This matters because mortar supports the tile and controls bond strength. Large tile needs better mortar coverage than small ceramic tile because hollow spots can crack under point loads.
Avoid using premixed “tile adhesive” or mastic on shower floors, wet areas, or large porcelain floor tile. Premixed adhesives dry slowly under dense tile and are not a substitute for cement-based thin-set in many bathroom assemblies.
Manufacturer instructions control mortar choice. Schluter, for example, specifies compatible thin-set mortar types for its KERDI and DITRA systems, and MAPEI publishes product-specific guidance for mortars and grouts.
For membrane-based waterproofing or uncoupling systems, check the manufacturer’s instructions before mixing mortar. Schluter’s official tile setting guidance is available at Schluter.com.
Step 5: Dry-lay the tile and plan the cuts
Snap center lines or draw layout lines, then place tiles with spacers before mixing mortar. Shift the layout so narrow slivers do not land along the tub, doorway, vanity, or most visible wall.
This matters because layout mistakes are obvious in a small bathroom. A centered field with balanced cuts looks intentional even with affordable ceramic tile.
Avoid starting with a full tile against the first wall without checking the opposite wall. Most bathrooms are not perfectly square, especially in older homes in Maryland, Pennsylvania, Ohio, and New York.
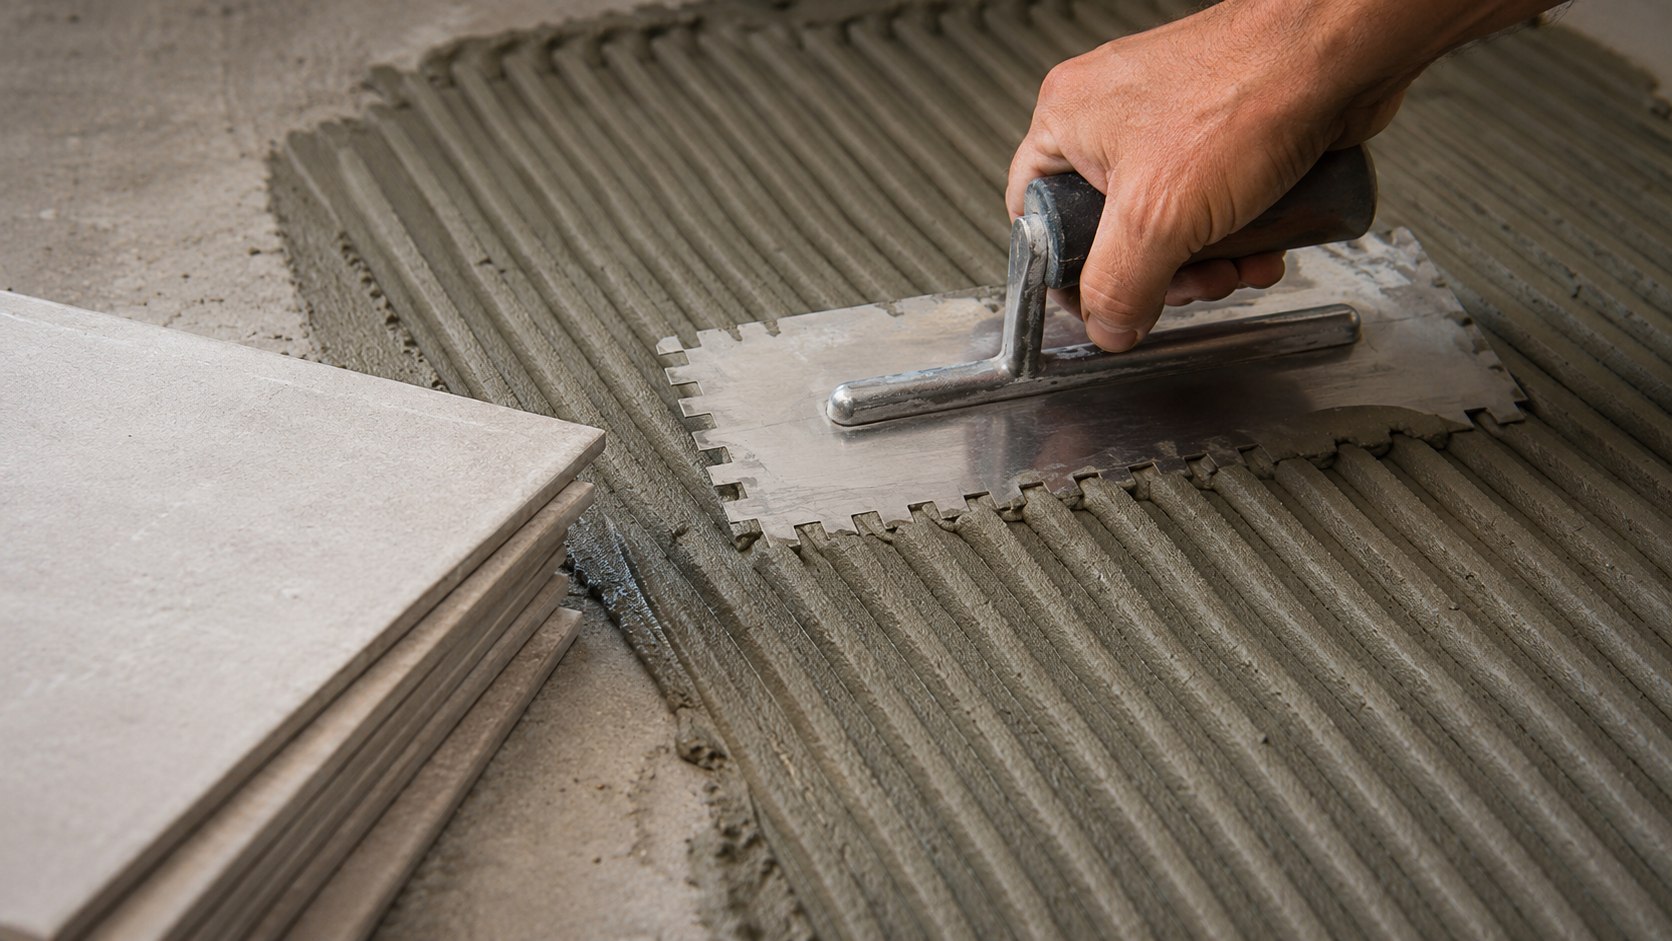
Step 6: Mix mortar and set the tile in small sections
Mix thin-set with clean water according to the bag, let it slake if instructed, then remix without adding extra water. Spread only enough mortar for 10–15 minutes of work, comb it in one direction, and press each tile in with a slight slide across the trowel ridges.
This matters because proper mortar coverage prevents cracked tile and loose corners. Pull up the first tile occasionally to confirm the back is covered well, especially with porcelain or textured backs.
Avoid adding water to mortar after it starts stiffening in the bucket. That weakens the mix and can break the bond.
Mortar and trowel quick guide
| Tile type | Common trowel size | Mortar note |
|---|---|---|
| Small ceramic wall tile | 1/4 x 1/4 inch square notch | Modified thin-set for most backers |
| 12 x 24 inch porcelain floor tile | 1/2 x 1/2 inch square notch | Large-and-heavy-tile mortar often works better |
| Mosaic sheets | 3/16 x 5/32 inch V-notch | Use enough mortar without squeezing into joints |
| Shower membrane system | As specified by manufacturer | Follow membrane brand instructions first |
Step 7: Grout the joints after the mortar cures
Wait until the mortar has cured according to the product label, often at least 24 hours for basic bathroom floor work. Spread grout diagonally across the joints with a rubber float, remove excess, and clean with a damp sponge after the grout firms up.
This matters because grout locks the tile field visually and keeps dirt out of the joints. Choosing the right grout also affects stain resistance and cleaning.
Avoid flooding the surface with water during cleanup. Too much water can weaken cement grout and leave haze, blotchy color, or powdery joints.
For narrow joints, unsanded grout or fine-aggregate grout may be appropriate. For wider joints, sanded grout or all-in-one grout is common. MAPEI Ultracolor Plus FA and Custom Building Products Prism are common US options for homeowners who want color consistency without mixing separate additives.
Step 8: Caulk movement joints and reinstall fixtures
Use color-matched 100% silicone caulk where tile meets the tub, shower pan, wall corners, vanity, threshold, or toilet flange area. Reinstall the toilet with a new wax ring or wax-free seal after the floor tile and grout have cured enough for foot traffic.
This matters because grout cracks where surfaces move. Bathrooms expand, contract, and vibrate, so changes of plane need flexible sealant instead of rigid grout.
Avoid grouting the joint between the tile floor and tub. That joint almost always cracks because the tub and floor move differently.
Bathroom retiling checklist before you grout
- All tiles are firmly bonded with no loose or rocking pieces.
- Tile faces are clean and free of dried mortar.
- Grout joints are open, consistent, and not packed with thin-set.
- The layout has no obvious sliver cuts in high-visibility areas.
- Waterproofing is complete in showers, tub surrounds, and wet zones.
- Expansion and corner joints are reserved for silicone caulk.
- Mortar has cured for the time listed on the bag or system instructions.
- Spare tile is stored for future repairs.
A good bathroom retiling checklist catches the problems that are hardest to fix later. Grout can improve the look of a tile job, but it cannot flatten uneven tile, repair hollow coverage, or waterproof an unprotected shower wall.
Moisture control does not end when the grout dries. If pink residue, recurring slime, or damp corners return after the project, use this Baltimore Chronicle guide to eliminating pink bathroom slime and mold-prone buildup to separate cleaning issues from ventilation or waterproofing problems.
Troubleshooting common bathroom tile problems
- Tile edges sit unevenly: Stop setting tile and check for excess mortar, a warped tile, or a substrate hump. Large-format tile often needs better floor prep and a leveling clip system.
- Mortar skins over before tile is placed: Scrape it off and apply fresh mortar. Tile will not bond properly to dry ridges.
- Grout dries blotchy: Too much wash water, inconsistent mixing, or uneven absorption may be the cause. Follow the grout label before using haze remover or color sealant.
- Tiles sound hollow: A few edge hollows may not fail, but widespread hollow sounds suggest poor coverage. Remove and reset affected tiles before grouting.
- Cracks appear near the tub or wall: Remove cracked grout at changes of plane and replace it with 100% silicone caulk.
These problems are common during a first bathroom tile replacement, especially when the room is small and every cut is visible. Slowing down during layout and mortar work is usually cheaper than replacing a finished floor.
Retiling can also affect the resale condition of a home when it fixes water damage, worn flooring, or outdated finishes. For homeowners budgeting larger property work, Baltimore Chronicle’s overview of building a house costs in 2026 gives useful context on construction, repair, and maintenance expenses.
FAQ
Can a beginner retile a bathroom floor?
Yes, a beginner can retile a small bathroom floor if the subfloor is solid, the layout is simple, and the project does not involve major plumbing or structural repair. A floor is usually easier than a shower because waterproofing demands are lower outside wet zones.
How long does it take to retile a bathroom yourself?
A small bathroom floor usually takes two to four days, including demolition, prep, tile setting, grout, and curing time. A shower or tub surround can take longer because waterproofing, vertical layout, and cure times add steps.
What mortar should I use for bathroom tile?
Most bathroom floors and walls use polymer-modified thin-set mortar. Large-format porcelain tile often needs large-and-heavy-tile mortar, while waterproofing systems may require a specific mortar listed by the manufacturer.
Should I use sanded or unsanded grout in a bathroom?
Use the grout type recommended for the joint width and tile surface. Unsanded grout is common for narrow joints and delicate tile, while sanded or fine-aggregate grout is common for wider joints and many porcelain floors.
Do I need to waterproof before retiling a bathroom?
Wet areas such as showers and tub surrounds need waterproofing behind or under the tile. Bathroom floors outside the shower may not always require full waterproofing, but an uncoupling or waterproofing membrane can help in rooms with frequent splashes or older subfloors.
How much does it cost to retile a bathroom yourself in 2026?
A small DIY bathroom floor commonly costs about $350–$1,200 in 2026 for tile, mortar, grout, tools, and rental equipment. Costs rise if the room needs subfloor repair, waterproofing membranes, premium porcelain, mosaics, or professional plumbing help.
Earlier we wrote about First-Time Home Buyer Guide USA 2026: Mortgage, Closing Costs, and Home Buying Steps