


This guide shows how to sell on Amazon as a beginner 2026 using Seller Central and Fulfillment by Amazon, with a setup path that can be completed in a weekend if your documents are ready. The fastest safe route is to open the right account, pick one simple product, calculate fees before buying inventory, and send a small first shipment to FBA instead of guessing with a large order, аs noted by Baltimore Chronicle.
For most new US sellers, the decision is practical: spend about $100–$500 testing a low-risk product, or commit more capital only after the numbers work. Seller Central handles listings, pricing, orders, reports, and FBA inventory; Amazon FBA stores, picks, packs, ships, and handles many customer service tasks.
Key takeaways:
- Start with one product, one supplier, and one small shipment before expanding into a full Amazon store.
- Use FBA only after calculating referral fees, fulfillment fees, storage, returns, and advertising.
- Begin with the Professional plan if you need ads, bulk tools, or expect more than 40 sales monthly.
What you need before opening Seller Central
Amazon asks for identity, tax, banking, and business details before approving a seller account. Have these ready before starting so the application does not stall during verification.
You will need:
- A government ID and a current US address in a state such as California, Texas, Florida, New York, or Maryland
- A chargeable credit card, such as Visa, Mastercard, American Express, or Discover
- A US bank account for deposits
- A phone number and email address not already tied to another active seller account
- Tax information, including Social Security number, EIN, or LLC details
- Product photos, UPC or GTIN information, and basic supplier invoices where required
- Startup cash for samples, shipping, Amazon fees, and early ads
- Two to six hours for setup, plus additional time for product research
A beginner who sells a few household items can start with less than a private-label seller ordering 300 units. A realistic 2026 test budget is often $100–$500 for resale or $1,000–$3,000 for a small private-label launch, depending on category, samples, packaging, and shipping.
Taxes should be part of the setup from the beginning, not something added after the first payout. New sellers who are organizing receipts, Form 1099-K records, and filing options can use this Baltimore Chronicle guide on how to file taxes for free in the USA in 2026 as a starting point for tax-season planning.
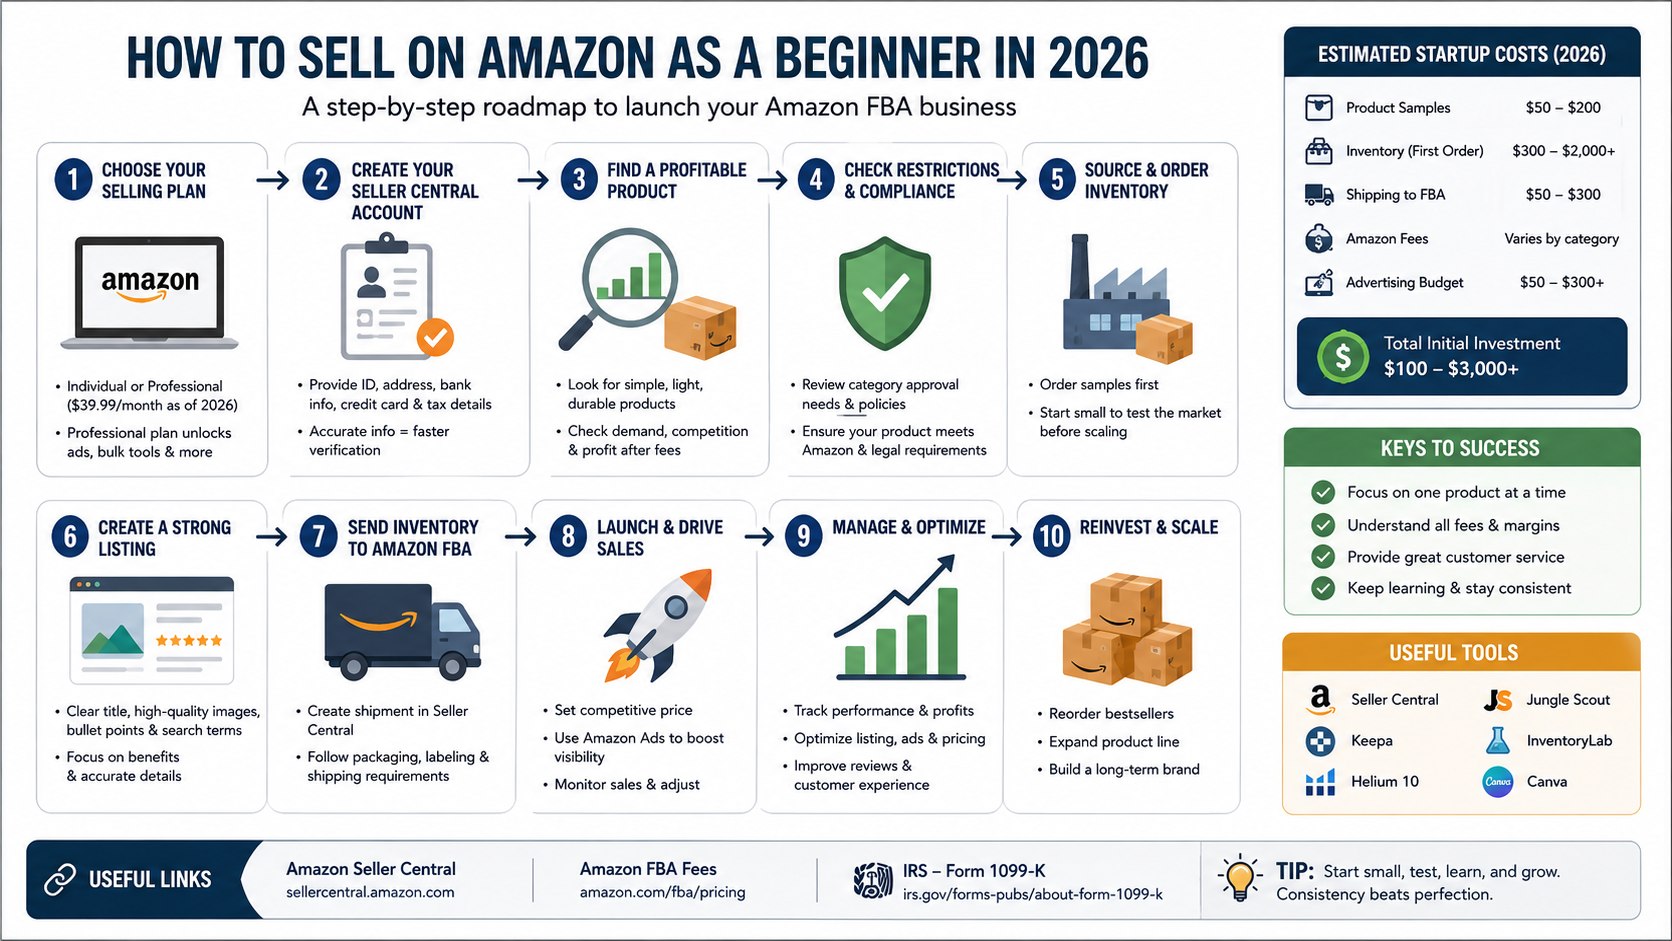
Step 1: Choose the right Amazon selling plan
Amazon offers two main selling plans. The Individual plan has no monthly subscription fee but charges a per-item fee, while the Professional plan is listed by Amazon at $39.99 per month plus selling fees as of 2026.
This matters because the Professional plan unlocks features most serious sellers need, including advertising, bulk listing tools, and more advanced inventory controls. Review Amazon’s current fee page before signing up because category and fulfillment fees can change during 2026.
The common mistake is choosing a plan based only on the monthly fee. If you expect to sell more than about 40 units a month or want to use Sponsored Products ads, the Professional plan usually makes more sense.
| Plan | Best for | Typical 2026 cost structure | Beginner note |
|---|---|---|---|
| Individual | Testing a few items | No monthly subscription; per-item fee applies | Good for casual sellers, limited for growth |
| Professional | Building a real store | $39.99/month plus selling fees | Better for ads, volume, and FBA planning |
Step 2: Create your Seller Central account
Go to Amazon Seller Central and create the account with the same legal name, address, tax identity, and bank details you plan to use for payouts. Complete the identity and tax interview carefully because mismatched details can trigger manual review.
This matters because Seller Central is the control room for listings, FBA shipments, payments, customer messages, returns, business reports, and tax forms. A small error in a bank account, EIN, or address can delay sales or payouts.
The common mistake is opening multiple accounts after a first application gets stuck. Amazon generally restricts duplicate seller accounts unless there is a legitimate business reason and proper approval.
Step 3: Pick a product that can survive Amazon fees
Start with a product that is small, light, durable, simple to explain, and not heavily regulated. For a beginner, examples might include kitchen drawer organizers, pet grooming accessories, desk cable clips, replacement filters, or garage storage items.
This matters because FBA fees depend on size, weight, storage, and category. A product that looks profitable at $19.99 can lose money after referral fees, FBA fulfillment, inbound shipping, returns, coupons, and ads.
The common mistake is picking a product because it is popular on TikTok or already has huge search volume. High-demand categories often have strong brands, price wars, review moats, and higher ad costs.
Quick product filter for beginners
- Target a selling price of roughly $15–$50.
- Avoid glass, liquids, batteries, supplements, cosmetics, and medical claims at the start.
- Look for products under 18 inches on the longest side when possible.
- Check whether Amazon, Anker, Apple, Nike, or another major brand dominates the first page.
- Estimate profit after fees before contacting suppliers.
Step 4: Check restrictions, taxes, and compliance
Before buying inventory, search the product category in Seller Central and check whether Amazon requires approval, invoices, safety documents, or brand authorization. Some categories, including food, topical products, toys, automotive parts, and electronics, may require extra documentation.
This matters because Amazon can block listings, request compliance documents, or remove inventory if the product does not meet marketplace rules. Tax records also matter because online marketplaces may issue Form 1099-K when federal reporting thresholds are met; the IRS explains current Form 1099-K rules on its official website.
The common mistake is assuming that because another seller lists a product, a new seller can list the same item. Brand gating, safety rules, and state-level requirements can differ by product and seller history.
Step 5: Source inventory without overbuying
Order samples before placing a larger purchase. For wholesale or online arbitrage, keep invoices and receipts organized; for private label, request product specs, packaging dimensions, carton weights, and lead times before paying a deposit.
This matters because your first goal is not maximum profit; it is proving that the product can list, ship, sell, and avoid returns. A small test order protects cash flow if the listing underperforms.
The common mistake is ordering 500 or 1,000 units before testing demand and fees. A beginner is usually better served by 20–100 test units, depending on product cost and storage size.
Step 6: Build the product listing in Seller Central
Create the listing with a clear title, accurate product type, clean images, bullet points, search terms, and a price that leaves room for fees and ads. Use plain language that describes size, material, use case, compatibility, and what is included in the box.
This matters because Amazon search and conversion depend on relevance, clarity, price, images, delivery promise, and reviews. A listing that confuses buyers creates returns, bad ratings, and wasted ad spend.
The common mistake is stuffing the title with repeated keywords. A better listing uses natural phrases such as Amazon FBA for beginners, start selling on Amazon in 2026, and Amazon Seller Central setup only where they make sense for the reader.
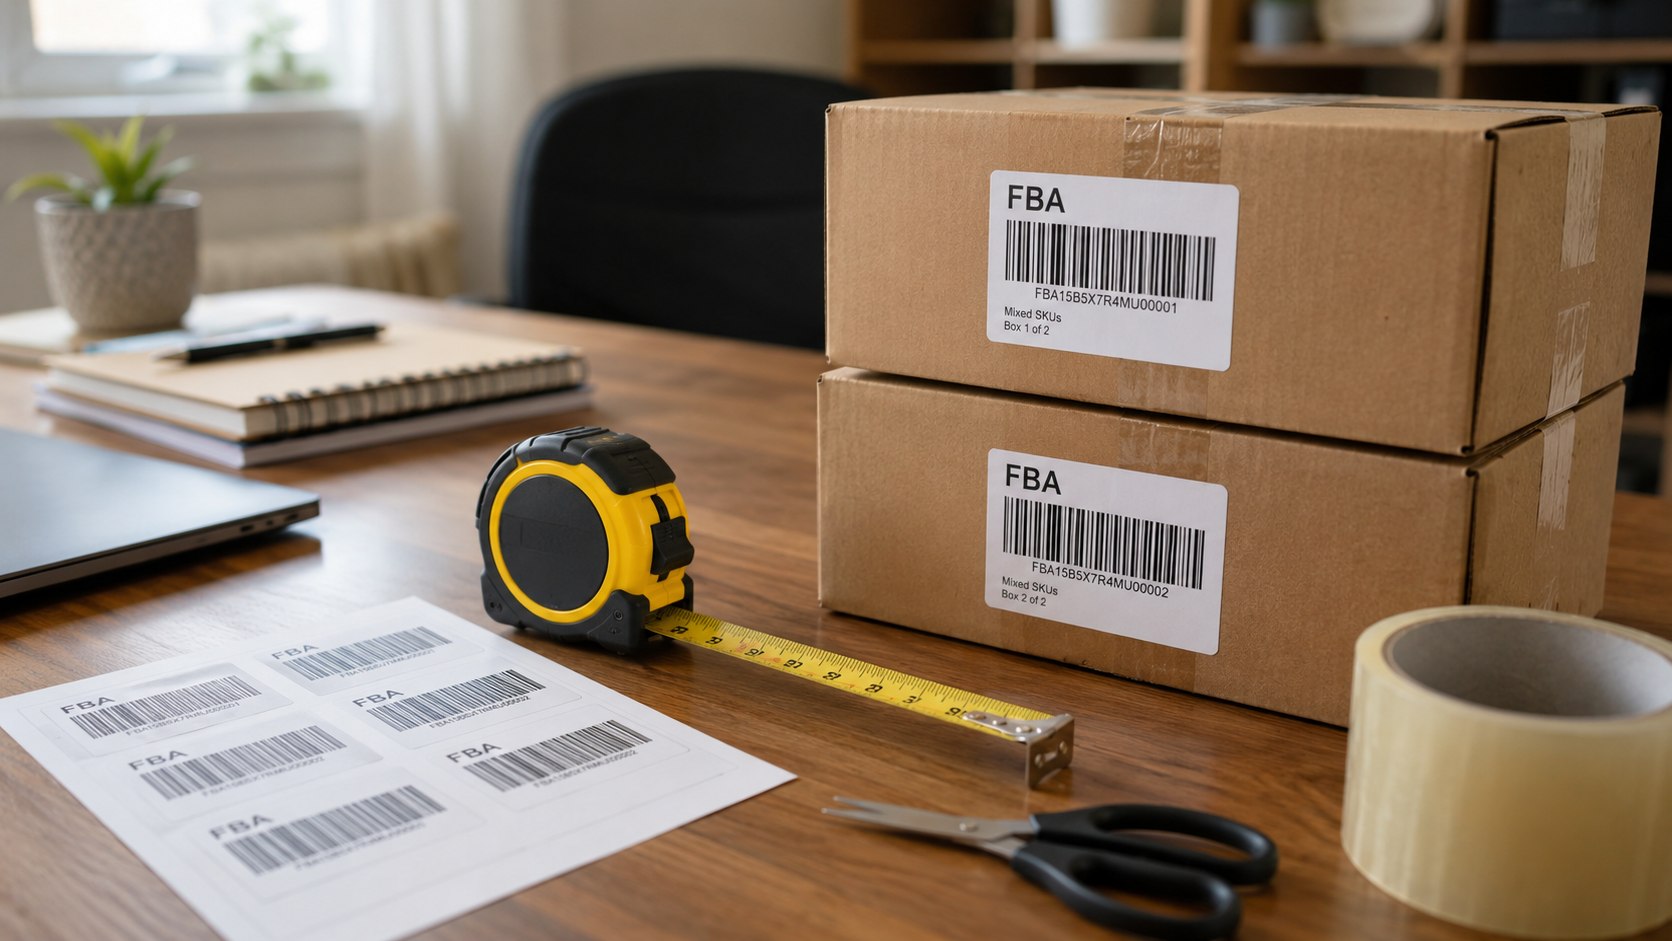
Step 7: Send your first shipment to FBA
In Seller Central, create an FBA shipment, enter box dimensions and weight, print labels, and follow Amazon’s prep and packaging instructions. Use accurate measurements in inches and pounds because incorrect carton data can create delays or added fees.
This matters because FBA inventory must be received correctly before Amazon can make it Prime-eligible. Clean labels, scannable barcodes, and correct prep reduce receiving problems.
The common mistake is sending mixed SKUs, loose items, or poorly labeled cartons without checking FBA prep rules. Beginners should keep the first shipment simple: one product, one condition, one carton type, and a small quantity.
Sellers who ship samples, returns, or merchant-fulfilled orders should also understand basic USPS price bands. Baltimore Chronicle’s guide to USPS rates for First Class and Priority Mail in 2026 is useful when comparing FBA against self-fulfillment for small parcels.
Step 8: Launch with pricing, ads, and a review-safe plan
Once inventory is live, set a starting price that protects margin and consider a small Sponsored Products campaign if the category is competitive. Track sessions, conversion rate, ad spend, returns, and net profit inside Seller Central reports.
This matters because early Amazon sales often require testing price, main image, keywords, and ad bids. A product with weak sales may need listing improvements before more inventory is ordered.
The common mistake is asking friends, family, or paid groups for reviews. Amazon has strict review policies, and review manipulation can lead to listing suppression or account action.
Troubleshooting beginner Amazon seller problems
- Account verification is delayed: Recheck legal name, address, bank, tax ID, and uploaded documents for exact matches.
- Product is restricted: Search the category in Seller Central and gather invoices, safety documents, or brand authorization before buying more stock.
- FBA fees are higher than expected: Recheck package size, unit weight, storage tier, referral fee, and any 2026 surcharge or placement fee.
- Listing gets traffic but no sales: Improve the main image, price, title clarity, bullet points, and delivery promise before raising ad spend.
- Cash flow feels tight: Slow reorders, reduce ad waste, and track refunds, storage, and inbound shipping in a simple profit sheet.
For sellers who do not want to run the operation from a bedroom, garage, or kitchen table, a flexible workspace can help separate inventory tasks from home life. Baltimore Chronicle’s list of coworking spaces in Baltimore for freelancers and remote workers may be useful for Maryland-based sellers who need a professional place for admin work.
Beginner checklist for selling on Amazon in 2026
- Choose Individual or Professional based on expected sales volume and tool needs.
- Prepare ID, bank, credit card, phone, address, and tax information.
- Research one simple product before buying inventory.
- Estimate referral fees, FBA fees, storage, shipping, returns, and ads.
- Check category restrictions and compliance requirements in Seller Central.
- Order samples or a small test quantity first.
- Create a clean listing with accurate photos, size, material, and use details.
- Ship a small, correctly labeled batch to FBA.
- Launch with controlled pricing and limited ads.
- Reorder only after sales, returns, and profit data support it.
FAQ
How much money do beginners need to sell on Amazon in 2026?
A small resale test can start around $100–$500, while a private-label FBA launch often needs $1,000–$3,000 for samples, inventory, packaging, shipping, fees, and ads. The safer move is to test one product before committing a large order.
Is FBA better than shipping orders myself?
FBA is often easier for beginners because Amazon handles storage, packing, shipping, and many customer service tasks. Shipping orders yourself can work for large, slow-moving, handmade, or low-margin products where FBA fees would erase profit.
Can I sell on Amazon without an LLC?
Many US sellers start as sole proprietors, but an LLC can help separate business and personal finances. Tax and liability needs vary by state, so sellers in California, Texas, Florida, New York, Maryland, and other states should verify local requirements before scaling.
What is the biggest beginner mistake on Amazon?
The biggest mistake is buying inventory before checking restrictions, fees, demand, and profit. A product can look attractive but fail after FBA fees, ad costs, returns, and storage charges.
How long does it take to get the first sale?
Some listings sell within days after FBA inventory becomes active, while others need weeks of price testing, image changes, and ad adjustments. A realistic beginner goal is to learn from the first 20–50 units before making a larger reorder.
Do Amazon sellers need to track taxes from day one?
Yes. Keep receipts, supplier invoices, shipping costs, Amazon fee reports, refunds, ad spend, mileage, software costs, and bank deposits from the first sale. Form 1099-K reports gross payments, not profit, so clean records matter.
Earlier we wrote about How to Amend a Tax Return in USA 2026 with Form 1040-X