


How to fix a washer that won’t drain starts with 3 checks: the filter, drain hose, and pump. Most basic inspections take 30–60 minutes and require only simple household tools, as noted by the Baltimore Chronicle editorial team.
Unplug the washer, remove standing water, and clean the accessible drain filter first. Then inspect the hose for kinks before testing the drain pump. Coins, lint, small socks, and detergent buildup often stop drainage without causing permanent damage.
Key takeaways
- Disconnect power before opening a filter panel, removing a hose, or reaching near the pump.
- Clean the filter and hose before buying a replacement drain pump or scheduling professional service.
- Stop immediately after finding burned wiring, electrical odors, serious leaks, or a tripping circuit breaker.
The procedure applies to many Whirlpool, Maytag, Samsung, LG, GE Appliances, Electrolux, and Bosch washers. Filter locations and panel designs differ, so confirm each step in the model’s manual.
What You Need
Prepare the work area before opening any drain component. A filter housing or disconnected hose may release several gallons of water.
- 30–60 minutes for inspection and cleaning
- Washer manual and complete model number
- Shallow pan, bucket, and absorbent towels
- Flashlight and protective work gloves
- Phillips and flat-head screwdrivers
- Pliers or channel-lock pliers
- Small brush for filter cleaning
- Wet-dry vacuum, when available
- About $10–$40 for basic supplies
Place towels under the front and rear edges of the appliance. Water can quickly damage laminate, engineered wood, and baseboards.
Do not rely only on the control panel’s power button. Pull the plug from the outlet before touching internal parts. Shut both supply valves when moving the machine.
Renters should photograph the washer and surrounding floor before starting. Major leaks or internal repairs should be reported to the landlord. Removing sealed panels without permission may create liability.
Keep children and pets outside the laundry area. Never use a regular household vacuum to collect water. Only a wet-dry vacuum is designed for that task.
Common Causes and 2026 Repair Costs
The washer’s behavior can narrow the diagnosis. Humming often signals a blockage or seized impeller. Silence may point toward the pump, door lock, wiring, or control board.
| Likely problem | Typical symptom | Estimated DIY cost | Typical US service cost in 2026 |
|---|---|---|---|
| Clogged pump filter | Slow drainage or humming | $0–$15 | $100–$200 |
| Blocked drain hose | Water remains after spinning | $0–$40 | $120–$250 |
| Failed drain pump | Grinding, humming, or silence | $40–$150 | $180–$400 |
| Damaged door lock | Cycle stops before draining | $25–$120 | $150–$350 |
| Wiring or control fault | Intermittent operation or error codes | Varies | $200–$700 |
These amounts are realistic planning ranges, not fixed quotes. Prices depend on the brand, model, technician, location, and part availability.
Service often costs more in California, New York, Alaska, Hawaii, and remote rural areas. Factory-authorized technicians may charge more than independent repair businesses.
Confirm whether the estimate includes diagnosis, labor, parts, and warranty coverage. Some companies charge a separate service-call fee.
Use the complete model number when ordering components. Similar-looking pumps may use different connectors, housings, or mounting points.
Installing an incompatible pump can create leaks or damage the electrical system. Compare the final repair cost against the washer’s age and condition.
Step 1: Stop the Washer and Disconnect Power
Cancel the cycle and wait until the drum stops completely. Unplug the machine before moving it or opening any access door.
This prevents an unexpected restart near the pump and moving components. Turn off both water supply valves when access requires moving the washer.
Common mistake: repeatedly restarting the drain cycle. A blocked pump may overheat without moving any water.
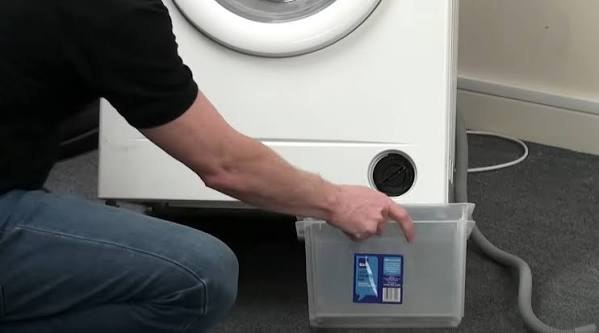
Step 2: Remove Standing Water Safely
Look for an emergency drain tube behind the lower front access panel. Place its end over a shallow pan and release water gradually.
Empty the pan several times when necessary. A full front-load washer can hold more water than one container can manage.
If no emergency tube exists, lower the main drain hose into a bucket. Gravity may empty the drum when the hose remains clear.
This step reduces flooding when the filter cap is removed. Never unscrew a full filter housing without towels and a container nearby.
Common mistake: tilting a washer while its drum remains full. Water may reach wiring, controls, or the drive system.
Step 3: Clean the Drain Pump Filter
Many front-load models place the filter behind a small door near the floor. Turn the cap counterclockwise and open it slowly.
Remove coins, lint, hairpins, buttons, pet hair, and pieces of fabric. Rinse the filter and clean its housing with a small brush.
Use a flashlight to inspect the pump impeller behind the filter. It may move in short steps but should not remain blocked by debris.
A clean filter restores water flow and reduces strain on the pump. However, some top-load washers lack a user-accessible drain filter.
Routine cleaning can prevent another blockage. Baltimore Chronicle explains detergent use, loading errors, and maintenance in its guide to using a washing machine properly.
Common mistake: forcing a stuck filter cap with large pliers. A cracked or cross-threaded housing can cause a serious leak.
Step 4: Inspect the Drain Hose
Pull the washer forward without stretching its supply lines. Examine the entire hose for kinks, crushed sections, cracks, or sharp bends.
Disconnect the hose after placing towels and a bucket below the connection. Inspect both ends for lint, fabric, or hardened detergent.
A partial obstruction may allow some water through while leaving laundry wet. A complete blockage often causes humming with no visible flow.
Make sure the hose is not pushed too far into the standpipe. An airtight connection or improper depth can create siphoning problems.
Replace any hose that appears brittle, swollen, split, or permanently flattened. Standard replacement hoses often cost $15–$40 in 2026.
Common mistake: pushing a flexible object through the hose with excessive force. That can puncture its wall or lodge debris deeper.
Step 5: Check the Standpipe and Household Drain
Inspect the laundry standpipe or sink after confirming that the washer hose is clear. Slow drainage may indicate a plumbing blockage.
A working washer pump cannot overcome a restricted household drain. Water may rise from the standpipe during the pump’s discharge cycle.
Test the nearby laundry sink when one is available. Slow flow from other fixtures supports a household plumbing diagnosis.
Do not pour aggressive drain chemicals through the washer hose. They can damage seals and endanger anyone who later disconnects the line.
Common mistake: replacing the washer pump while ignoring an overflowing standpipe. Contact a plumber when the home drain backs up.
Step 6: Listen to the Drain Pump
Reinstall the filter and reconnect the hose. Restore power and run an empty drain-and-spin cycle while listening from a safe distance.
A steady hum without water movement often indicates a jammed or seized impeller. Grinding may mean broken pump blades or trapped debris.
Complete silence does not prove pump failure. The washer may withhold power because of a damaged lock, switch, wire, or control board.
Watch the drain hose and standpipe during the test. A strong water stream indicates that the pump is operating normally.
Common mistake: reaching into the filter housing during a powered test. Keep all covers secured whenever the machine is energized.
Step 7: Check the Door Lock, Lid Switch, and Load
Redistribute heavy towels, jeans, or bedding before testing again. Some washers pause when the load remains severely unbalanced.
Confirm that the door or lid closes firmly. Remove fabric around the latch and inspect the plastic strike for visible damage.
The control may refuse to drain or spin without a confirmed lock signal. This safety function prevents movement with an open door.
Front-load and top-load models use different drainage layouts. Their maintenance needs also vary. Compare them in Baltimore Chronicle’s front-load versus top-load washer guide for 2026.
Record every displayed error code before clearing the control panel. Search the exact code in the manufacturer’s model-specific support guide.
Common mistake: assuming every wet load means pump failure. An unbalanced load or defective door lock may stop the cycle earlier.
Step 8: Decide Whether the Pump Needs Replacement
Consider replacing the pump only after clearing the filter, hose, and household drain. A technician should confirm whether the pump receives power.
Electrical diagnosis usually requires a multimeter and model-specific wiring information. Leave that work to a professional without suitable repair experience.
Stop troubleshooting after finding melted insulation, burned connectors, active electrical leakage, or a recurring breaker trip. These conditions create fire and shock risks.
Ask at least 2 repair businesses for written estimates when the expected bill exceeds $250. Confirm whether the installed part receives a warranty.
The washer’s age should affect the decision. Baltimore Chronicle’s guide to how long washing machines last in 2026 explains lifespan, failure signs, and replacement timing.
A single pump failure can justify repair on a reliable newer machine. Repeated leaks, bearing noise, rust, and control failures favor replacement.
Common mistake: buying the cheapest pump before confirming compatibility. Always match the complete manufacturer part number.
Troubleshooting a Washer That Still Won’t Drain
These symptom patterns can separate a blocked drainage path from a control, lock, or household plumbing problem.
- The washer hums but keeps the water: Recheck the filter, impeller, hose, and pump housing.
- The machine stays silent: Inspect the door lock, lid switch, wiring, controls, and pump power supply.
- Water drains very slowly: Look for a partial clog, weak pump, crushed hose, or restricted standpipe.
- The washer drains but will not spin: Redistribute the load and inspect the locking mechanism.
- Water returns after draining: Check hose placement, standpipe blockage, and possible siphoning.
Test the washer with an empty drum whenever possible. Laundry adds weight and may hide a separate balance problem.
Watch the standpipe during every test. Overflow indicates a household drain issue rather than a defective washer pump.
Inspect the filter cap and hose connections for leaks afterward. Tighten the filter by hand according to the manufacturer’s instructions.
Take photographs of repeated error codes. Clear documentation can shorten the technician’s diagnosis and prevent unnecessary part replacement.
Do not keep using a washer that leaks onto wiring. Disconnect the appliance until a qualified professional completes an inspection.
How to Prevent Another Drainage Blockage
Check pockets for coins, tissues, screws, and hairpins before loading laundry. Place small garments inside a zippered mesh bag.
Use only the detergent type and amount recommended for the machine. Excessive suds can interfere with sensors and leave residue inside hoses.
Clean an accessible pump filter on the manufacturer’s schedule. Homes with pets or frequent laundry may require more regular inspection.
Leave the front-load washer door slightly open after use. Drying the gasket reduces odors, residue, and biological growth.
Inspect the drain hose every 6 months for compression and wear. Avoid pushing the machine tightly against the wall.
Run the manufacturer’s cleaning cycle when indicated. Baltimore Chronicle also provides a detailed guide to cleaning a front-load washer and its drain filter.
FAQ
Why is my washer not draining but still spinning?
A partial clog may allow limited drainage while leaving clothes wet. Inspect the filter, hose, standpipe, and pump impeller. Excessive detergent can also affect sensing.
Can I use drain cleaner in a washing machine?
No. Caustic drain cleaners can damage seals, hoses, and pump components. They also create a chemical hazard during later repairs.
How can I tell whether the washer pump is bad?
A failed pump may grind, leak, hum without moving water, or remain silent. Professional voltage testing can separate pump failure from control problems.
Where is the washing machine drain filter?
Many front-load machines place it behind a lower front access door. Some top-load models have no filter intended for owner servicing.
How much does it cost to fix a washer that won’t drain?
Cleaning a filter or straightening a hose may cost nothing. Professional repairs often run $180–$400, depending on the cause and location.
Should I repair or replace an older washer?
Compare the repair estimate with replacement cost, age, condition, and previous failures. Repeated major repairs usually weaken the case for keeping it.
Earlier we wrote about Do Homebuyers Need Title Insurance in 2026? Costs, Risks, and Policy Differences