


How to use dual SIM on iPhone 2026 takes about 10 minutes when both carrier plans are ready. Add or transfer the second eSIM, label each number, then choose which line handles calls, texts, and cellular data, as the Baltimore Chronicle editorial team notes.
An iPhone can keep 2 phone numbers active at the same time. One line might handle personal calls, while the other serves clients, coworkers, or travel needs. The correct setup prevents calls from leaving through the wrong number and reduces unexpected roaming charges.
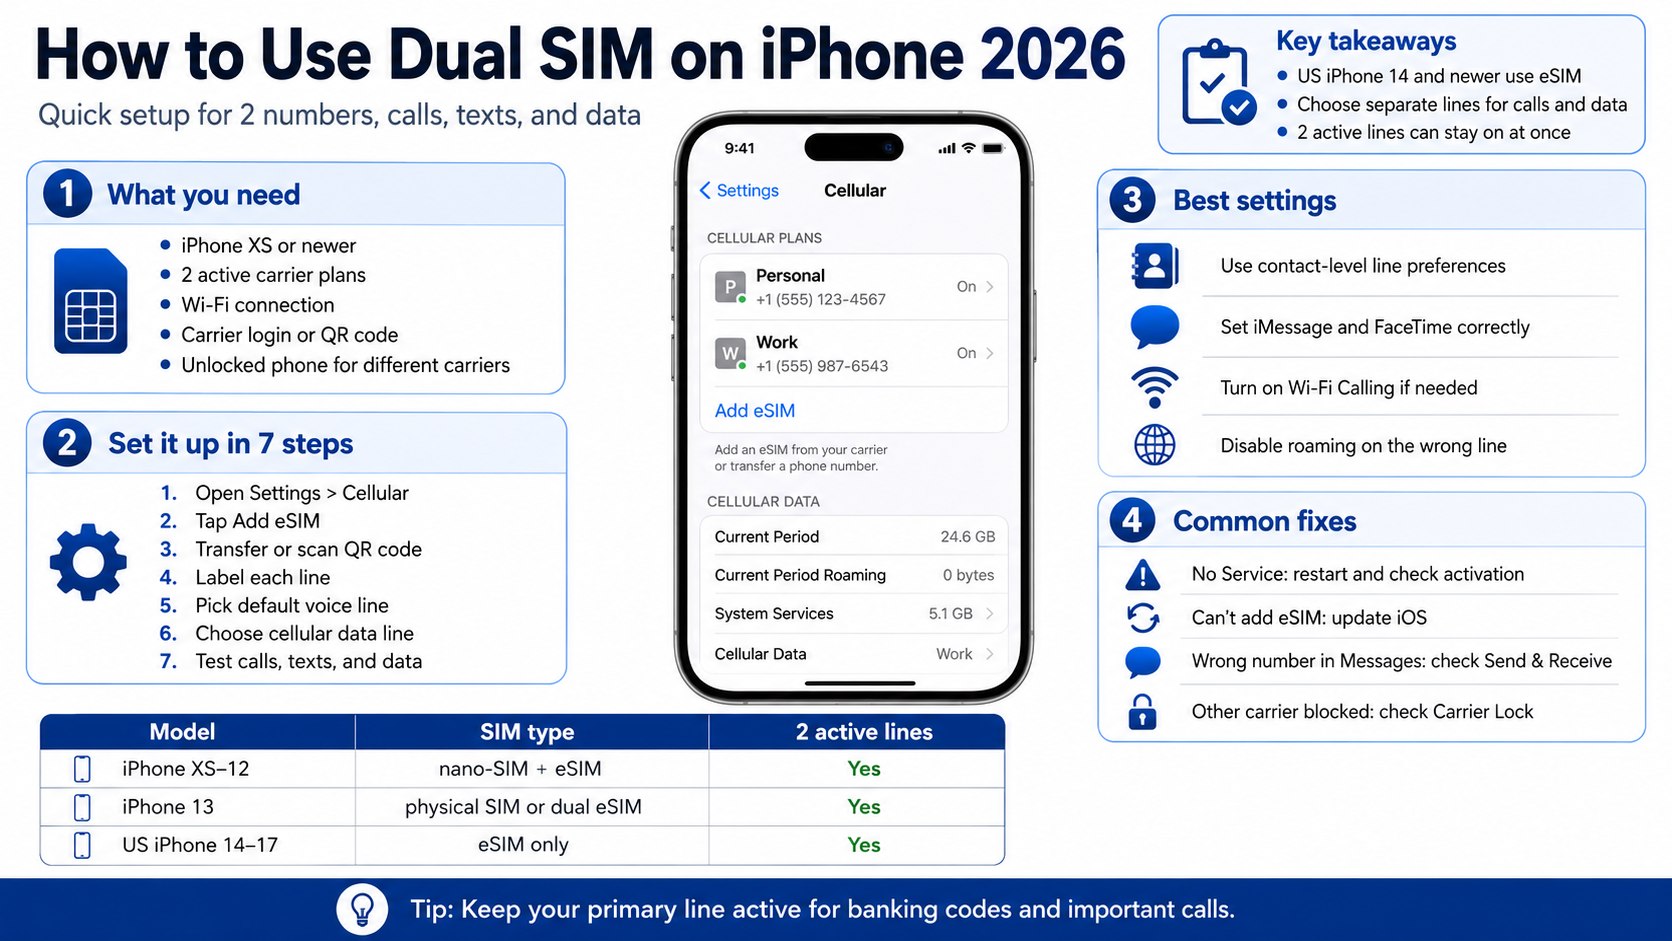
Key takeaways
- US iPhone 14 and newer models use eSIM instead of a removable physical SIM card.
- You can choose separate default lines for calls, contacts, messages, FaceTime, and cellular data.
- Both numbers remain active, but one ongoing call can affect availability on the second line.
What you need before setting up Dual SIM
Prepare both cellular accounts before opening the iPhone settings. Most failed activations involve an account restriction, carrier lock, expired QR code, or unsupported plan.
You will need:
- An iPhone XS, XS Max, XR, or newer model
- Two active cellular plans from supported carriers
- A reliable Wi-Fi connection
- Your carrier login and account PIN
- The billing ZIP code attached to each account
- An unlocked iPhone when using different carriers
- A QR code, carrier app, activation link, or nearby old iPhone
- About 10–20 minutes for setup and testing
Check the carrier lock before buying or transferring a second plan. Open Settings, General, About, then locate Carrier Lock. “No SIM restrictions” means the device should accept another compatible US carrier.
A locked AT&T, T-Mobile, or Verizon iPhone may reject a competing plan. Contact the original carrier for its unlocking requirements before paying for another service.
Adding an existing eSIM is often free, although the carrier may charge for a new line. Prepaid service in the USA commonly starts near $15–$50 monthly in 2026. Taxes, activation charges, hotspot limits, and priority data vary by provider.
People moving both their number and personal files should first follow the Baltimore Chronicle guide on how to transfer data from an old iPhone to a new iPhone in 2026. It explains Quick Start, iCloud, Finder backups, and eSIM migration.
How to use dual SIM on iPhone 2026: compatible models
Apple introduced Dual SIM support with the iPhone XS, iPhone XS Max, and iPhone XR. The available SIM combination depends on the model and the country where Apple originally sold it.
| iPhone model | Typical US SIM configuration | Two active lines |
|---|---|---|
| iPhone XS, XS Max, XR | 1 nano-SIM and 1 eSIM | Yes |
| iPhone 11 and 12 series | 1 nano-SIM and 1 eSIM | Yes |
| iPhone 13 series | Nano-SIM plus eSIM, or 2 eSIMs | Yes |
| US iPhone 14 and 15 series | eSIM only | Yes |
| US iPhone 16 series | eSIM only | Yes |
| US iPhone 17 series | eSIM only | Yes |
An iPhone can store several eSIM profiles, although only 2 plans normally remain active together. Inactive plans stay saved until you delete them or transfer them elsewhere.
Imported devices can use different hardware. Some European and Asian models retain a physical nano-SIM tray. Certain models sold in mainland China support 2 physical nano-SIM cards instead of the standard US arrangement.
Open Settings, General, About, then check the model number before assuming the phone supports a specific setup. The original sales region matters more than the owner’s current state.
Carrier support also varies. A compatible iPhone does not guarantee that every prepaid, business, government, or legacy plan can use eSIM.
Verify current compatibility through the carrier and Apple before canceling an existing line. Deactivating the old service too early can delay or disrupt number transfers.
Step 1: Add or transfer the second cellular plan
Open Settings, tap Cellular, then choose Add eSIM or Set Up Cellular. The options shown depend on your carrier, account, and previous phone.
- Choose Transfer From Nearby iPhone for an eligible existing line.
- Select Use QR Code when the carrier supplied an activation code.
- Use the carrier app when activation happens through your online account.
- Select Transfer From Android when your provider supports direct migration.
- Choose Enter Details Manually when the carrier supplied activation server information.
This process installs the digital carrier profile on the iPhone. Keep Wi-Fi enabled until the new carrier name and signal bars appear.
Do not delete the old eSIM before the transfer finishes. Leave the previous device powered on, unlocked, and connected until the new phone completes a test call.
AT&T, Verizon, T-Mobile, Visible, Mint Mobile, and other providers use different activation flows. Business accounts can require approval from an account administrator.
A prepaid carrier may send an activation link by email or display a QR code inside its app. Some codes work only once, so avoid scanning them on the wrong device.
Readers configuring a newly purchased device can also use the Baltimore Chronicle guide on how to set up a new iPhone in 2026. It covers Quick Start, Apple Account access, eSIM activation, apps, and security checks.
Step 2: Label both phone numbers clearly
After activation, iOS asks you to label each cellular plan. Available labels include Primary, Secondary, Personal, Business, Travel, and Cellular Data.
You can also create a custom name. A freelancer might use “Personal” and “Clients,” while a traveler could choose “Verizon USA” and “Europe Travel.”
Clear labels reduce mistakes when placing calls or changing data lines. Generic names such as Line 1 and Line 2 become confusing after several eSIM profiles are stored.
To rename a plan later, open Settings, Cellular, select the line, then tap Cellular Plan Label. The chosen name appears in Phone, Messages, Contacts, and cellular settings.
Use short labels that remain readable on smaller screens. Including the carrier name can help when 2 plans have similar numbers or coverage areas.
Step 3: Choose the default line for calls
Open Settings, Cellular, then tap Default Voice Line. Select the number that should handle new outgoing calls when a contact has no saved preference.
The selected line also handles calls placed through the keypad unless you manually switch numbers. This setting matters most for workers who must keep personal and business calls separate.
iPhone can remember the last line used for each contact. Open a contact, tap the current cellular plan, then select the preferred number.
Assign the business line to customers, contractors, and coworkers. Use the personal line for relatives, schools, doctors, and household services.
Before making a one-time call, open the Phone keypad and tap the line label near the top. Select the other number, enter the phone number, then place the call.
The most common mistake is calling a client from a private number. Contact-level preferences prevent that problem without changing the default for everyone else.
Step 4: Configure Messages, iMessage, and FaceTime
Open Settings, Apps, Messages, then tap Send & Receive. Confirm which phone numbers can receive iMessages and which number starts new conversations.
Repeat the process under Settings, Apps, FaceTime. Both lines may appear after Apple and the carrier finish verifying them.
Under Start New Conversations From, choose the number you use most often. Existing conversations usually continue using the number that started the original thread.
Do not create a new message thread when you need to preserve the current sender number. Open the existing conversation and check which line appears above the keyboard.
Standard SMS and MMS behavior can depend on carrier support. Group messages containing Android users may also rely on SMS, MMS, or RCS rather than iMessage.
If a number remains stuck on “Waiting for Activation,” confirm that the line can send ordinary SMS messages. Restart the iPhone and check the Apple Account under Send & Receive.
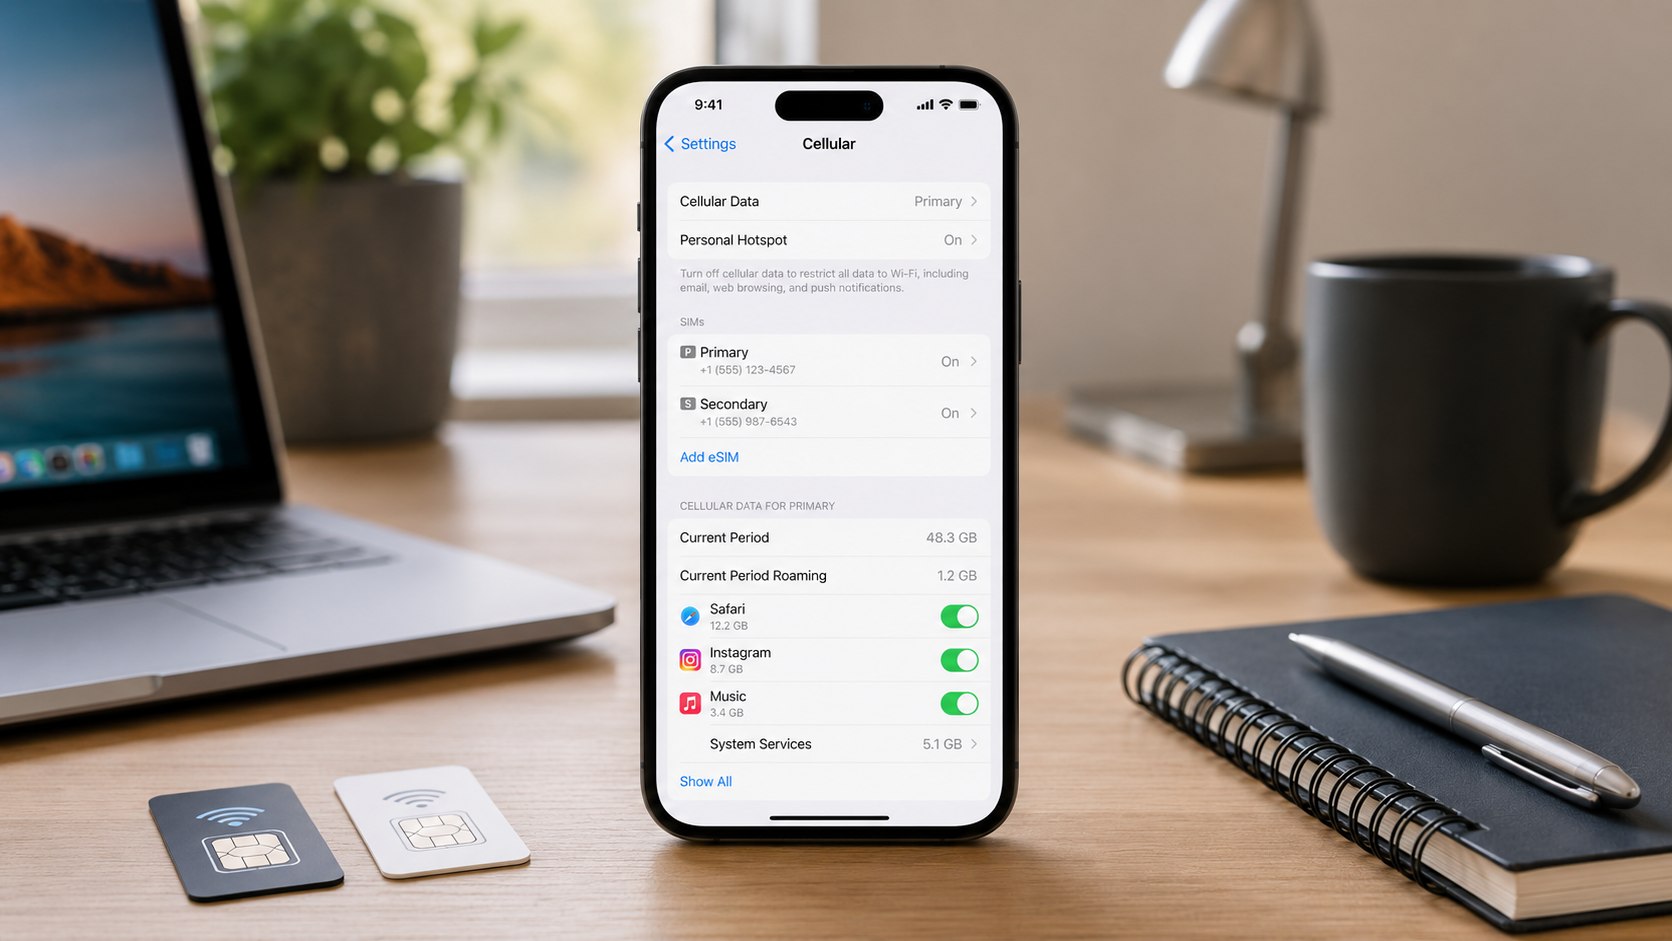
Step 5: Select the cellular data line
Open Settings, Cellular, then tap Cellular Data. Choose the plan that should provide mobile internet for apps, maps, email, streaming, and Personal Hotspot.
Only one line usually supplies cellular data at a time. The second remains available for calls and messages while both plans stay enabled.
Enable Allow Cellular Data Switching when you want the iPhone to use another line’s data during certain calls. This can preserve internet access while the voice line is busy.
Leave data switching disabled when the secondary plan has expensive roaming or a small allowance. Otherwise, background services could consume the wrong package.
Review data use under Settings, Cellular. The screen shows usage by app and can reveal whether video, cloud backups, or social media consumed the monthly allowance.
Reset the statistics at the start of the billing cycle when accurate tracking matters. Carrier billing remains the final source for chargeable usage.
Step 6: Control roaming and Wi-Fi Calling
Open each plan under Settings, Cellular. Review Data Roaming, Voice & Data, Network Selection, Low Data Mode, and Wi-Fi Calling separately.
For ordinary US service, keep data roaming disabled unless the provider directs otherwise. Some plans include domestic roaming, while international roaming can cost significantly more.
Travelers should usually disable data roaming on the main US line. Enable it only on the travel eSIM when that provider requires roaming to connect to a partner network.
This arrangement lets the primary number receive calls and verification texts without using its international data package. Charges can still apply to voice calls and SMS, so check the plan.
Wi-Fi Calling can improve service inside homes, offices, and hotels with weak cellular coverage. The carrier may require an emergency address before enabling the feature.
Do not turn off the primary line without checking which accounts use it. Banks, airlines, employers, and government services may send security codes to that number.
Step 7: Test both lines before relying on them
Call a trusted person from each number and ask them to call both lines back. Send an SMS and an iMessage from each available number.
Turn off Wi-Fi briefly and load a webpage. Confirm that the expected carrier provides the cellular data connection, then restore Wi-Fi.
Use this checklist before relying on dual eSIM on iPhone for travel or business:
- Both carrier names appear under Settings and Cellular.
- Each line can place and receive a call.
- SMS verification codes reach the correct number.
- iMessage and FaceTime show the intended numbers.
- Cellular data uses the selected plan.
- Roaming is disabled on lines that should not roam.
- Important contacts have the correct preferred line.
- Voicemail works for both carrier accounts.
Testing confirms that carrier provisioning has finished. It also exposes number-porting delays before the old service is canceled.
Keep the previous carrier active until the new provider confirms completion. Canceling the original plan too soon can place the phone number at risk.
Restart the iPhone when either line lacks service after activation. A restart forces iOS to reload the carrier profiles and network settings.
Take screenshots of the final labels and defaults. They provide a useful reference after an iOS update or another eSIM transfer.
Check voicemail separately for both lines. Each carrier can use its own greeting, PIN, and visual voicemail configuration.
Troubleshooting Dual SIM problems
Most Dual SIM failures involve carrier provisioning rather than damaged hardware. Start by opening Settings, General, About, then wait for a possible carrier settings update.
- The second line shows No Service: confirm activation, restart the iPhone, and inspect the carrier account.
- Add eSIM is missing: update iOS and confirm that both the model and cellular plan support eSIM.
- Another carrier will not activate: check Carrier Lock and request an official device unlock.
- Calls reach only one number: ensure both lines are enabled and review Wi-Fi Calling settings.
- Messages use the wrong number: check Send & Receive and Start New Conversations From.
If the problem continues, open Settings, General, Transfer or Reset iPhone, Reset, then choose Reset Network Settings. This action removes saved Wi-Fi networks and other network preferences.
Do not delete an eSIM unless the carrier confirms that it can be downloaded again. Removing the profile does not cancel the underlying contract or monthly bill.
Contact the carrier assigned to the failing line when only one plan has problems. Apple can inspect the device, but the provider controls number provisioning and network registration.
People living near state or international borders should also inspect Network Selection. Automatic selection normally prevents registration on an unintended network.
If a phone containing both active numbers is lost, use the Baltimore Chronicle guide on how to find an iPhone when it is offline. It explains Find My, Lost Mode, carrier suspension, Apple Pay protection, and replacement steps.
FAQ about using two numbers on iPhone
Can an iPhone receive calls on both SIMs?
Yes. Both active lines can receive calls while the iPhone remains on standby. During one call, the other number may send incoming calls to voicemail. Behavior depends on the carrier and Wi-Fi Calling support.
Can I use Verizon and T-Mobile on the same iPhone?
Yes, when the iPhone is unlocked and both plans support eSIM. Label each provider clearly, then choose separate defaults for voice and data.
Can I use 2 eSIMs at the same time?
iPhone 13 and later models support 2 active eSIMs. Compatible devices can store additional inactive profiles for future travel or carrier changes.
Does Dual SIM use more battery?
Maintaining 2 network connections can increase battery use, especially in weak-signal areas. The effect depends on coverage, calls, background data, and roaming.
How do I switch lines before making a call?
Open the Phone keypad and tap the current line label. Choose the other number before dialing. You can also assign a preferred line to individual contacts.
Can I turn off one SIM without deleting it?
Yes. Open Settings, Cellular, select the plan, then disable Turn On This Line. The eSIM remains stored and can be enabled again later.
Once calls, messages, data, voicemail, and roaming are tested, the 2-number setup is ready. Review the defaults before travel, carrier changes, or major iOS updates.
Earlier we wrote about Moving Address Checklist 2026: 30 Agencies, Accounts and Services to Update