


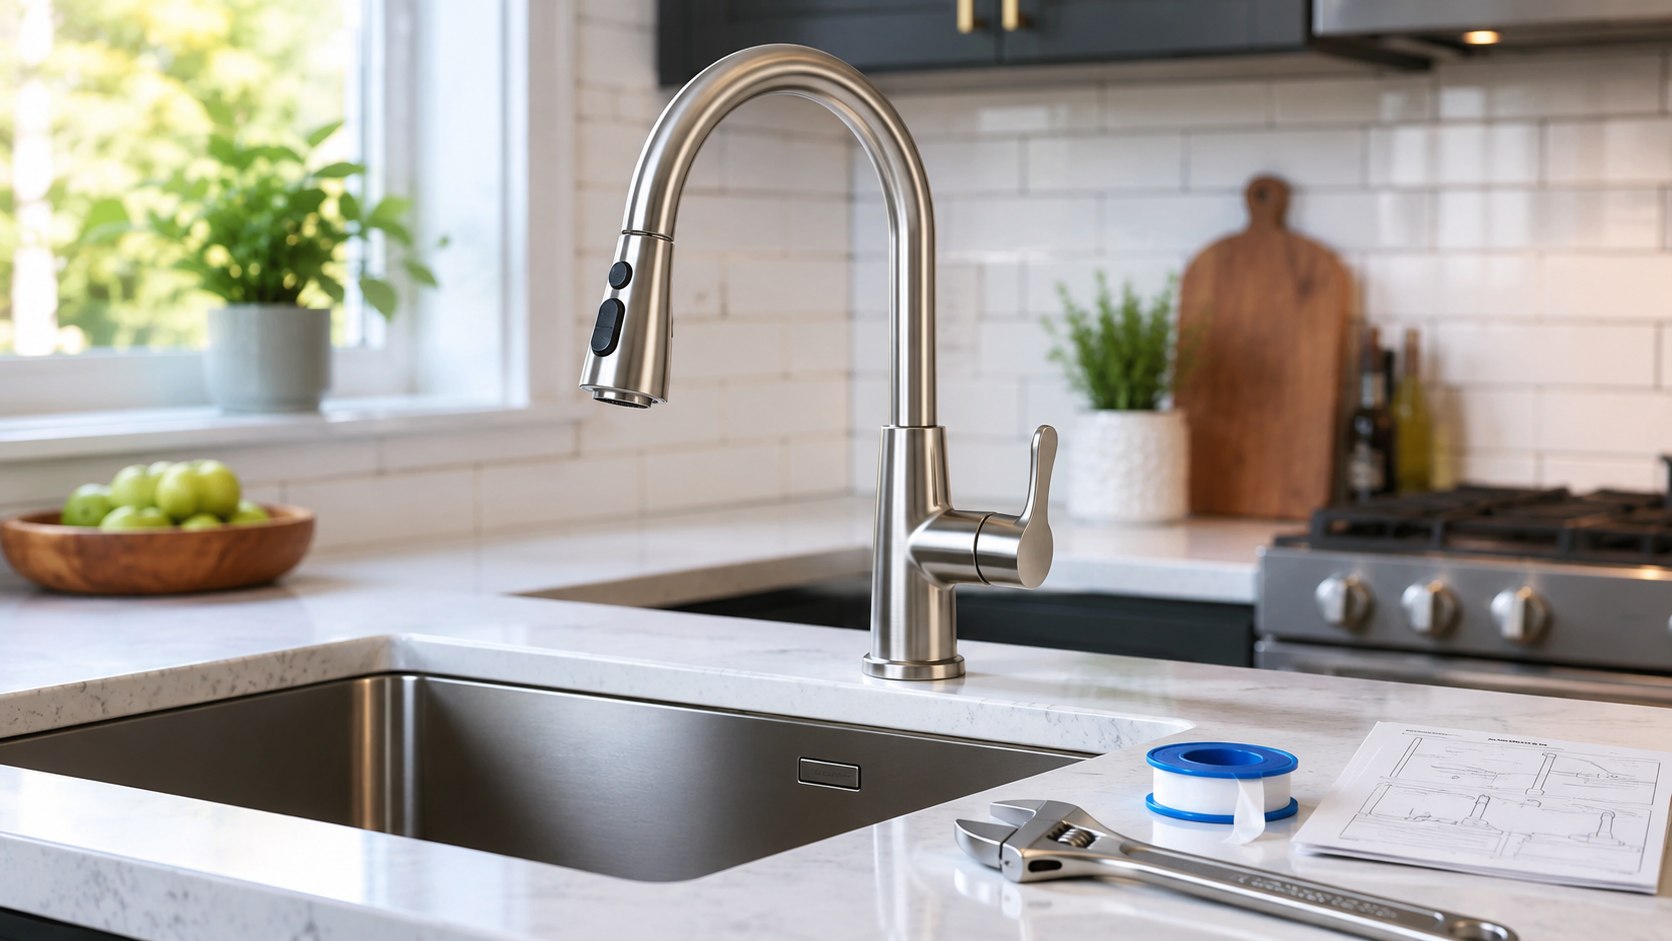
How to replace a kitchen faucet without a plumber comes down to 3 checks: confirm the sink-hole layout, inspect the shutoff valves, and make sure the new supply lines reach without stretching. Most straightforward replacements take 1–2 hours and require basic hand tools rather than advanced plumbing experience, as the Baltimore Chronicle editorial team notes.
Turn off both water valves, release pressure through the old faucet, disconnect the supply lines, and remove the mounting hardware. Clean the sink deck before securing the new faucet, reconnecting its hoses, and testing every joint. Stop the project if a shutoff valve leaks, a pipe rotates inside the wall, or corrosion has weakened the plumbing.
Key takeaways
- Match the new faucet to the sink’s hole count, spacing, and available backsplash clearance.
- A basin wrench makes hidden mounting nuts easier to reach and reduces the risk of damaged hardware.
- Test every connection with dry paper towels before returning cleaners or trash bins to the cabinet.
What you need
Gather the tools and replacement parts before shutting off the water. A missing adapter or short supply hose can leave the kitchen sink unusable until another store trip.
- New kitchen faucet that fits the sink or countertop
- Basin wrench or faucet installation tool
- Adjustable wrench and tongue-and-groove pliers
- Phillips and flat-head screwdrivers
- Bucket, shallow tray, towels, and flashlight
- Plastic putty knife and nonabrasive cleaner
- Braided stainless-steel supply lines, when not included
- Correct adapters for nonstandard shutoff valves
- Plumber’s putty or silicone, only when specified
- Penetrating oil for corroded mounting hardware
- 1–2 hours for a standard replacement
- Approximately $80–$400 for tools, parts, and faucet
Many Moen, Delta, Kohler, Pfister, and American Standard faucets include factory-attached hot and cold hoses. Check the package before purchasing separate lines. Measure from each shutoff valve to the faucet connection without pulling the hose tight.
A basic manual faucet often costs about $70–$150 in the United States during 2026. Midrange pull-down models commonly cost $150–$350. Touch-activated, filtered, commercial-style, and premium-finish faucets can exceed $300 and sometimes reach $900.
A basin wrench generally adds $15–$35 to the project. New supply lines, adapters, sealant, or mounting hardware may add another $10–$50. Exact prices depend on the retailer, finish, brand, and state.
Check the faucet, sink holes, and supply lines
Look under the sink and count the mounting holes. A single-hole faucet may fit a 3-hole sink when the manufacturer includes a deck plate. A widespread or bridge faucet needs the correct spacing and cannot be forced into an incompatible opening.
| Item to inspect | What to confirm | Common problem |
|---|---|---|
| Mounting holes | Number, diameter, and spacing | The faucet cannot cover unused holes |
| Backsplash clearance | Room for the handle to move | The handle hits a wall or window trim |
| Supply hoses | Length and connector size | The hoses are stretched or incompatible |
| Shutoff valves | They close fully without leaking | Water continues after the valves close |
| Sprayer hose | Clear path beneath the sink | The hose catches on pipes or bottles |
Most US under-sink shutoff valves use a 3/8-inch compression outlet. Older homes and modified plumbing may use different fittings. Never identify a connector only by appearance.
Compare the new connection with the existing valve. Take a clear photograph and measurements to a plumbing counter when the size remains uncertain. Buying several random adapters often creates more joints and more possible leak points.
Inspect valve bodies for rust, green deposits, mineral buildup, or moisture. Turn each handle gently. A frozen valve can break when excessive force is applied, turning a simple faucet replacement into an emergency repair.
Renters should review their lease and obtain written permission before changing a permanent fixture. Keep the old faucet and mounting hardware unless the property owner says otherwise. Homeowners planning broader work can also read the Baltimore Chronicle guide on how to install kitchen cabinets yourself, including plumbing clearances and cabinet measurements.
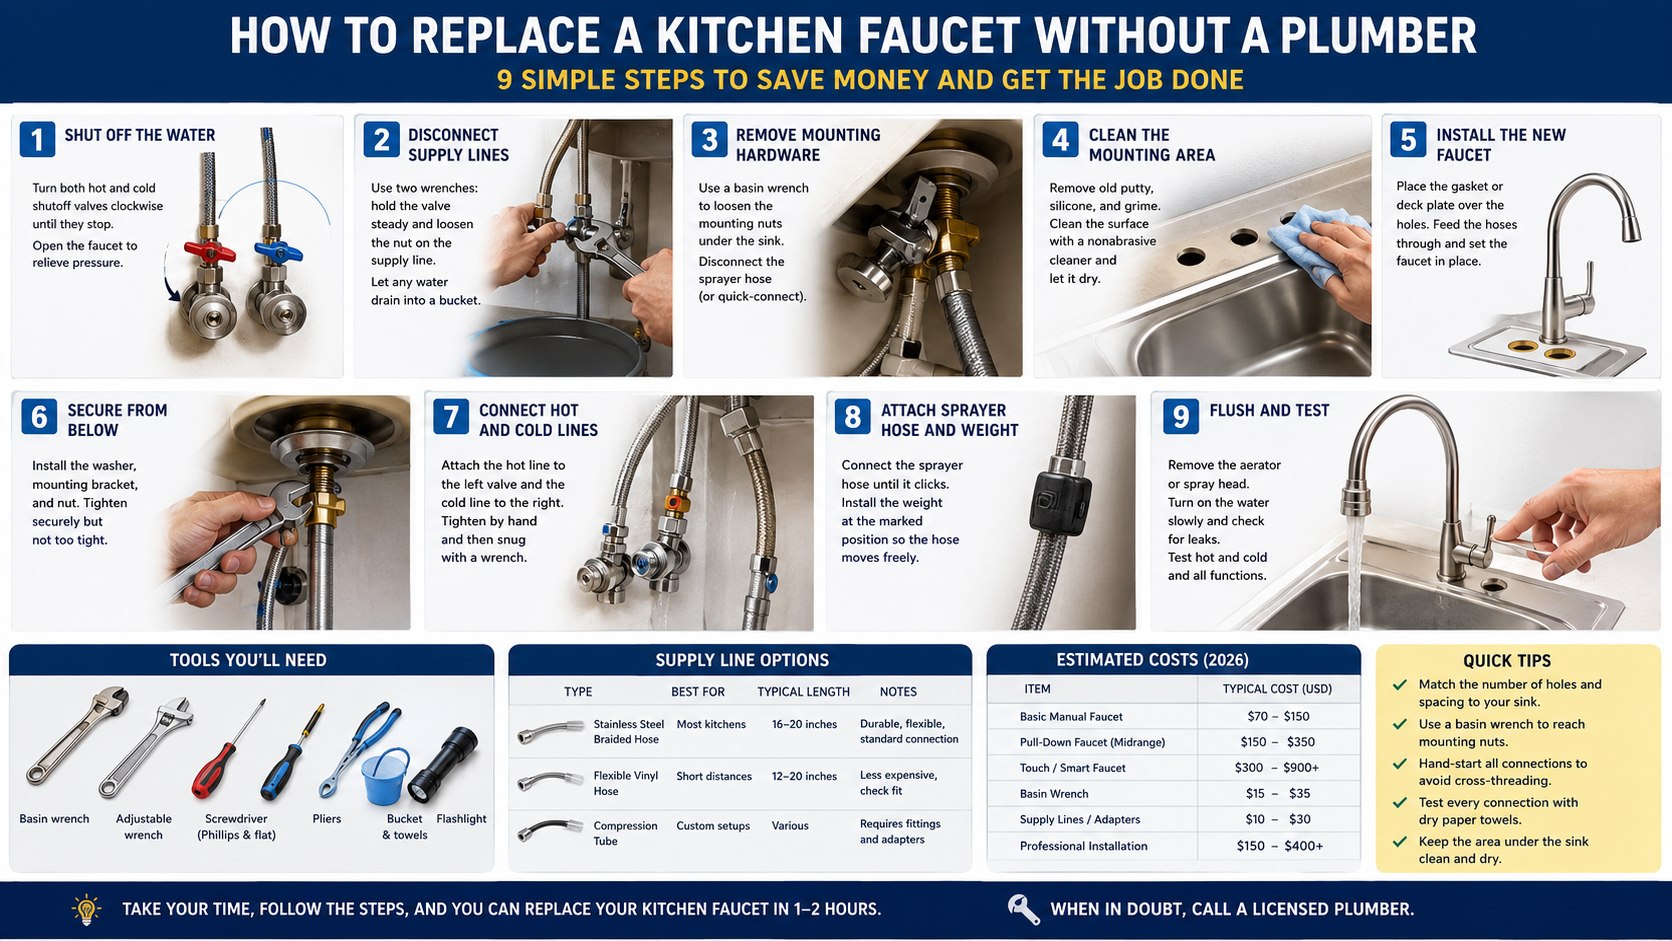
Step 1: Shut off the water and relieve pressure
Turn the hot and cold shutoff valves clockwise until they stop. Open the faucet and wait until the water flow ends, then place a bucket beneath both connections.
This step confirms whether the valves are holding and limits the amount of water released. Do not remove a supply line while water continues flowing steadily.
If a valve will not close, use the home’s main shutoff. Open another low-level faucet to relieve pressure. Contact a plumber when the main valve also fails or cannot be found.
Step 2: Disconnect the old supply lines
Hold the shutoff valve steady with 1 wrench while loosening the supply-line nut with another. This counterhold prevents the valve and connected pipe from twisting.
Allow trapped water to drain into the bucket. A small spill is normal, even after the faucet stops running.
The common mistake is pulling or rotating the complete valve assembly while fighting a seized nut. Stop if the pipe moves inside the wall or cabinet floor.
Step 3: Remove the mounting hardware and old faucet
Use a basin wrench to loosen the mounting nuts behind the sink basin. Disconnect the sprayer hose or quick-connect fitting according to its release mechanism.
A basin wrench reaches narrow spaces where ordinary pliers cannot sit squarely. Removing every nut, clip, bracket, and hose matters before lifting the faucet from above.
Apply a small amount of penetrating oil when corrosion prevents movement. Let it work before trying again. Never use an open flame beneath a sink because cleaners, plastic parts, and cabinet materials may ignite.
Step 4: Clean and prepare the mounting surface
Lift out the old faucet and remove putty, silicone, mineral deposits, and grime. Use a plastic scraper on stainless steel, porcelain, stone, or composite surfaces.
A clean and level mounting area helps the gasket seal correctly. Hardened residue beneath the faucet base can cause movement or allow water into the cabinet.
Check the exposed sink deck for cracks, rust, swelling, or water stains around the holes. Repair those problems before installing the new fixture. A new faucet cannot compensate for a damaged sink or weakened countertop.
If the replacement is part of a larger renovation, compare the work with current kitchen remodeling costs in the USA for 2026. That guide covers plumbing, cabinets, countertops, appliances, and commonly overlooked expenses.
Step 5: Position the gasket, deck plate, and faucet
Read the model-specific instructions before applying any sealant. Place the supplied gasket or deck plate over the mounting holes, then feed the hoses through the correct opening.
Turn the faucet into its final position before tightening the hardware. Proper alignment is easier while the base can still move.
A common mistake is adding plumber’s putty beneath a faucet designed to use only a rubber gasket. Some stone surfaces can also absorb oils from traditional putty. Use silicone only when the manufacturer permits it.
Step 6: Secure the faucet beneath the sink
Install the washer, mounting bracket, and nut in the order shown in the instructions. Tighten the hardware gradually while keeping the faucet centered from above.
The fixture should feel stable without crushing the gasket or deforming the sink. Overtightening can crack plastic components and damage thin stainless steel.
Tall commercial-style faucets may cause lightweight sinks to flex. Install the included reinforcement plate when available. An approved support bracket may also help when it fits the sink and faucet design.
Step 7: Connect the hot and cold supply lines
Connect the hose marked hot to the left-side valve. Attach the cold hose to the right-side valve. Start each nut by hand before using a wrench.
Hand-starting helps prevent cross-threading. Tighten each fitting according to the faucet instructions rather than applying maximum force.
Do not use thread-seal tape on standard compression fittings unless the manufacturer specifically requires it. Compression connections seal through their mating surfaces, not through tape wrapped around the threads.
Keep the hoses free from sharp bends, kinks, and tension. Do not join 2 short hoses simply because the included lines cannot reach. Use an approved replacement line or the correct manufacturer-recommended extension.
Step 8: Attach the sprayer hose and weight
Push the quick-connect fitting together until it locks. Tug gently to confirm that both parts are fully engaged.
Install the pull-down hose weight at the marked position. The weight must move freely without striking the drain, garbage disposal, dishwasher hose, or cabinet wall.
The usual mistake is storing cleaning products directly in the hose path. Move bottles, bins, and tools before testing the spray head’s full travel.
Step 9: Flush and test the new kitchen faucet
Remove the aerator or spray head when the instructions recommend flushing. Open the shutoff valves slowly, then run hot and cold water to remove debris from the lines.
Slow pressurization makes leaks easier to identify. Check each fitting while the faucet is running and after it is turned off.
Wipe all connections dry. Wrap a clean paper towel around each nut, valve, and quick-connect joint. Even a small leak will leave a visible mark.
Test the faucet in stream and spray modes. Rotate the spout and operate the handle several times. Recheck the cabinet after 10 minutes and again later that day.
Supply-line options and realistic 2026 costs
The correct supply line should reach its valve without tension. It should also avoid tight loops that can rub against cabinet hardware or drain components.
| Item or service | Typical 2026 US cost | When it may be needed |
| Basic manual kitchen faucet | $70–$150 | Standard replacement without electronic features |
| Midrange pull-down faucet | $150–$350 | Improved hose, docking, finish, or spray controls |
| Touch or smart faucet | $300–$900+ | Electronic controls, sensors, or advanced features |
| Basin wrench | $15–$35 | Reaching mounting nuts behind the sink |
| Supply lines or adapters | $10–$30 | Missing, damaged, short, or incompatible hoses |
| Professional installation | $150–$400+ | Corrosion, failed valves, difficult access, or altered plumbing |
These figures are practical market ranges rather than fixed national prices. Labor can cost more in California, New York, Massachusetts, Washington, and other high-cost areas.
Emergency visits and weekend appointments also carry higher charges. A plumber may charge more when replacing shutoff valves, correcting damaged threads, or working around a garbage disposal.
Compare model numbers rather than brand names alone. Moen, Delta, Kohler, Pfister, and American Standard sell products across several price levels. Warranty terms, included hoses, deck plates, and replacement-part availability vary.
Keep the receipt and photograph the model label before installation. This information can simplify future claims for a cartridge, spray head, sensor, or pull-down hose. Readers updating the rest of the kitchen can also use the Baltimore Chronicle instructions on how to paint kitchen cabinets professionally at home.
Troubleshooting a DIY kitchen faucet replacement
Most problems after installation come from a loose connection, blocked hose, displaced gasket, or debris in the aerator. Check the affected component before removing the entire faucet.
- Water leaks at a supply nut: Close the valve, relieve pressure, inspect alignment, and tighten carefully. Replace a damaged connector or seal.
- Water appears around the faucet base: Check the gasket, mounting tension, and deck plate. Confirm that spray from above is not entering the base.
- Water flow is weak: Remove and clean the aerator or spray head. Installation debris may be restricting the outlet.
- The pull-down hose will not retract: Reposition its weight and clear objects from the hose path.
- Hot and cold water are reversed: Shut off both valves and switch the supply connections after checking the markings.
Do not continue tightening a leaking fitting without inspecting it. Excessive force can damage a washer, crack a plastic connector, or deform the shutoff valve.
A leak from the valve stem or valve body is separate from the faucet connection. Close the main water supply when necessary. A defective valve may require replacement.
Call a licensed plumber when pipes move inside the wall, valves cannot close, or severe corrosion is visible. Professional work is also sensible for stone drilling, wall-mounted faucets, filtered 3-way fixtures, and instant-hot systems.
FAQ
Can I replace a kitchen faucet without turning off the main water?
Yes, when both under-sink shutoff valves close completely. Use the main shutoff when either valve continues leaking or fails to stop the flow.
Do new kitchen faucets include supply lines?
Many modern single-handle faucets include factory-attached hot and cold hoses. Some models require separate lines, so check the package before installation.
Should I use plumber’s tape on kitchen faucet lines?
Usually not on compression fittings. Use tape only when the manufacturer identifies a threaded connection that requires it.
How tight should faucet supply lines be?
Start the connection by hand and tighten it according to the manufacturer’s directions. It should be secure without crushing seals or twisting the valve.
Why is my new kitchen faucet leaking underneath?
Common causes include a loose supply line, damaged seal, incomplete quick-connect fitting, leaking shutoff valve, or defective factory-attached hose.
When should I call a plumber instead of replacing the faucet myself?
Call a plumber when valves fail, pipes rotate, fittings are heavily corroded, or the sink requires drilling. Hidden water damage also warrants professional inspection.
Earlier we wrote about Gas vs Electric Dryer Cost 2026: Monthly Bills, Hookups and Real Savings