


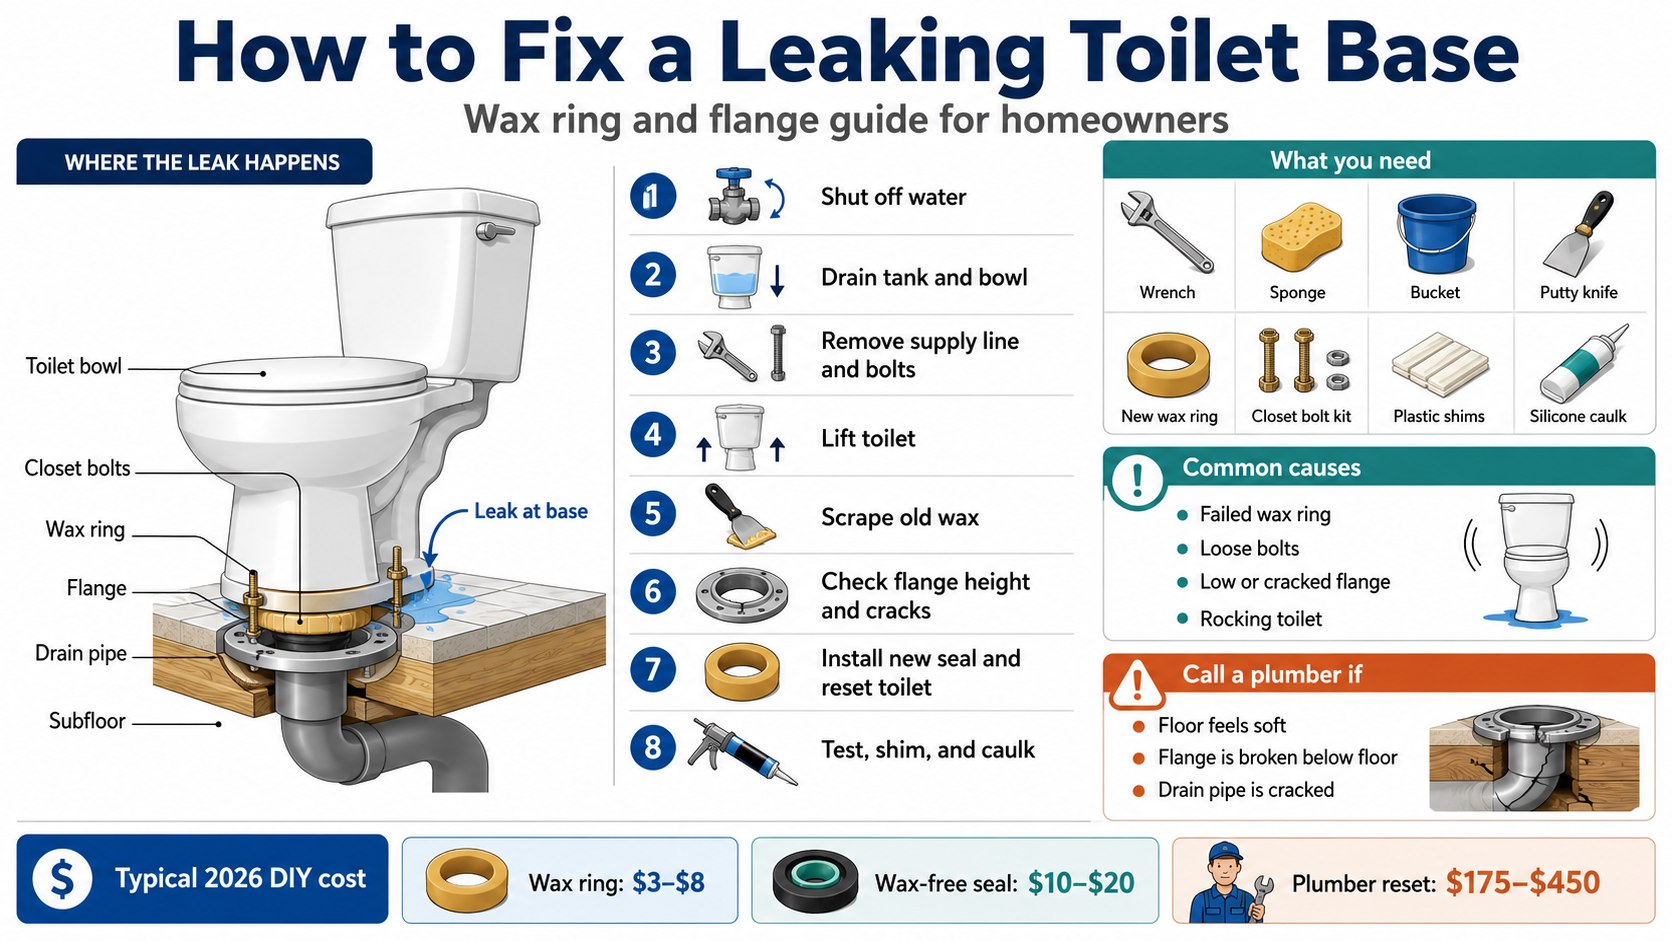
This guide explains how to fix a leaking toilet base by replacing the wax ring, checking the flange, and resetting the bowl. Most homeowners can do the job in 2–3 hours with basic tools and $15–$75 in parts, unless the flange or subfloor is damaged, аs noted by Baltimore Chronicle.
Stop using the toilet until the leak is fixed. Water at the base usually means the seal between the toilet and drain has failed, the toilet is rocking, or the closet flange no longer holds the bowl tight to the floor.
Key takeaways
- A wet toilet base usually points to a failed wax ring, loose closet bolts, or a cracked flange.
- Do not caulk over an active leak; it traps water and can hide floor damage.
- Call a plumber if the flange is broken below floor level or the subfloor feels soft.
If the leak has already affected flooring, drywall, or the room layout, Baltimore Chronicle’s guide to bathroom remodel costs in the USA in 2026 gives useful context for deciding whether this is a small repair or part of a larger bathroom project.
What causes water around the toilet base?
Water around the bottom of a toilet is not always a sewer leak. First, dry the floor and flush once while watching the tank, supply line, shutoff valve, and bowl base.
If water runs down from the tank, the base seal may be fine. If clean water appears at the shutoff valve or braided supply line, replace those parts before pulling the toilet.
If water seeps from under the bowl after a flush, the likely problem is the wax ring or flange. The wax ring seals the toilet horn to the drain opening; the flange anchors the toilet to the floor and drain pipe.
| Symptom | Likely cause | Best next move |
|---|---|---|
| Water appears only after flushing | Failed wax ring or uneven toilet base | Pull and reset the toilet |
| Toilet rocks side to side | Loose bolts, uneven floor, or damaged flange | Shim the bowl and inspect the flange |
| Water drips near the wall valve | Supply line or shutoff valve leak | Replace the connector or valve |
| Sewer smell near the bowl | Broken seal or open drain path | Replace the seal and check the flange height |
The U.S. Environmental Protection Agency’s WaterSense program notes that household leaks can waste large amounts of water, and toilets are a common source. Its Fix a Leak Week guidance is a useful reference for separating toilet leaks from other plumbing problems.
What you need
Gather parts before shutting off the toilet. A half-finished toilet repair is difficult to pause if the bathroom is the only one in the home.
- Adjustable wrench or deep socket for closet bolts
- Putty knife or scraper for old wax
- Large sponge, bucket, towels, and disposable gloves
- New wax ring, extra-thick wax ring, or wax-free toilet seal
- Closet bolt kit, usually 1/4 inch by 2-1/4 inches or similar
- Plastic toilet shims for leveling the bowl
- Flange repair ring, extender, or spacer kit if the flange is damaged or too low
- Utility knife and bathroom-grade silicone caulk for the final perimeter bead
As of 2026, a basic wax ring from brands such as Fluidmaster, Oatey, Korky, or Danco often costs about $3–$8 at major U.S. retailers. Wax-free seals usually run about $10–$20, closet bolt kits about $3–$8, and flange repair rings about $10–$30.
A plumber may charge about $175–$450 to reset a toilet in many U.S. markets, with higher pricing in states such as California, New York, Massachusetts, and Washington. The bill can climb if the flange connects to old cast iron, the subfloor is rotten, or the bathroom floor must be opened.
How to fix a leaking toilet base before you pull the toilet
Before removing anything, test the simple causes. A toilet that rocks even slightly can break a new wax seal after a few flushes.
- Dry the floor completely and flush once.
- Check the tank-to-bowl bolts and the supply connection.
- Press gently on both sides of the bowl to feel for movement.
- Look for gaps between the toilet base and finished floor.
- Tighten closet bolts only a quarter-turn at a time.
- Stop tightening if the porcelain creaks or the bolt spins.
If the leak stops after careful bolt tightening and the toilet does not rock, monitor it for several days. If water returns, the seal has likely failed and the toilet needs to be reset.
Do not use caulk as a leak repair. Caulk can make the bathroom look dry while water continues to damage the flooring underneath.
Step 1: Shut off water, drain the bowl, and protect the floor
Turn the shutoff valve clockwise until it stops, then flush the toilet. Hold the handle down to drain as much water as possible from the tank.
Sponge remaining water from the tank and bowl into a bucket. Lay towels or cardboard nearby so the toilet can rest on a protected surface.
This matters because a toilet always holds more water than it appears to hold. The common mistake is pulling the bowl too soon and spilling water into the subfloor or hallway.
Step 2: Disconnect the supply line and remove the closet bolts
Disconnect the supply line from the toilet tank using an adjustable wrench. Remove the plastic caps at the base, then loosen the nuts on the closet bolts.
If the nuts are corroded, use penetrating oil or cut the bolts with a small hacksaw or oscillating tool. Do not twist aggressively against the porcelain base.
This matters because the closet bolts hold the toilet to the flange, not directly to the floor. The common mistake is overtightening or forcing a rusted nut until the bowl cracks.
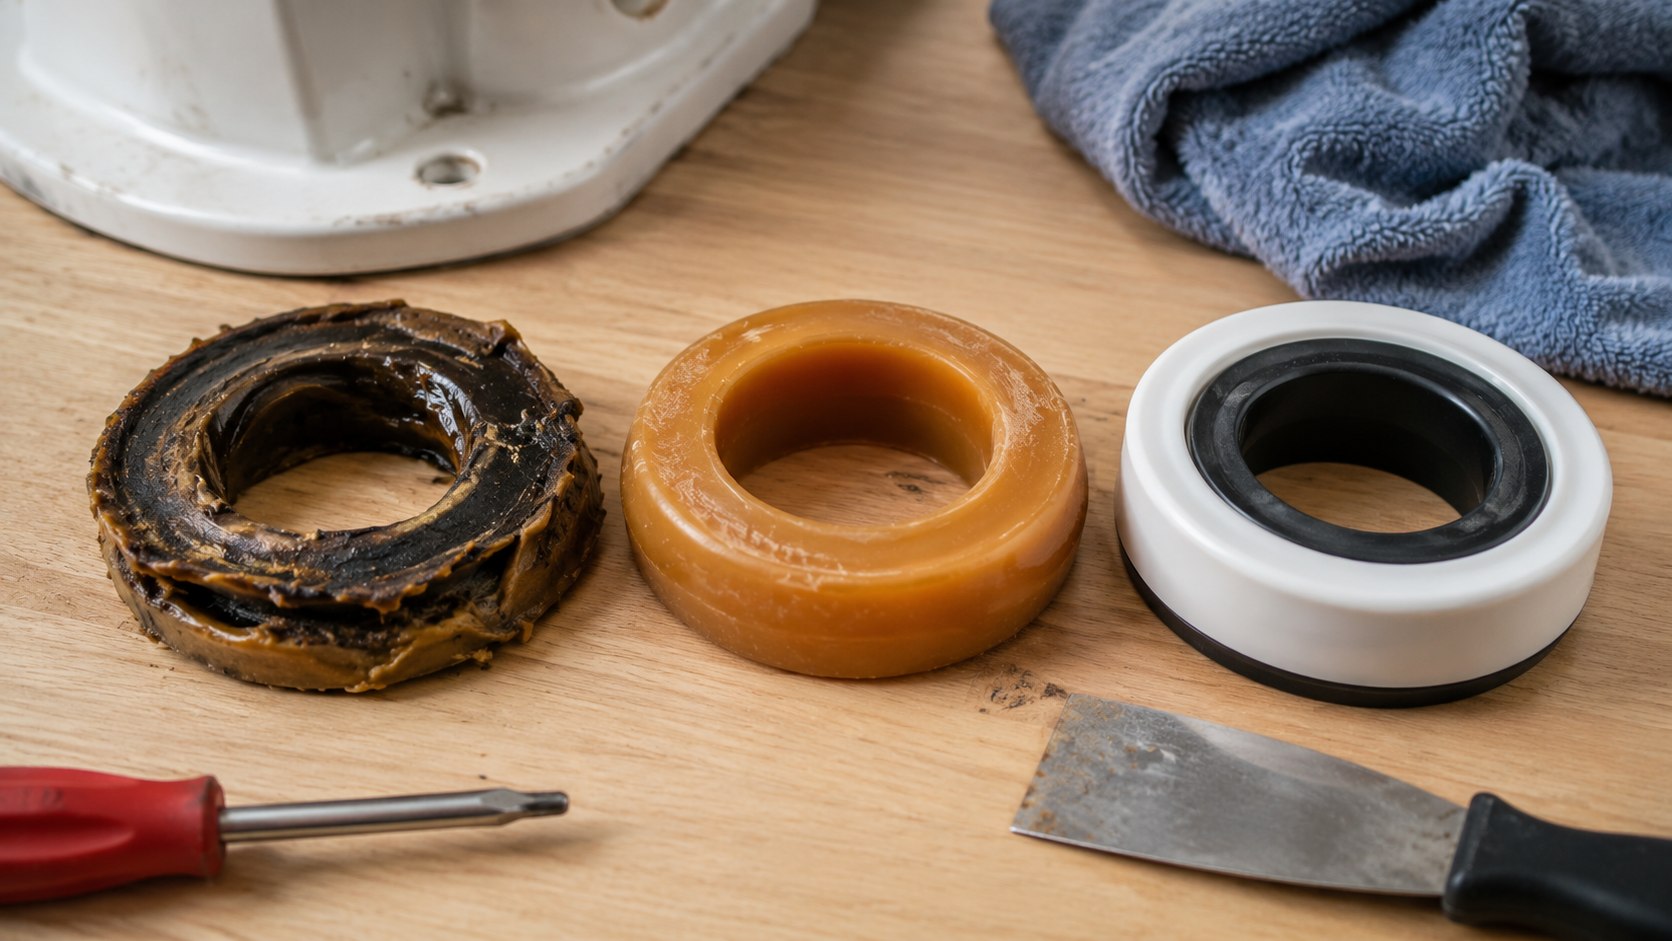
Step 3: Lift the toilet straight up and inspect the wax ring
Rock the toilet gently to break the old seal, then lift it straight up. Set it on towels, cardboard, or a contractor bag with the underside facing up enough to inspect.
A flattened, split, off-center, or missing wax ring explains most base leaks after flushing. Scrape the old wax from the toilet horn and flange with a putty knife.
This matters because old wax cannot be reused. The common mistake is trying to reset the bowl onto the same wax ring after lifting it even once.
Step 4: Check the toilet flange height and condition
The flange should sit on top of the finished floor or very close to that level. If new tile, vinyl plank, or backer board raised the floor, the flange may now be too low for a standard seal.
Check whether the flange is cracked, loose, rusted, or missing bolt slots. Oatey’s official toilet flange repair guide explains repair rings, spacer kits, and replacement options for common flange problems.
This matters because the flange must compress the seal and hold the toilet still. The common mistake is installing a thicker wax ring on a broken flange and expecting wax to solve a mechanical problem.
When the flange is too low
Use a flange extender or spacer kit when the flange sits below the finished floor. Many kits include stackable spacers and a gasket to raise the sealing surface.
A low flange is common after bathroom flooring upgrades in older homes in states such as Maryland, Pennsylvania, Ohio, and Illinois. If the floor height changed after a DIY tile job, Baltimore Chronicle’s guide on how to retile a bathroom yourself in 2026 explains why surface prep, underlayment, and finished-floor height can affect later plumbing work.
When the flange is cracked
A stainless steel repair ring can restore bolt slots when the plastic or metal flange collar is broken. If the pipe connection itself is cracked, replacement is safer than a patch.
Cast iron and lead bends in older homes may require a licensed plumber. Renters should document the leak and notify the landlord before removing fixtures.
Step 5: Choose the right wax ring or wax-free seal
A standard wax ring works when the flange is at the correct height and the toilet sits flat. An extra-thick wax ring helps when the flange is slightly low, but it is not a fix for a rocking toilet.
A toilet wax ring replacement is inexpensive and reliable, but wax has one drawback: once compressed, it does not rebound. If the toilet shifts later, the seal can open.
Wax-free seals from Fluidmaster, Korky, and Danco use rubber, foam, or flexible gaskets. They can be cleaner to install and more forgiving during positioning, but the flange still needs to be stable.
| Seal type | Typical 2026 part cost | Best for | Avoid when |
|---|---|---|---|
| Standard wax ring | $3–$8 | Flange at finished-floor height | Toilet rocks or flange is very low |
| Extra-thick wax ring | $6–$12 | Slightly low flange | Flange is broken or uneven |
| Wax ring with horn | $5–$12 | Guiding waste into 3-inch or 4-inch drain | Horn interferes with older flange shape |
| Wax-free toilet seal | $10–$20 | Cleaner reset and flexible fit | Manufacturer instructions do not match flange depth |
Step 6: Install new closet bolts and set the seal
Slide new closet bolts into the flange slots and align them directly across from each other. Use retaining washers if the bolt kit includes them.
Place the wax ring on the flange or on the toilet horn, depending on the product instructions. For wax-free seals, follow the brand’s exact stacking and spacer directions.
This matters because bolt alignment controls how evenly the toilet compresses the seal. The common mistake is bumping a bolt out of place while lowering the bowl.
Step 7: Reset the toilet and tighten evenly
Lower the toilet straight down over the bolts without twisting. Press down with body weight until the bowl meets the floor and the seal compresses.
Install washers and nuts, then tighten each side a little at a time. Stop when the toilet is stable; porcelain can crack if treated like metal hardware.
This matters because an uneven reset can create a new leak path. The common mistake is using the bolts to pull the toilet down instead of pressing the bowl into the seal first.
Step 8: Level, test, and caulk the toilet base
If the toilet rocks, insert plastic shims at the low spots and trim them flush. Reconnect the supply line, turn the water on, let the tank fill, and flush several times while checking the base.
Once the floor stays dry, apply a neat bead of bathroom-grade silicone around the front and sides of the base. Leave a small gap at the back so future leaks can show instead of staying hidden.
This matters because a stable toilet protects the new seal. The common mistake is caulking before testing, which can conceal a failed reset.
Troubleshooting a toilet leaking at the floor
- Toilet still leaks after new wax ring: The flange may be too low, cracked, or misaligned with the toilet horn.
- Toilet rocks after tightening bolts: The floor is uneven, the flange sits too high, or shims are missing.
- Closet bolt spins in place: The flange slot is broken and may need a repair ring.
- Sewer smell remains: The seal may not be compressed evenly, or another drain opening may be dry.
- Floor feels soft: Stop the repair and inspect for subfloor damage before reinstalling the toilet.
A leaking toilet base repair becomes more serious when water reaches wood framing. In that case, resetting the toilet without drying and repairing the floor can trap moisture under new caulk and flooring.
When to call a plumber instead of resetting the toilet
Call a licensed plumber if the flange is broken below the finished floor, the drain pipe is cracked, the toilet sits on a soft floor, or the bathroom has old cast iron connections. These repairs can involve cutting pipe, replacing subfloor, or meeting local plumbing code.
Homeowners in states with older housing stock, including Maryland, New York, Massachusetts, New Jersey, and Pennsylvania, may run into cast iron, lead bends, or unusual flange assemblies. A simple DIY reset can turn into a floor and drain repair if the original connection is deteriorated.
For homeowners comparing repair costs with broader renovation plans, Baltimore Chronicle’s 2026 home buying guide explains why plumbing, flooring, and inspection issues matter before and after purchase.
Renters should not remove a toilet without written permission. A landlord, property manager, or maintenance office should handle the repair because the leak may affect flooring, adjacent units, or insurance documentation.
FAQ
Can you fix a leaking toilet base without removing the toilet?
Sometimes. If the leak comes from loose closet bolts, a supply line, or tank hardware, the toilet may not need to be removed. If water comes from under the bowl after flushing, the toilet usually needs to be pulled and reset with a new seal.
Should I use wax or a wax-free seal?
Wax is cheap, proven, and widely available. Wax-free seals cost more but can be easier to position and cleaner to handle. The flange height, floor condition, and manufacturer instructions should decide the choice.
How much does it cost to fix a toilet leaking from the base in 2026?
A DIY repair often costs $15–$75 for a seal, bolts, shims, and small supplies. A professional reset commonly costs about $175–$450 as of 2026, before any flange, drain pipe, or floor repair.
Is a leaking toilet base an emergency?
It is urgent if the leak appears after every flush, smells like sewer gas, or reaches wood flooring. Stop using the toilet until the seal and flange are checked.
Why does the toilet leak only after flushing?
That pattern usually means wastewater is escaping at the seal between the toilet and drain. The most common causes are a failed wax ring, a low flange, a cracked flange, or a bowl that moves during use.
Can I caulk around the toilet to stop the leak?
No. Caulk can finish the installation after the repair is tested, but it should not be used to stop an active leak. Fix the seal or flange first, then caulk the front and sides while leaving a small rear gap.
Earlier we wrote about Tax Deadline USA 2026: Federal Filing Dates, Extensions, and Payment Rules