


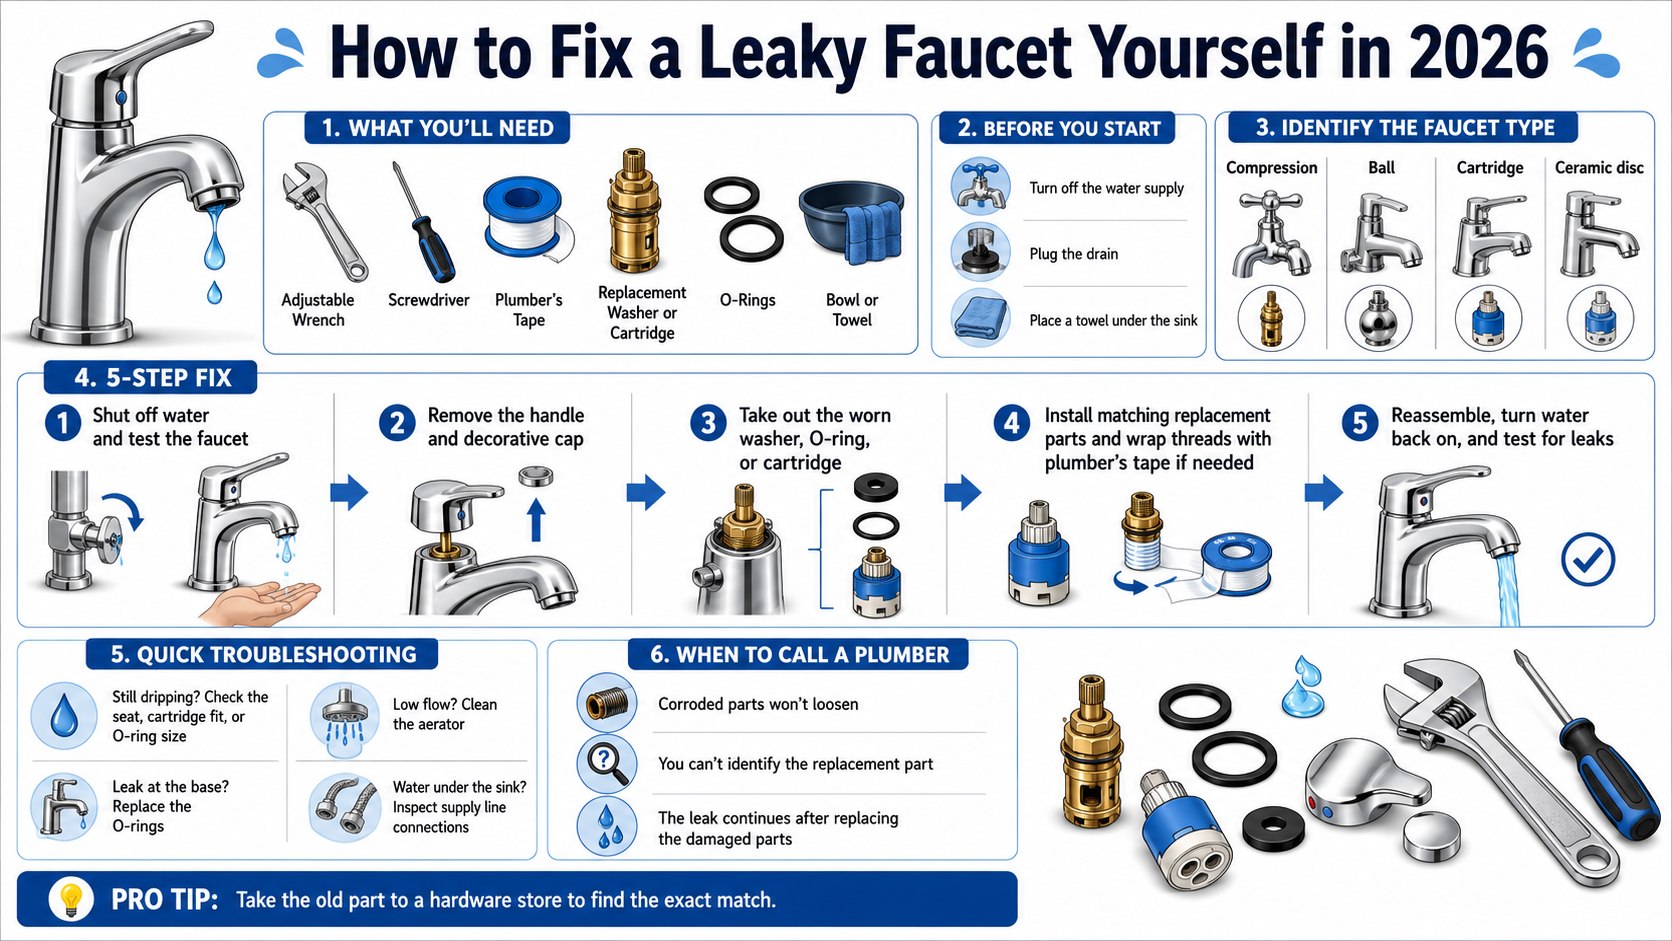
How to fix a leaky faucet yourself usually comes down to replacing a worn cartridge, rubber washer, O-ring, seat, or spring. Most homeowners can diagnose and complete the repair within 30–90 minutes using basic tools and a correctly matched replacement part, as noted by the Baltimore Chronicle.
First, shut off the hot and cold supply valves beneath the sink. A steady drip from the spout usually points to a damaged internal seal. Water around the handle often means a worn O-ring, loose retaining nut, or leaking cartridge.
Key takeaways
- Identify the faucet type and exact model before buying a washer, cartridge, seat, or repair kit.
- Photograph every component during disassembly and place removed parts in the same order on a towel.
- Replace the faucet when its body is cracked, badly corroded, or no compatible parts remain available.
What You Need
A routine leaky faucet repair does not require professional plumbing equipment. Gather the tools before turning off the water, especially when the sink is used throughout the day.
- Adjustable wrench or channel-lock pliers
- Phillips and flat-head screwdrivers
- Allen-key set, often including 1/8-inch and 3/32-inch keys
- Needle-nose pliers
- Small pick or utility knife
- Replacement cartridge, washer, O-ring, seat, or spring
- Silicone plumber’s grease approved for potable-water fixtures
- White vinegar and an old toothbrush
- Bucket, clean rags, drain plug, and masking tape
- 30–90 minutes and about $3–$60 for common replacement parts
Do not lubricate rubber seals with petroleum jelly. Petroleum products can damage some plumbing elastomers. Use a thin coating of manufacturer-approved silicone grease instead.
Wrap wrench jaws with masking tape before touching chrome, brushed nickel, brass, or matte-black surfaces. Keep the original cartridge or washer until the new part has passed a complete leak test. It remains the most reliable reference for size, stem shape, port position, and alignment tabs.
How to Fix a Leaky Faucet Yourself: Identify the Valve Type
Start by checking the handle, escutcheon, spout, or supply-line tag for a manufacturer name. Moen, Delta, Kohler, Pfister, American Standard, Grohe, and Glacier Bay use different internal systems. Parts are rarely interchangeable across every model.
| Faucet design | How it usually feels | Likely failed component | Typical 2026 part cost |
|---|---|---|---|
| Compression | 2 handles that turn several times | Rubber washer or valve seat | $3–$15 |
| Cartridge | 1 or 2 handles with smooth movement | Cartridge or O-ring | $10–$45 |
| Ball | Single handle above a rounded cap | Seats, springs, cam, or ball | $8–$30 |
| Ceramic disc | Short, firm handle movement | Ceramic cartridge or seal | $15–$60 |
These are broad retail ranges as of 2026, not fixed national prices. Original manufacturer parts may cost more than universal repair kits. However, the correct part usually seals better and preserves normal handle movement.
Availability also differs by location. Stores in Maryland, California, Texas, Florida, and New York may stock different cartridges. Photograph any numbers molded or stamped into the old part before visiting a hardware store.
Never choose a replacement based only on color or general appearance. Two cartridges can look almost identical while using different port positions. Installing the wrong one may reverse hot and cold water or prevent the handle from closing.
Step 1: Confirm Where the Water Starts
Dry the complete faucet and surrounding counter. Place separate paper towels around the spout, handle, base, supply connections, and shutoff valves. Turn the faucet on briefly and watch which area becomes wet first.
This simple test separates a valve problem from a loose supply connection. It matters because water leaking near the handle can run down the faucet body and appear beneath the sink.
A common mistake is replacing the cartridge before checking the pull-down hose, aerator, supply nuts, and shutoff valves. Diagnose the highest wet point first.
Step 2: Shut Off the Water and Release Pressure
Turn both shutoff valves clockwise until they stop. Open the faucet afterward to drain trapped water and confirm that the valves close fully.
Place a small bucket beneath the supply lines. Old shutoff valves sometimes begin seeping after they are moved for the first time in years.
Do not remove a handle or retaining nut while water still reaches the fixture. If either valve fails to stop the flow, close the home’s main water valve before continuing.
Step 3: Cover the Drain and Remove the Handle
Close the sink drain or cover it with a thick rag. Remove the decorative cap, visible screw, or concealed Allen screw holding the handle.
Place every component on a towel in removal order. Take a photograph before removing the next part. This record becomes valuable when several washers, trim rings, and clips have similar shapes.
Avoid forcing a decorative cap with a large metal screwdriver. It can scratch the finish or chip a porcelain sink. Use a thin plastic tool when possible.
Step 4: Remove the Retaining Nut, Clip, or Bonnet
The internal valve may be secured by a brass nut, plastic collar, U-shaped clip, threaded bonnet, or decorative dome. Hold the faucet body steady while loosening the fastener.
Counterholding protects the copper tubes and supply connections beneath the sink. Excessive twisting can turn a small repair into a cabinet leak.
If mineral deposits have locked the nut in place, apply white vinegar and wait several minutes. Do not crush a plastic retaining nut with oversized pliers.
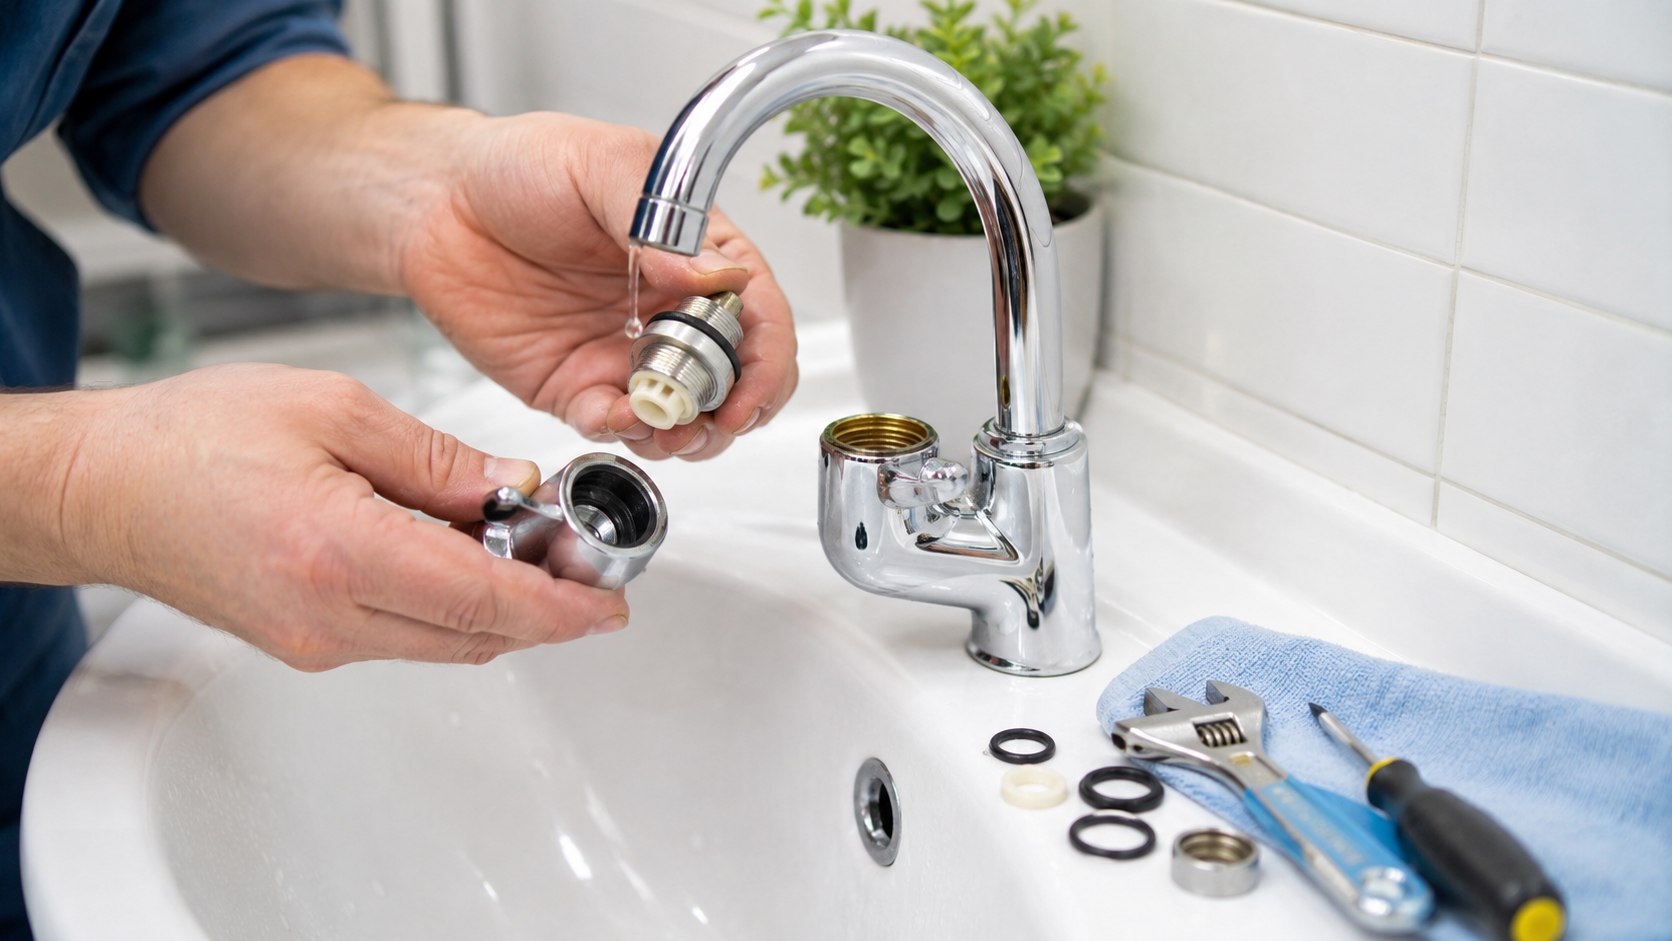
Step 5: Replace the Faucet Cartridge
Photograph the cartridge’s orientation before removing it. Pull it straight upward using pliers or the manufacturer’s cartridge tool. Some Moen-style cartridges may require a dedicated puller after years of mineral buildup.
Inspect the old cartridge for torn seals, scratches, cracks, or distorted plastic. Match the stem profile, total length, ports, grooves, and alignment tabs exactly.
Apply only a light coating of silicone grease to approved seals. Insert the new cartridge in the same direction. Reinstall every clip or retaining nut before testing the handle.
The most common mistake is rotating the cartridge without checking the model instructions. Incorrect orientation may reverse hot and cold water or create a handle that turns backward.
Step 6: Replace the Washer, Seat, or Spring
Older compression faucets often drip because the rubber washer at the bottom of the stem has hardened or worn unevenly. Remove its small retaining screw and install a washer with the same diameter, thickness, and profile.
Inspect the metal valve seat using a flashlight. A rough or pitted seat can cut a new washer within days. Removable seats require a correctly sized seat wrench.
Some single-handle Delta-style fixtures use small rubber seats mounted over springs. Replace the seats and springs as a matched set. Install each spring in the same direction as the original.
Do not grind or reshape an unfamiliar valve seat without manufacturer guidance. Removing too much material can prevent the stem from reaching the sealing surface.
Step 7: Clean the Valve Body and Reassemble
Use white vinegar and a soft toothbrush to remove loose mineral deposits. Wipe the cavity with a lint-free cloth. Do not scratch polished brass, ceramic, or plastic sealing surfaces.
Reinstall the cartridge, clips, retaining nuts, trim pieces, and handle in reverse order. Tighten each component until secure, but do not force it beyond normal resistance.
Overtightening can distort rubber seals or crack a plastic housing. It can also make a single-handle faucet difficult to operate. If the handle becomes stiff, loosen the retaining nut slightly and check cartridge alignment.
Inspect the cabinet for swollen wood, dark staining, or mold. A faucet drip may follow a supply line and remain hidden behind cleaning products. Homeowners planning larger repairs can compare likely expenses in the Baltimore Chronicle guide to kitchen remodel costs in the USA in 2026.
Step 8: Restore the Water and Test the Repair
Leave the faucet handle partly open. Turn the hot and cold shutoff valves on slowly. Run both sides for about 1 minute to flush sediment and trapped air.
Check the handle, spout, base, supply lines, and shutoff valves with a dry paper towel. Test the fixture while water is running and again after the handle has been closed for several minutes.
Remove and rinse the aerator if the stream becomes weak or uneven. Repair work can dislodge small mineral particles that collect behind the aerator screen.
Water near another bathroom fixture may have a separate source. The Baltimore Chronicle guide on how to fix a leaking toilet base explains how to distinguish a failed wax ring from leaking bolts, supply lines, and shutoff valves.
Troubleshooting a Faucet That Still Leaks
A continuing drip usually means that another component remains worn, incorrectly installed, or damaged. Work through the following scenarios before disassembling everything again.
- The spout still drips: Check the cartridge orientation, valve seat, rubber seats, springs, and the cartridge on the opposite handle.
- Water appears around the handle: Replace the stem O-ring and verify that the retaining nut sits evenly.
- The handle feels stiff: Check cartridge alignment, reduce excessive nut tension, and apply approved silicone grease.
- Hot and cold are reversed: Remove and rotate the cartridge according to the manufacturer’s instructions.
- Water appears beneath the sink: Inspect supply nuts, pull-down hoses, mounting hardware, and shutoff valves.
A 2-handle faucet may need repairs on both sides. Heat can harden rubber seals in the hot-water valve faster than those in the cold side.
Persistent leakage may also indicate damage inside the valve body. Deep corrosion, a cracked housing, or a distorted cartridge cavity cannot be corrected with a new washer.
Do not apply excessive force when a part refuses to move. A broken valve body usually requires complete faucet replacement. Monitor every repaired connection for several days.
When to Replace the Faucet or Call a Plumber
Stop working when a shutoff valve breaks, a copper tube twists, or water keeps flowing after the main valve closes. These problems are no longer a routine DIY faucet repair.
Professional help is also sensible when the fixture is mounted behind tile or connected to badly corroded galvanized plumbing. Leaks inside walls, floors, or cabinets require faster investigation.
As of 2026, a straightforward US plumber visit for a faucet problem may commonly cost about $150–$350. Local labor, emergency scheduling, accessibility, and replacement parts can change the final price.
Replace the complete faucet when its body is cracked, internal metal is heavily corroded, or the required cartridge has been discontinued. Repeated leaks from several areas also suggest that the fixture is near the end of its service life.
When water has damaged flooring, drywall, a vanity, or the subfloor, compare the wider project scope with Baltimore Chronicle’s review of bathroom remodel costs in the USA in 2026. A minor seal replacement and a water-damage renovation require very different budgets.
Check the faucet warranty before purchasing parts. Several major manufacturers offer replacement components for qualifying original residential owners.
FAQ
Can I fix a leaky faucet without turning off the water?
No. Shut off both supply valves before removing a handle, stem, cartridge, or retaining nut. Pressurized water can escape immediately and damage cabinets, flooring, and nearby electrical equipment.
How do I know whether the washer or cartridge has failed?
A compression faucet usually contains a threaded stem with a rubber washer at the bottom. A cartridge faucet contains a removable plastic, brass, or ceramic valve unit. Handle movement and manufacturer diagrams help confirm the design.
Why does the faucet still drip after cartridge replacement?
The cartridge may be backward, incompletely seated, or incompatible with the faucet. A damaged valve seat, misplaced spring, loose nut, or trapped debris can also allow water through.
How much does it cost to fix a leaky faucet yourself?
Common washers and O-rings may cost about $3–$15 in 2026. Brand-specific cartridges commonly cost $10–$45. Ceramic, thermostatic, and specialty cartridges can cost more.
Can a renter repair a dripping faucet?
Renters should notify the landlord or property manager before disassembly. Lease terms and state rules may assign plumbing maintenance to the owner. Unauthorized repairs could create liability if damage occurs.
When should I replace the entire faucet?
Replacement is usually more practical when the body is cracked, the internal metal is badly corroded, or compatible parts are unavailable. Multiple leaks from different areas also support replacement.
Earlier we wrote about What Is PMI on a Mortgage and When Does It Stop? The 80% and 78% Rules