


How to clean a dryer vent yourself starts with disconnecting the appliance, removing the vent hose, and clearing lint from the entire exhaust route. Most accessible systems take 45 to 90 minutes to clean. The work can improve airflow, shorten drying cycles, and reduce dangerous heat buildup, as noted by the Baltimore Chronicle editorial team.
A basic DIY dryer vent cleaning kit costs about $20 to $45 in the US in 2026. You will also need a vacuum, screwdriver, gloves, flashlight, and enough flexible rods to reach the exterior outlet. Stop and call a professional if the vent crosses several floors, exits through the roof, or contains damaged ductwork.
Key takeaways
- Clean the lint screen after every load and inspect the full exhaust system at least once each year.
- A flexible brush and shop vacuum can clear most short, accessible dryer ducts within 90 minutes.
- Stop using the dryer if you notice burning odors, scorched lint, weak airflow, or an overheated cabinet.
Why a clogged dryer vent is a fire risk
A dryer moves hot, moist air through a duct measuring about 4 inches across. The lint screen catches much of the loose fiber, but smaller particles continue into the exhaust system.
These particles settle around bends, seams, crushed sections, and the exterior hood. The opening becomes narrower, airflow weakens, and heat remains inside the machine longer than intended.
The U.S. Fire Administration reports that failure to clean caused 31% of home clothes-dryer fires recorded from 2018 through 2020. Lint is combustible, while restricted airflow creates the heat that can ignite it.
A blockage may also place additional strain on the blower wheel, heating element, thermostat, motor, and thermal fuse. Cleaning cannot repair a broken component, but it removes a major cause of slow drying and dryer overheating.
Watch for loads that need 2 cycles, unusually hot clothing, lint behind the appliance, or a musty odor. Another warning sign is an exterior vent flap that barely moves while the dryer operates.
What you need to clean a dryer vent
Most homeowners already own several of the required tools. The main purchase is usually a flexible brush kit long enough to cover the complete duct route.
- Flexible dryer vent brush kit with extension rods
- Shop vacuum or household vacuum with a crevice tool
- Cordless drill if the brush supports powered rotation
- Phillips or flat-head screwdriver
- Work gloves and protective dust mask
- Flashlight or headlamp
- Microfiber cloths
- Metal clamps for the transition duct
- UL-listed foil HVAC tape where permitted
- 45 to 90 minutes of working time
Basic hand brushes often cost $10 to $20 in 2026. Drill-powered kits from brands such as Everbilt, Holikme, Deflecto, and Gardus generally fall within a wider $20 to $50 range.
Check the rod length before buying. A 12-foot set will not fully clean a 25-foot exhaust route with several bends.
A shop vacuum is useful for loose lint near both openings. However, suction alone may not remove compressed material attached to corrugated or rigid duct walls.
Renters should check their lease before disconnecting or moving an appliance. Apartment vents may connect to concealed or shared systems maintained by the landlord.

How to clean a dryer vent yourself step by step
Step 1: Disconnect the dryer safely
Turn off the appliance and unplug its power cord. If you own a gas dryer, close the dedicated gas shutoff valve without disturbing the supply connector.
This prevents the motor, fan, or heater from starting while you work. Do not continue if the gas line appears corroded, sharply bent, or damaged.
Step 2: Move the appliance away from the wall
Pull the dryer forward slowly until you can reach the transition duct. Protect wood or vinyl flooring with furniture sliders if needed.
Slow movement prevents damage to the electrical cable, vent hose, and gas connector. A common mistake is pulling the machine farther than its connections allow.
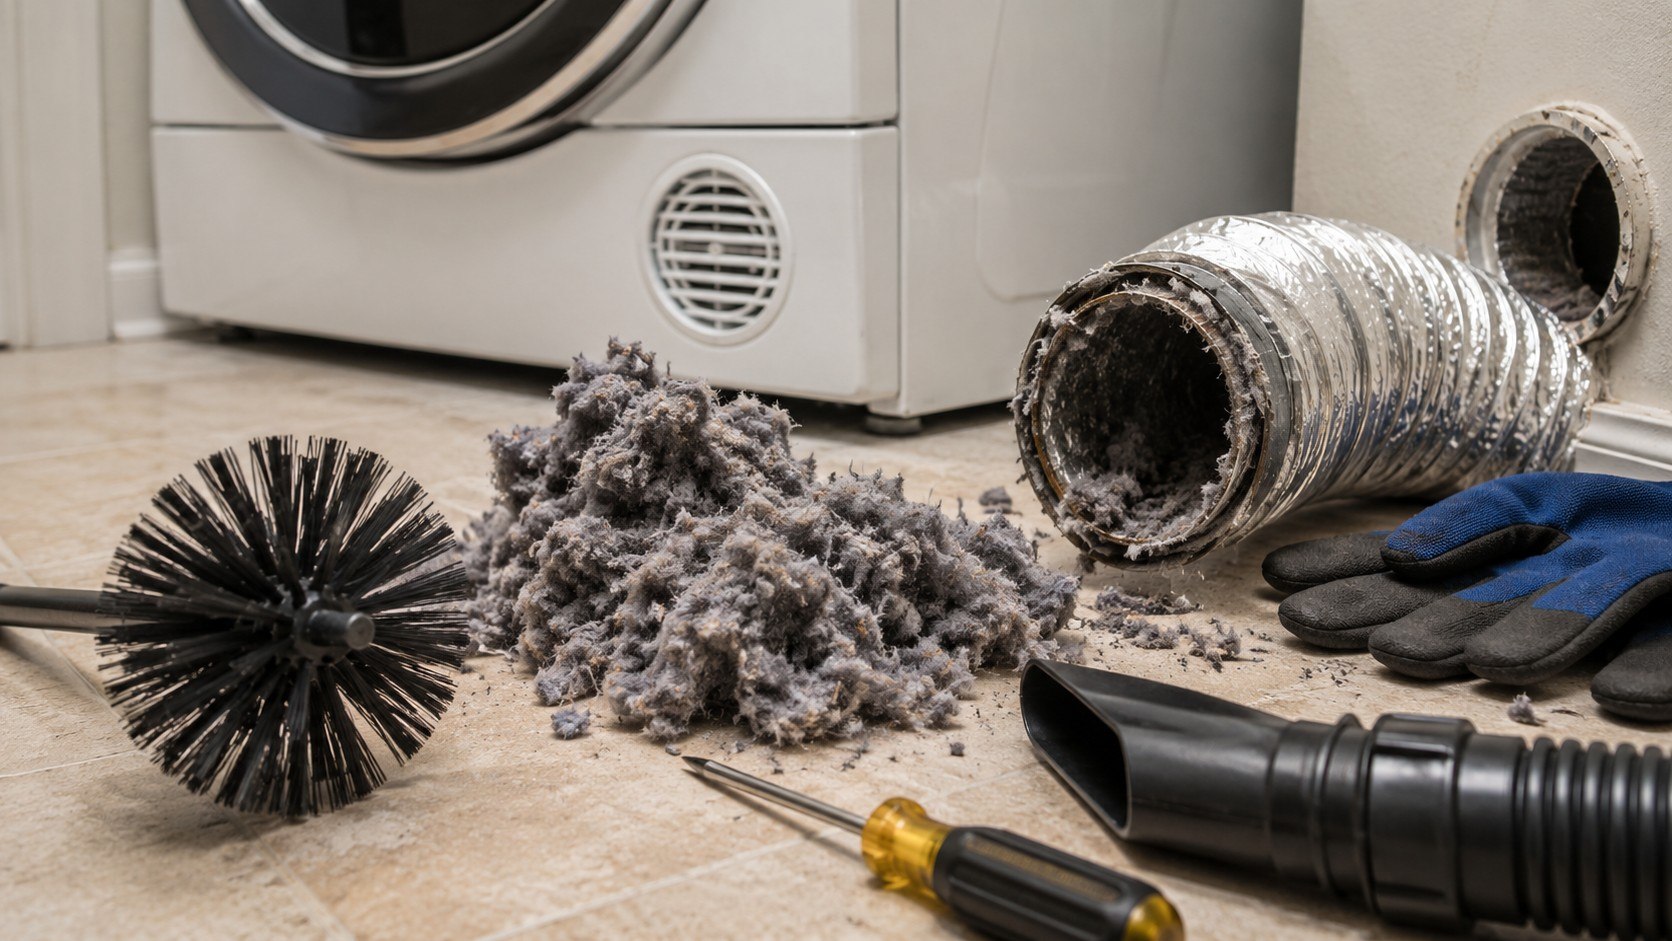
Step 3: Remove and inspect the transition duct
Loosen the clamps at the dryer outlet and wall connection. Remove the duct carefully because a large amount of loose lint may be trapped inside.
Look for crushed sections, tears, rust, burns, or sharp bends. Damaged ducting should be replaced rather than cleaned and reinstalled.
Many manufacturers, including Whirlpool, Maytag, GE Appliances, LG, and Samsung, recommend approved metal transition ducts. Plastic and thin vinyl hoses can restrict airflow and may not meet local requirements.
Step 4: Vacuum the dryer outlet
Use a crevice tool to remove lint from the exhaust collar and the floor behind the appliance. Wipe accessible surfaces with a dry microfiber cloth.
This prevents loose debris from entering the freshly cleaned system. Do not push a rigid vacuum attachment deep inside the dryer cabinet.
Proper appliance care extends beyond the exhaust system. Baltimore Chronicle’s guide to using a washing machine correctly explains how loading, detergent, and maintenance habits affect laundry equipment.
Step 5: Insert the dryer vent brush
Push the round brush into the wall opening. Add flexible rod sections gradually while rotating the tool according to the manufacturer’s directions.
The bristles break apart compacted lint that a vacuum cannot reach. Keep a drill at low speed to avoid damaging the duct or extension rods.
Do not reverse the drill unless the kit specifically allows it. Threaded rods may unscrew and become trapped inside the wall.
Step 6: Clean the duct through its full length
Continue adding rods until the brush reaches the exterior outlet or the documented end of the duct. Pull it back slowly while maintaining controlled rotation.
Complete several passes because the first pass may only create a narrow channel. Continue until the brush returns with very little lint.
Never force the tool around a hard obstruction. The resistance may come from a sharp elbow, screw, collapsed duct, or animal nest.
Step 7: Clear the exterior vent hood
Find the outlet outside the home and remove visible lint from the hood, louvers, and surrounding wall. Confirm that the flap moves freely.
The exterior hood must open when the dryer runs and close afterward. Do not cover it with fine mesh because fibers can block the screen quickly.
A first-floor wall outlet is usually accessible from the ground. Hire a professional for steep roofs, unstable ladders, or upper-story outlets.
Step 8: Vacuum the loosened lint
Return indoors and vacuum the wall opening again. Repeat the brushing and vacuuming process if debris continues to appear.
This final pass removes material left near elbows and low points. Do not assume the largest lint pile represents the complete blockage.
Step 9: Reconnect the vent
Attach an undamaged metal transition duct to the dryer and wall connection. Tighten the clamps without crushing either opening.
Use approved foil HVAC tape on suitable metal joints when required. Ordinary cloth-backed duct tape may loosen under heat and moisture.
Avoid placing screws inside the airflow route. Exposed screw tips catch lint and create another obstruction.
Step 10: Test the dryer and exterior airflow
Restore electrical power and reopen the gas valve when applicable. Run the dryer on an air-only or low-heat setting.
Check that the exterior flap opens fully and produces a steady stream of air. Stop immediately if you smell gas, burning plastic, or scorched lint.
Dry one normal load and compare the cycle with earlier results. Continued slow drying may indicate a hidden obstruction or appliance failure.
DIY dryer vent cleaning costs in 2026
DIY cleaning is often less expensive than hiring a contractor. However, the cheapest option is not always appropriate for a long or inaccessible vent.
| Cleaning option | Typical 2026 price | Suitable use | Main limitation |
|---|---|---|---|
| Basic hand brush | $10–$20 | Short ducts and accessible openings | Limited reach and cleaning power |
| Drill-powered brush kit | $20–$50 | Longer straight or gently curved ducts | Rods can separate when misused |
| Vacuum attachment kit | $15–$35 | Loose lint near either opening | Cannot scrub compacted deposits |
| Professional wall-vent service | $80–$185 | Long or difficult wall ducts | Price varies by access and location |
| Roof-vent or complex service | $150–$300+ | Roof exits and multi-story systems | Higher labor and safety costs |
Professional costs differ across Maryland, Texas, Florida, California, New York, and other states. Labor rates, roof access, vent length, parking, and local demand affect the final quote.
Ask whether the service includes brushing from both ends, airflow testing, transition-hose inspection, and exterior hood cleaning. Some low advertised prices cover only a short inspection or one accessible section.
A DIY approach works best when the route is short, visible, and reachable from both ends. Long ducts hidden behind finished walls require better equipment and more experience.
Homeowners replacing several laundry appliances may also compare top-load and front-load washers in 2026. The guide examines purchase prices, water use, maintenance, mold risk, and practical space requirements.
How often should a dryer vent be cleaned?
Inspect the complete dryer exhaust system at least once each year. Clean it sooner if drying performance declines or visible lint appears around the outside outlet.
Households running several loads each day may need more frequent service. Pet hair, towels, blankets, athletic clothing, and bedding can increase lint production.
Long routes with several elbows also collect material faster. A short, straight duct through an exterior wall usually remains clear longer.
Clean the lint screen after every load. Periodically wash it with mild soap and water if dryer-sheet residue blocks its mesh.
Hold the clean screen under running water. If water pools on the surface instead of passing through, residue may be restricting airflow.
Washer maintenance also affects odors in the laundry area. Baltimore Chronicle explains how to clean a front-load washer, including its gasket, detergent drawer, drum, and drain filter.
When to call a professional dryer vent cleaner
Some problems require more than a flexible brush and vacuum. Stop the job when access, electrical hazards, gas connections, or damaged building materials create additional risk.
- The outlet is on a steep roof or high exterior wall.
- The brush stops repeatedly at the same location.
- The duct contains an animal nest or heavy contamination.
- Metal sections are crushed, separated, rusted, or burned.
- You smell gas, scorched lint, or melting insulation.
- The breaker trips or the receptacle becomes hot.
- Drying remains slow after the duct has been cleared.
- A flexible rod has disconnected inside the exhaust route.
Do not operate the dryer while investigating a burning odor. Disconnect an electric model when doing so is safe.
For a suspected gas leak, avoid switches, flames, and electrical devices. Leave the building and contact the gas utility from a safe location.
An animal nest may require both pest removal and duct cleaning. The exterior hood should then be repaired or replaced.
Continued overheating can indicate a failed thermostat, heating element, blower wheel, moisture sensor, or thermal fuse. These parts require appliance diagnosis rather than additional vent brushing.
Renters should report concealed or shared vent problems to the landlord. They should not cut walls or modify communal exhaust equipment.
Troubleshooting problems after cleaning
A clean-looking opening does not guarantee that the full system is clear. Use these checks when the dryer still performs poorly.
- Weak exterior airflow: A hidden blockage, crushed section, or closed hood may remain farther along the route.
- Dryer still overheats: Stop using it and inspect for restricted airflow or an internal temperature-control failure.
- Brush will not advance: Do not force it past a sharp bend, screw, collapsed duct, or solid obstruction.
- Lint returns quickly: Look for leaking joints, damaged ducting, or a hood that cannot open fully.
- Rattling after reassembly: Check whether the transition duct touches the cabinet, wall, or nearby pipes.
Test one change at a time. Several simultaneous adjustments can hide the original cause.
Do not judge performance only by the heat inside the drum. A restricted dryer may produce heat while moving too little air.
Check the owner’s manual for model-specific airflow warnings and error codes. Manufacturers may use different codes for blocked vents, sensors, or heating faults.
Stop repeated test cycles if the cabinet becomes unusually hot. Continued operation can damage clothing and internal components.
FAQ
Can I clean a dryer vent without moving the dryer?
You can clean the lint screen and exterior outlet without moving it. A complete cleaning usually requires access to the transition duct behind the appliance.
Can I use a leaf blower to clean a dryer vent?
A leaf blower may push loose lint outward, but it cannot scrub compacted buildup. Air pressure may also disconnect weak duct joints.
Can I vacuum the dryer vent instead of brushing it?
A vacuum removes loose lint near accessible openings. A flexible brush is usually required for material attached to the interior duct walls.
How do I know whether the dryer vent is clean?
The exterior flap should open fully, airflow should feel steady, and the brush should return nearly clean. Normal loads should dry without unusual heat.
Does cleaning the lint screen clean the vent?
No. The screen captures much of the lint, but smaller fibers still pass into the duct and collect along bends and seams.
Should renters clean their own dryer vents?
Renters can clean the removable lint screen and accessible debris. They should contact the landlord before moving appliances or servicing concealed and shared vents.
Earlier we wrote about How to Remove Stains from a Mattress: Safe Methods for Urine, Blood, and Sweat